When people move from a Windows PC to an Apple Mac, incompatibility is always a headache especially when you need to use a Windows formatted external disk for file sharing. Windows New Technology File System (NTFS) by Microsoft will be mounted in read-only condition in Mac OS.
To gain the full read and write access to NTFS drives on Mac, the article will introduce three best ways:
- Enable Apple’s native NTFS write support
- Use free NTFS for Mac driver – Mounty for NTFS
- Use paid NTFS for Mac driver – iBoysoft NTFS for Mac
Method 1: Enable macOS to write to NTFS drives using commands (free)
Many people may find it confusing why Apple doesn’t enable the NTFS write support yet on Mac machines when it actually has the ability imbedded. Well, that is because the NTFS writing capability is lack of enough testing and reports file damages/losses during the writing. Therefore, it is not very recommended for the use of transferring important files.
The method is totally free and not very complicated if you are comfortable with Terminal commands.
Follow the steps carefully and the at your own risk:
Open Terminal. If you don’t know where it is, you can use the magnifying glass icon to open Spotlight Search, input Terminal and hit Enter to launch it.
Copy and paste the command line sudo nano /etc/fstab in italics to the Terminal window and hit Enter.

Type in your login password (don’t worry if you can’t see any letters or numbers) and hit Enter.
Copy and paste the command line “LABEL=VOLUME_NAME none ntfs rw,auto,nobrowse in italics to the Terminal window. Remember to replace the VOLUME_NAME with the name of your volume or disk, which can be found in the left column of Disk Utility.
Press Control + O keys to save the change and you will see File Name to Write: /etc/fstab at the bottom.
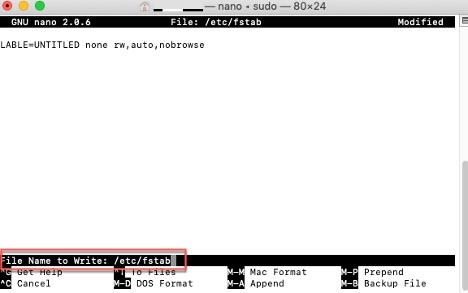
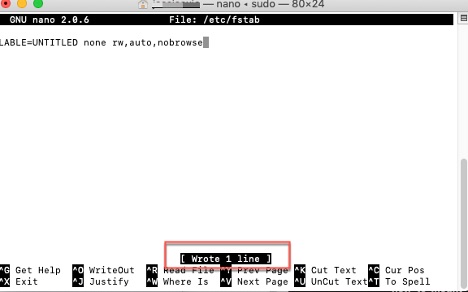
Hit Enter and press Control + X to exit the writing and you will see Wrote 1 line at the bottom. If you want to enable write access to multiple NTFS volumes, you need to repeat the step 4, 5 and 6 and write different line for each of them.
Connect or reconnect the NTFS drive to Mac.
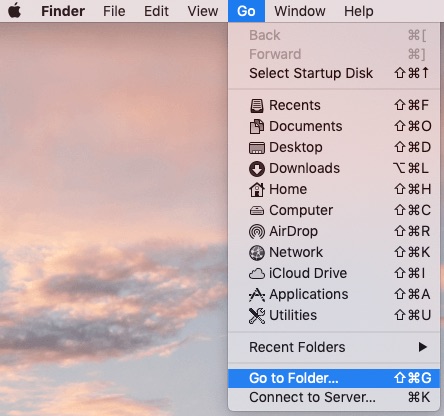
Click Go at the menu where the Apple logo is from the desktop and choose “Go to Folder”.
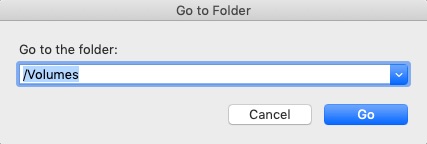
Type in /Volumes and hit Go.
Spot NTFS volume(s) in the volume list and drag it to the left column of Finder for easy access.
Tips: if you want the NTFS volumes to be mount in read-only state again, you need to follow from the first step and then delete the command line. Use Control + O and Control + X to save the deletion and exit.
Method 2: Install Mounty for NTFS
Mounty for NTFS is one of free NTFS for Mac drivers that can be installed in macOS to write to Microsoft NTFS. Compared to other free tools, Mounty for NTFS is the simplest to use. But this tool is not a perfect solution. The common drawbacks of free NTFS drivers include:
- Poor compatibility. The software sometimes can’t work on a Mac running the latest macOS. Or it can’t detect some certain type of external hard drives.
- Slow speed. The file transferring speed is noticeably slow, especially when you need to share large files.
- File limitation. It may limit you from writing large files to NTFS drives and files will be shown 0 byte.
- No technical support. Technical support costs human resource, so open-resource software doesn’t provide free technical support. It is devastating if you come across file corruption, or, even worse, disk corruption, no one can help you get back on the right track.
Here is how to use the Free Mounty for NTFS to write to NTFS drives:

- Download Mounty for NTFS and double-click on the downloaded DMG file to install it.
- Drag the software to Applications folder as instructed on the screen and wait for the installation to finish.
- Click the software icon to launch it.
- Click “Yes, Sure” when asked to mount the NTFS drives in read and write mode.
- Connect the external NTFS drive to the Mac and started to write to it.
Method 3: install commercial NTFS for Mac software
It is understandable that people usually don’t want to pay for a service, but NTFS for Mac driver doesn’t cost as much as you might expect. iBoysoft NTFS for Mac costs less than $20 for a lifetime use. Considering the advantages of security, speed, stability, compatibility and technical support, it is not a bad idea to invest in such an NTFS driver.
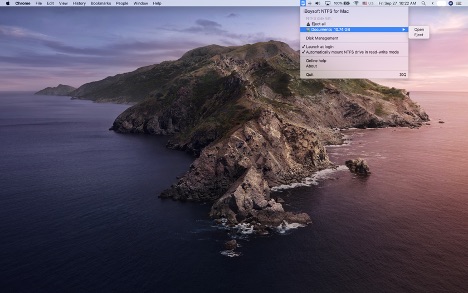
Here is how to use iBoysoft NTFS for Mac:
- Download iBoysoft NTFS for Mac and start a 7-day free trial from here.
- Install and launch it following the on-screen instructions.
- Connect the external NTFS disk or reconnected it to the Mac.
- Write to it directly because it will be automatically mounted with read and write access.
The Bottom Line
You don’t need to format your drives to a Mac -friendly file system like Mac OS Extended or a universal file system like FAT/ExFAT to be able to write to Microsoft NTFS-formatted partitions. The three best and mainstream methods to enable NTFS writing without formatting include commands, free NTFS driver and paid NTFS driver. You can choose whichever you like, but make sure you have known all risks along with the selected method.
If you liked this article, please consider sharing it with your friends and leaving a comment below. Also, don’t forget to “Like” us on Facebook, “Follow Us” on Twitter and add the Apple Tech Talk channel to your Apple News app.
And if you haven’t subscribed to Apple Tech Talk, now would be a great time to do it so. Just scroll down to the form below and enter your name and email address. Then you’ll receive a notification whenever we post new articles. Don’t worry, we never sell or share your information. While you’re at it, check out our YouTube channel (here) where you will find video on interesting products any Apple enthusiast would love.
This article was written and is sponsored by iBoysoft, which is solely responsible for its content. You can learn more about their products at iboysoft.com. Apple Tech Talk has not tested the software discussed in this article.



Leave a Comment
You must be logged in to post a comment.