
We previously looked at the Brother ADS-1500W scanner and you can see that review here. The NeatConnect scanner is an interesting enhancement to what is otherwise a pretty straightforward process.
Apple Tech Talk Scorecard
| Pros | Cons |
| Great Hardware | Expensive with ongoing software costs |
| Database allows for granular indexing | No OCR capabilities included |
| Scan directly to various cloud services | Scanning to the computer was problematic |
NeatConnect Hardware
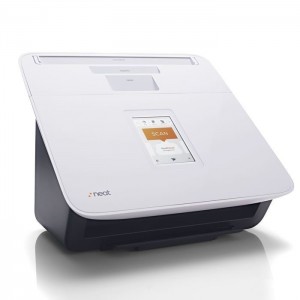 When you open the box of the NeatConnect Scanner you might think it was designed by our friends in Cupertino. The only thing you see is the sleek flat surface of the NeatConnect Scanner. When you remove it from the box you will find nicely tucked underneath, a small cardboard sleeve for the power cord, another sleeve with a USB cord for optional connection to a computer and a set-up guide which contains a PIN to activate the Neat Software bundle which is downloaded from the Neat web site.
The scanner supports almost any size document from 1.5” x 2” all the way up to 8.5” x 30” and will scan up to 600dpi although there are some limitations above a standard 8.5” x 11” paper size.
The scanner also has a standard SD card slot for scanning directly to a card up to 32 GB.
The scanner supports 802.11 b/g/n Wi-Fi as well as WEP, WPA/WPA2-Personal security. The removable top panel acts as a multi size paper tray which holds 15 business cards, 15 receipts and 15 letter size documents, all at the same time. Without the tray, the document feeder can hold 50 letter size documents.
Set-up of the unit is very straight-forward. Once you plug it in and press the power button on the rear of the unit, the small LED screen guides you through the set-up operation. In the alternative, you can complete the set-up process from your browser after you download the Neat software. We chose the latter given the small size of the LCD screen on the scanner but also found that using the keyboard on the screen was surprisingly easy to use. While you can’t type very fast, Neat has found a way to let the user press on a very small keyboard without making many errors.
Once set up, all functions are controlled from the scanner’s touchscreen. There are selections for Color or B&W, 1 or 2 Sided and whether the pages are combined into a single document or each page is an individual scan. You can then swipe left or right to select the destination of the scans. More on that in a moment. Once selections are made you press the SCAN icon in the middle of the screen and the scanner starts.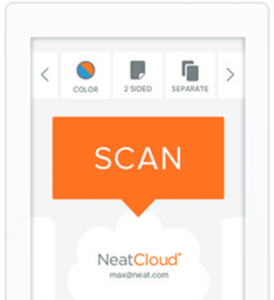
The scanner is rated at 24ppm in color, grayscale or B&W and while we didn’t time it, there is no doubt that this is a quick machine. There was no hesitation between pages, even when we were doing 2-sided scans, and the scan accepted the multiply size documents without hesitation. In one test, we loaded all three slots in the paper tray with documents that were far from pristine in condition. They all scanned the first time without a jam or a mis-feed.
The scanner provides automatic blank page removal which we found to be very accurate. However, there is no way to designate when some of the documents in a batch are individual pages and others need to be combined so that would require you scan those separately.
After the scans are completed you are presented with thumbnails of the pages. While you can’t see the detail, this is an opportunity to delete any pages you may have scanned but don’t need to send to the final location which we found helpful.
NeatConnect Software
Although the NeatConnect scanner is TWAIN complaint and can scan to other applications, we find is hard to think that anyone buying a Neat scanner wouldn’t be using the Neat software. The software is such an important part of Neat as a company that they even sell it as a stand-alone item on their web site. In fact, if you go to the Neat website, the first selection under the Products tab is Software Plans. The second selection is Scanner Bundles. That may be (as we found out) because the software bundled with the NeatConnect scanner only provides a one-year license. After that, you have to renew your software plan on a monthly or annual basis.
The “Essential” plan supports one user at $5.99 per month or $59.99 per year. The (most popular) “Premium” plan supports 2 users and adds several features, including enhanced tech support, at a monthly cost of $14.99 or $119.99 annually. A “Business” plan which supports 5 users and again, adds some features is $24.99 per month or $249.99 per year. While we appreciate that Neat offers their plans on a monthly basis, if you are committing to the software, there is no reason not to buy the annual plan which works out to a 17% discount for the Essential and Business plans and a 33% savings on the Premium plan.
Installation of the software was effortless. We downloaded a dmg file from the Neat website, mounted it on our desktop and clicked Install. The software presents the obligatory License Agreement, asks you to select the Neat scanner you have (or no scanner), and then goes through the install process. At the end, you are presented with a Log-In screen to either enter your credentials or create a Neat account.
This is the same account you need to link the scanner to the software and we found it easier to create the account on the desktop and then just sign in from the scanner.
The current version of Neat for Mac requires OS X 10.7 or later, 2 GB of RAM (although 4 GB is recommended), and 650MB for hard drive space. An earlier version of the Neat software is still available for those on OS X 10.6 or below.
There is also a mobile app available as a free download from the App Store.
NeatConnect Operation
Almost every scanner we’ve seen comes with some sort of software that allows you to process the scanned document as a pdf or other generic format document like rtf or txt. As part of the scanning process you usually assign a name to the scan and select a location on your computer’s hard drive where the scan will be saved to.
The main focus of the NeatConnect scanner is the “Connect” aspect.
Unless you plug the scanner into your Mac with a USB cable, everything happens wirelessly. Using the touch screen, you have multiple options for where you want to send your scans. The default is the Neat software that is identified by the email address you use to link the hardware to your Neat software account. Here is what we found with the various options.
Neat Cloud – The Neat program is a different approach. The software installed on your Mac is really more of a front end to a document repository that exists in the cloud (we assume on Neat servers). Instead of merely scanning a document and producing a pdf for filing, the Neat software is more like a database. The scanned document goes through an analysis called InDocument Identification, where numerous data points are extracted and indexed for you. That data is actually stored in the cloud and is accessible through the application installed on your Mac, the mobile app on your iPhone or iPad or any web browser at https://cloud.neat.com.
In our tests we found the data extraction to be mostly accurate. Categories like Payee Name, Amount Due, Date Due, etc. were extremely accurate. In those cases where the data was not correct, we think it has more to do with the fact that we had not yet scanned enough documents and created our own categories, tags, etc. to allow the software to really provide the correct information. There is also a whole host of data fields like, shipping and billing information, supplier names, that didn’t apply to us but would be extremely helpful to anyone dealing with outbound documents. Of course, to fill in all of this information would take a considerable amount of time but would undoubtedly be of great value later on.
Scanning of business cards was also very accurate with names, titles, phone numbers and email addresses being placed into their respective data fields in the software. The Neat software subscription also includes a service called NeatVerify. Depending on the software plan you purchase you get from 10 to 60 items per month that are reviewed manually for the highest possible data accuracy.
Scanned items go into an Inbox area of the Neat software and are marked as Unreviewed until you look at them and correct or add any needed information. You then move them into an area called My Cabinet which you can set up with a folder structure of your choosing.
Because all of this data exists in the cloud, the mobile app adds an extra level of functionality. Using your iPhone, you can take a picture of a receipt and have it uploaded to Neat Cloud where it will be indexed and will be available back on your phone and also on your desktop application the next time you log in and sync your desktop with the cloud data.
As sophisticate as the Neat software is for processing invoices, bills, receipts, etc., we found it lacking in its handling of plain documents. While you have the ability to assign a document title, date, type and category, there are no other data elements that can be added like Document From or Document To. We also found no option to OCR (Optical Character Recognition) the document within the Neat software nor did we see an option to add that functionality with software supplied by Neat. For a product that is so focused on data, this seems to be an oversight.
We also found that if you want to actually read the document (or any scanned image) you must download it out of the Neat software, rather than in some form of viewer contained in the software itself. The software does have a view panel as part of the display, and you can zoom in for greater detail, but it’s not the same as seeing the document in full screen size.
Email – You can program an email address directly from the touch screen, which we thought was the default address scans would be delivered to. What we found out is that is the “From” address used by the scanner. When you select the email option, you are asked to enter the address you want the scan delivered to. We found the extremely small keyboard on the touch screen to be surprisingly accurate and had no trouble entering an address. The scanner retains those addresses making repeated email scans much quicker and you have the ability to send an email to multiple addresses at the same time.
Cloud Services – The real power of NeatConnect is in its ability to send scans to the many on-line cloud services that we have all become familiar with, including Dropbox, Google Drive, Microsoft OneNote and OneDrive, Evernote, Box and QuickBooks Online. The process for attaching the scanner to those services is pretty much the same for each. You select the service on the touch screen, enter your log-in credentials and accept the connection request. When you send your first scan to that service a folder called “From NeatConnect” is automatically created and your scans are deposited there with the generic name NeatConnect followed by the date and time of the scan. Unfortunately, there is no way to give the scan a custom name before it is sent to the on-line service so it would be difficult to know what is in your on-line folder after the fact without renaming every scan.
Direct to Computer – The only way to scan directly to your computer is by connecting the scanner to your Mac via a USB cable. That seems a little old fashioned in this day and age of wireless everything and something we have been able to do with scanners that are much less expensive. Beyond that, while we did plug the scanner into our MacBook Pro, we were never able to get the scanner to work properly. It took us multiple tried and restarts of the Neat software and our Mac before we could even get the computer to recognize the scanner and even after that, we were never able to successfully complete a scan to the computer. Perhaps with a little more time or a call to Neat support we would have figured out what was wrong but it seems like it should not have been that difficult. That was disappointing to us since scanning directly to the computer appears to be the only option that allows you to name the scanned document before the scanning process is started. All that said the ability to scan directly to the computer might not be that important for someone who would be interested in the NeatConnect system. In addition, we found that as part of the software installation, a folder called NeatScan was created in our Documents folder which seems to contain a copy of everything that was sent to the Neat Cloud. Unfortunately, every scan is placed in the same subfolder with a fairly generic name (i.e. Document, Invoice, Statement, Bizcard, followed by a date and time and a alphanumeric identifier such as “Z_56c8ed9ef9f66”, which is of no real value to the user. While this makes for a nice backup of your scans, it would require a lot of work to go through each one and rename and file them.
The Bottom Line
The NeatConnect scanner is a solid piece of hardware with an attractive design. The Neat software is feature-rich and provides numerous options that would probably be of great value to any small business owner or road warrior who doesn’t want to have to juggle all of the papers, receipts, etc. that gets collected on a trip. The ability to scan directly to the numerous on-line services we all interact with these days is seamless and like most products familiar to Apple fans, just works.
While the handling of documents like letters, contracts etc. seems lacking, we don’t really think that is the primary focus of this device as we see it mostly for things like invoices, statements, business cards and all of the other paper that a business person needs to deal with on a daily basis.
The biggest negative we see with the NeatConnect scanner is the price. At a MSRP of $499.99 this is at the high end of the price range for these types of scanner. We could certainly support the argument that the quality of the hardware and the functionality of the software make it a worthwhile consideration for anyone, but the ongoing annual cost to use the Neat software long term makes this a significant investment that the average home user may think twice about.
The NeatConnect scanner is available directly from Neat and from Amazon
Thank you to the folks at Neat for providing the NeatConnect Scanner Premium Bundle for our evaluation.
If you liked this article, please consider sharing it with your friends and leaving a comment below.
Also, don’t forget to “Like” us on Facebook and “Follow Us” on Twitter.
APPLE TECH TALKER

Leave a Comment
You must be logged in to post a comment.