
Dear Apple Tech Talk:
I am a new Mac user and discovered that there is no Print Screen key on the Apple Keyboard. How can I take screenshots on a Mac?
Thanks for writing and welcome to the world of Apple.
Like many new Mac users, you will find that you can do everything in OS X that you can do in Windows once you get used to the different keyboard layout. As you mentioned, on a Windows keyboard there is a special key, called Print Screen or PtrScr which allows you to take a snapshot of the entire screen. If you hold down the Alt key along with the Print Screen key, you take a shot of the active window. In either case, the screenshot is saved to the Clipboard and you then have to paste it pasted into a document or the Paint program to actually see and save the image.
As you discovered, there is no Print Screen key on a Mac keyboard but it is still pretty easy to take a screenshot. In fact, many people say that it is actually easier to take a screenshot on a Mac, once you know how.
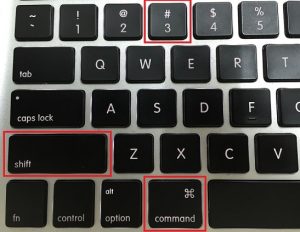
Full Screenshots on a Mac
Probably the most common screenshot is the full screen shot. This shows all of your open windows, you Dock and the menu bar. To do this, just press the Command +Shift + 3.
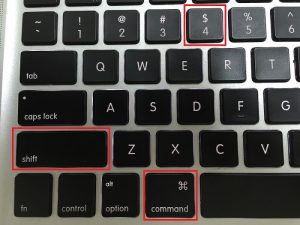
Selected Area Screenshots on a Mac
If you just want to capture a small section of your screen press Command + Shift + 4.
If that is all you remember you have what you need to know for the majority of your screenshot needs. But there are some additional tricks you may be interested in.This will turn the cursor into a cross-hair symbol. Using your mouse, click one corner of the area you want to captures and drag the mouse pointer to cover the area you are interested in. When you have it the way you want it, release the mouse button and you will capture the screenshot.
Application Window Screenshots
If you want to take a screenshot of a specific application window you can bring that window to the front of your screen and use the Selected Area method we just described. As an alternative, you can still press Command + Shift + 4 but instead of selecting an area on the screen, press the Space bar. The mouse pointer will change to a small camera icon. Place the icon on the window you want and press the mouse button. You have now captured that application window. What makes this especially easy is that the window you select does not have to be the front window. If you select a window that is behind another one, OS X will still capture the window you clicked on.
Some More Tricks
Sometimes you need to capture very specific parts of your desktop. Here are some tips for those more unusual situations.
Capture the Mac Menu Bar
Press Command + Shift + 4 and then Space. Drag the camera pointer to highlight the menu bar. Release the mouse button.
![]()
Capture a Menu Without the Menu Bar
Click the menu heading to reveal the specific dropdown box. Then, press Command + Shift + 4 and the Space bar. Highlight the drop-down menu with the camera icon, and click the mouse button.
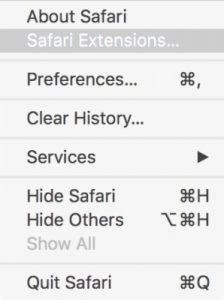
As you can see in the screenshot above, Safari Extensions is highlighted in gray. If there is a particular menu item you want highlighted, just make sure it is highlighted on the screen before you take the screenshot.
The Finished Product
When you take a screenshot in Windows, it is actually copied to the Clipboard and you have to paste it into something before you can see the results. OSX automatically saves your screenshots as a file on your desktop with a date and time stamp to help identify them.
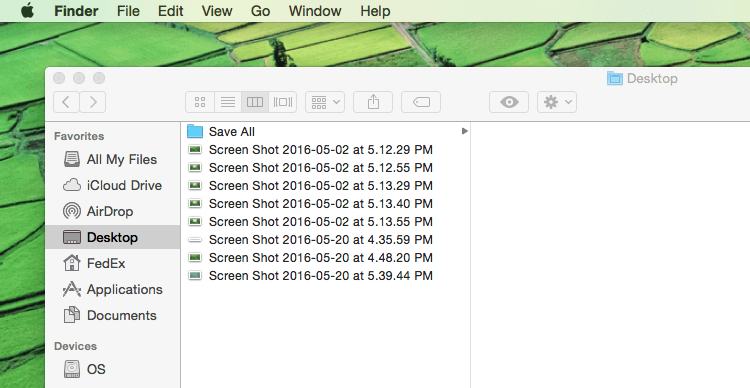
Once they are on your desktop, it’s a good idea to rename them to something more meaningful. But what if you prefer to have the screenshot go directly to the Clipboard? Well, OS X can do that too. Simply hold down the Control key while you press the other keys and the screenshot will be copied to the OS X clipboard and can be pasted directly into a document.
Mac Screenshot Format
By default, all OS X screenshots are saved to the desktop in the PNG format. If you have the need to change a particular screenshot, the easiest way is to open the file in Preview and export it in a different file format.
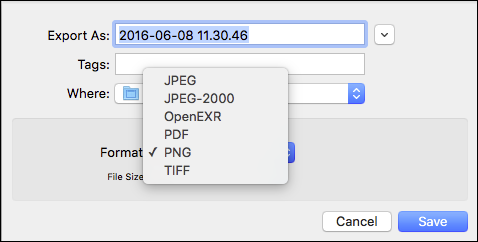
That’s great for the occasional change but if you want (or need) to have all of your screenshots in a different format you can change the default format by using a couple of simple Terminal commands.
To change the format to JPEG, open Terminal (in your Utilities folder) and paste this line of code:
defaults write com.apple.screencapture type jpg
After you run that command you need to restart the System UI Server function which you do by entering this command.
killall SystemUIServer
The next time you take a screenshot, you should see it saved in the JPEG format.
To make things easier you can combine the two commands like this:
defaults write com.apple.screencapture type jpg; killall SystemUIServer
Here is the code for PDF,
defaults write com.apple.screencapture type pdf; killall SystemUIServer
and this will return it to the original PGN format.
defaults write com.apple.screencapture type png; killall SystemUIServer
Mac Screenshot Location
Similar to file format, OS X saves all screenshot files to the Desktop by default. This is very convenient since you can quickly locate them regardless of the application you may be working in.
If you move your screenshots to the trash shortly after you use them, then saving them to the Desktop is probably all you need to do. But if you are one of those people that saves your screenshot files you will find that your Desktop will very quickly become cluttered. That not only makes it harder to find the one you want but can impact your Mac’s performance (but that is a discussion for another day). If you want to change the location where your screenshots get saved to, even if that is just a Screenshots folder on your Desktop, there is another Terminal command you can use.
To change the screenshot file location, enter a proper path where you want to save the files as part of the sample syntax below:
defaults write com.apple.screencapture location /path/
You can enter the entire path for the file or use the ~ (tilde) symbol, which is a shortcut to the current user home directory. So, for example, if I want to have the screenshots appear in a folder called Screenshots on your Desktop you would enter the following:
defaults write com.apple.screencapture location ~/Desktop/Screenshots
You’ll need to follow that up with a SystemUIServer relaunch too:
killall SystemUIServer
If you want to save your screenshots to your Pictures folder, you would enter:
defaults write com.apple.screencapture location ~/Pictures/
Whatever location you choose, be sure the folder you want exists or that you create it before running these commands.
The Bottom Line
As you can see, there is a lot you can do in OS X when it comes to screenshots and with a little practice, you’ve forget you ever used a Print Screen key in the past.
There are a lot more keyboard shortcuts every Mac user should know about and we have put together a comprehensive guide to Mac Keyboard Shortcuts. You can get a free copy when you subscribe to our web site. Just fill in your name and email address in the Subscribe Now box and we’ll email it to you right away.
If you liked this article, please consider sharing it with your friends and leaving a comment below.
Also, don’t forget to “Like” us on Facebook, “Follow Us” on Twitter and add the Apple Tech Talk channel to your Apple News app.
APPLE TECH TALKER

Leave a Comment
You must be logged in to post a comment.