
We’ve all seen this in a movie. Someone breaks into a high security facility, overpowers the guards, disables the alarm systems and cracks the password on the computer, and then simply plugs in a USB flash drive and copies all of the top secret information, which they then place in their pocket and walk out of the building.
While that might sound like something only possible in Hollywood, the fact is that it is more realistic than you might think. The truth is, the USB ports on your computer may be the weakest link in all of your security efforts.
Whether you work from home, work in an office or work in one of those high security buildings, if the USB port on your computer is not protected, you run the risk of someone copying data from your computer onto an external storage device.
In the business world, many companies have tried to address this by disabling the USB ports on their computers. While that does address the issue, it also greatly reduces the usability of your computer, especially if there is a valid reason to occasionally copy data to or from an external device. Fortunately, the folks at SecureData have a solution called SecureGuard USB.
Until recently, this was only available to Windows users but they recently expanded it to the Mac platform and we had an opportunity to test it out.
Disclosure: Apple Tech Talk participates in various affiliate marketing programs and may receive compensation if you purchase a product through one of our links, and/or in the form of product donations from the companies whose products we review . Unless otherwise specifically stated, Apple Tech Talk does not receive any other compensation for its reviews. The opinions expressed are based solely on our independent testing, are our own and are not shared with anyone prior to release on our site.
Apple Tech Talk Scorecard
| Pros | Cons |
| Adds excellent security without compromising functionality | Software can only be installed with the Admin credentials |
| Add protection on a computer or global level |
SecureGuard USB – Set-up
The SecureGuard USB service works in concert with the SecureData Remote Management Console (“RM”), that we discussed in our recent review of the SecureData – SecureUSB BT Encrypted Hard Drive and Remote Management Option (read our review here).
While that version of the RM application focused on managing the SecureData encrypted drives, there is no special hardware needed for the SecureGuard service. Instead, a piece of software is installed on your Mac. That software communicates with the RM application to safeguard the USB ports from improper use.
The SecureGuard USB software installs on the Mac like any other application and took just a couple of minutes to complete, but there was one important difference.
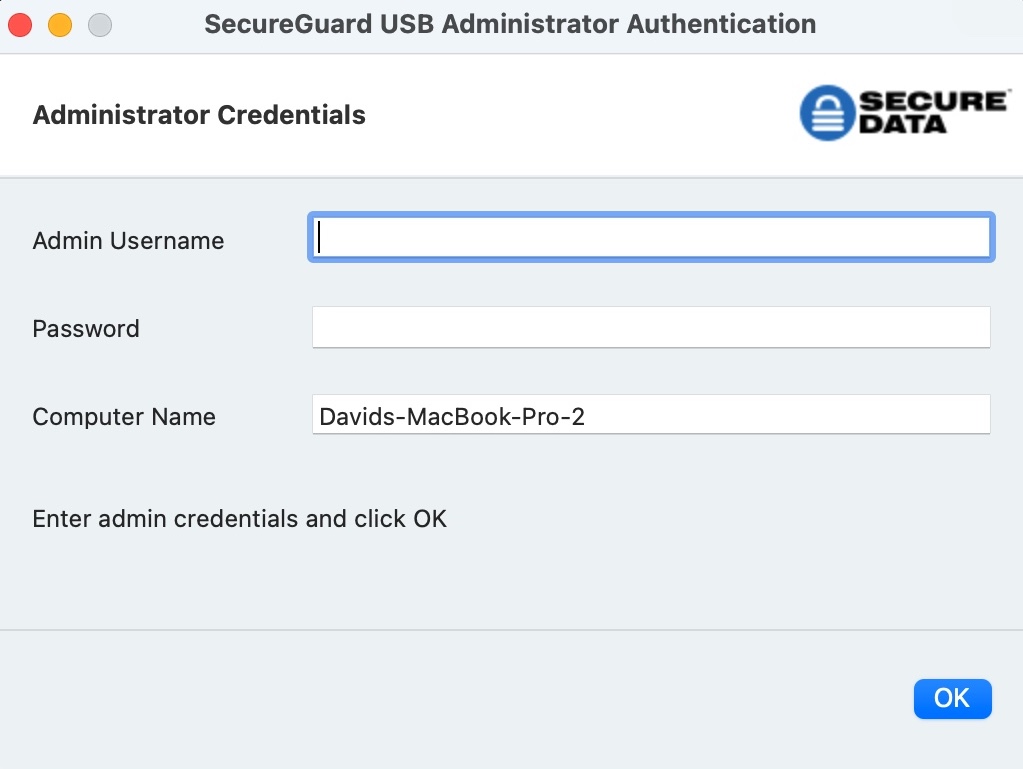
As part of the installation process, you not only need to have the administrator credentials for your Mac, but the credentials for the RM administrator must be entered. This registers the computer with the RM application. That also means that not just anyone can install this software. That may not be an issue if you are deploying new hardware but if you have a large number of units in the field, getting them all signed on to the RM application may be a bit of a chore.
As a final step to the installation, we were prompted to give the software full disk access. Something we are seeing more and more of as Apple continues to enhance security for macOS.
As part of our normal MacBook Pro setup, we have an external hard drive connected to one of the USB-C ports on our MacBook Pro, which we use for our Time Machine backup. We also have our CalDigit SOHO Dock (read our review here), attached to the other USB-C port.

With the SecureGuard software now active on our Mac, we immediately got a notification that our CalDigit Dock was identified as a non-registered USB device and further access to our Mac was blocked until we removed the device.
The CalDigit SOHO dock would be considered what SecureData calls a Human Interface Device (HID). These are things that do not store data, such as headsets, printers, keyboards, etc., and by default, are authorized by default. There is a tab in the RM console called HID Blocked where you can specifically exclude an HID device. Our guess is that because our CalDigit hub has several USB ports, the SecureGuard USB software recognized it as a possible storage device.
SecureGuard USB – How to Register a Device
With our individual computer now registered, all of the focus is on the RM application, since that is where the individual USB devices get authenticated.
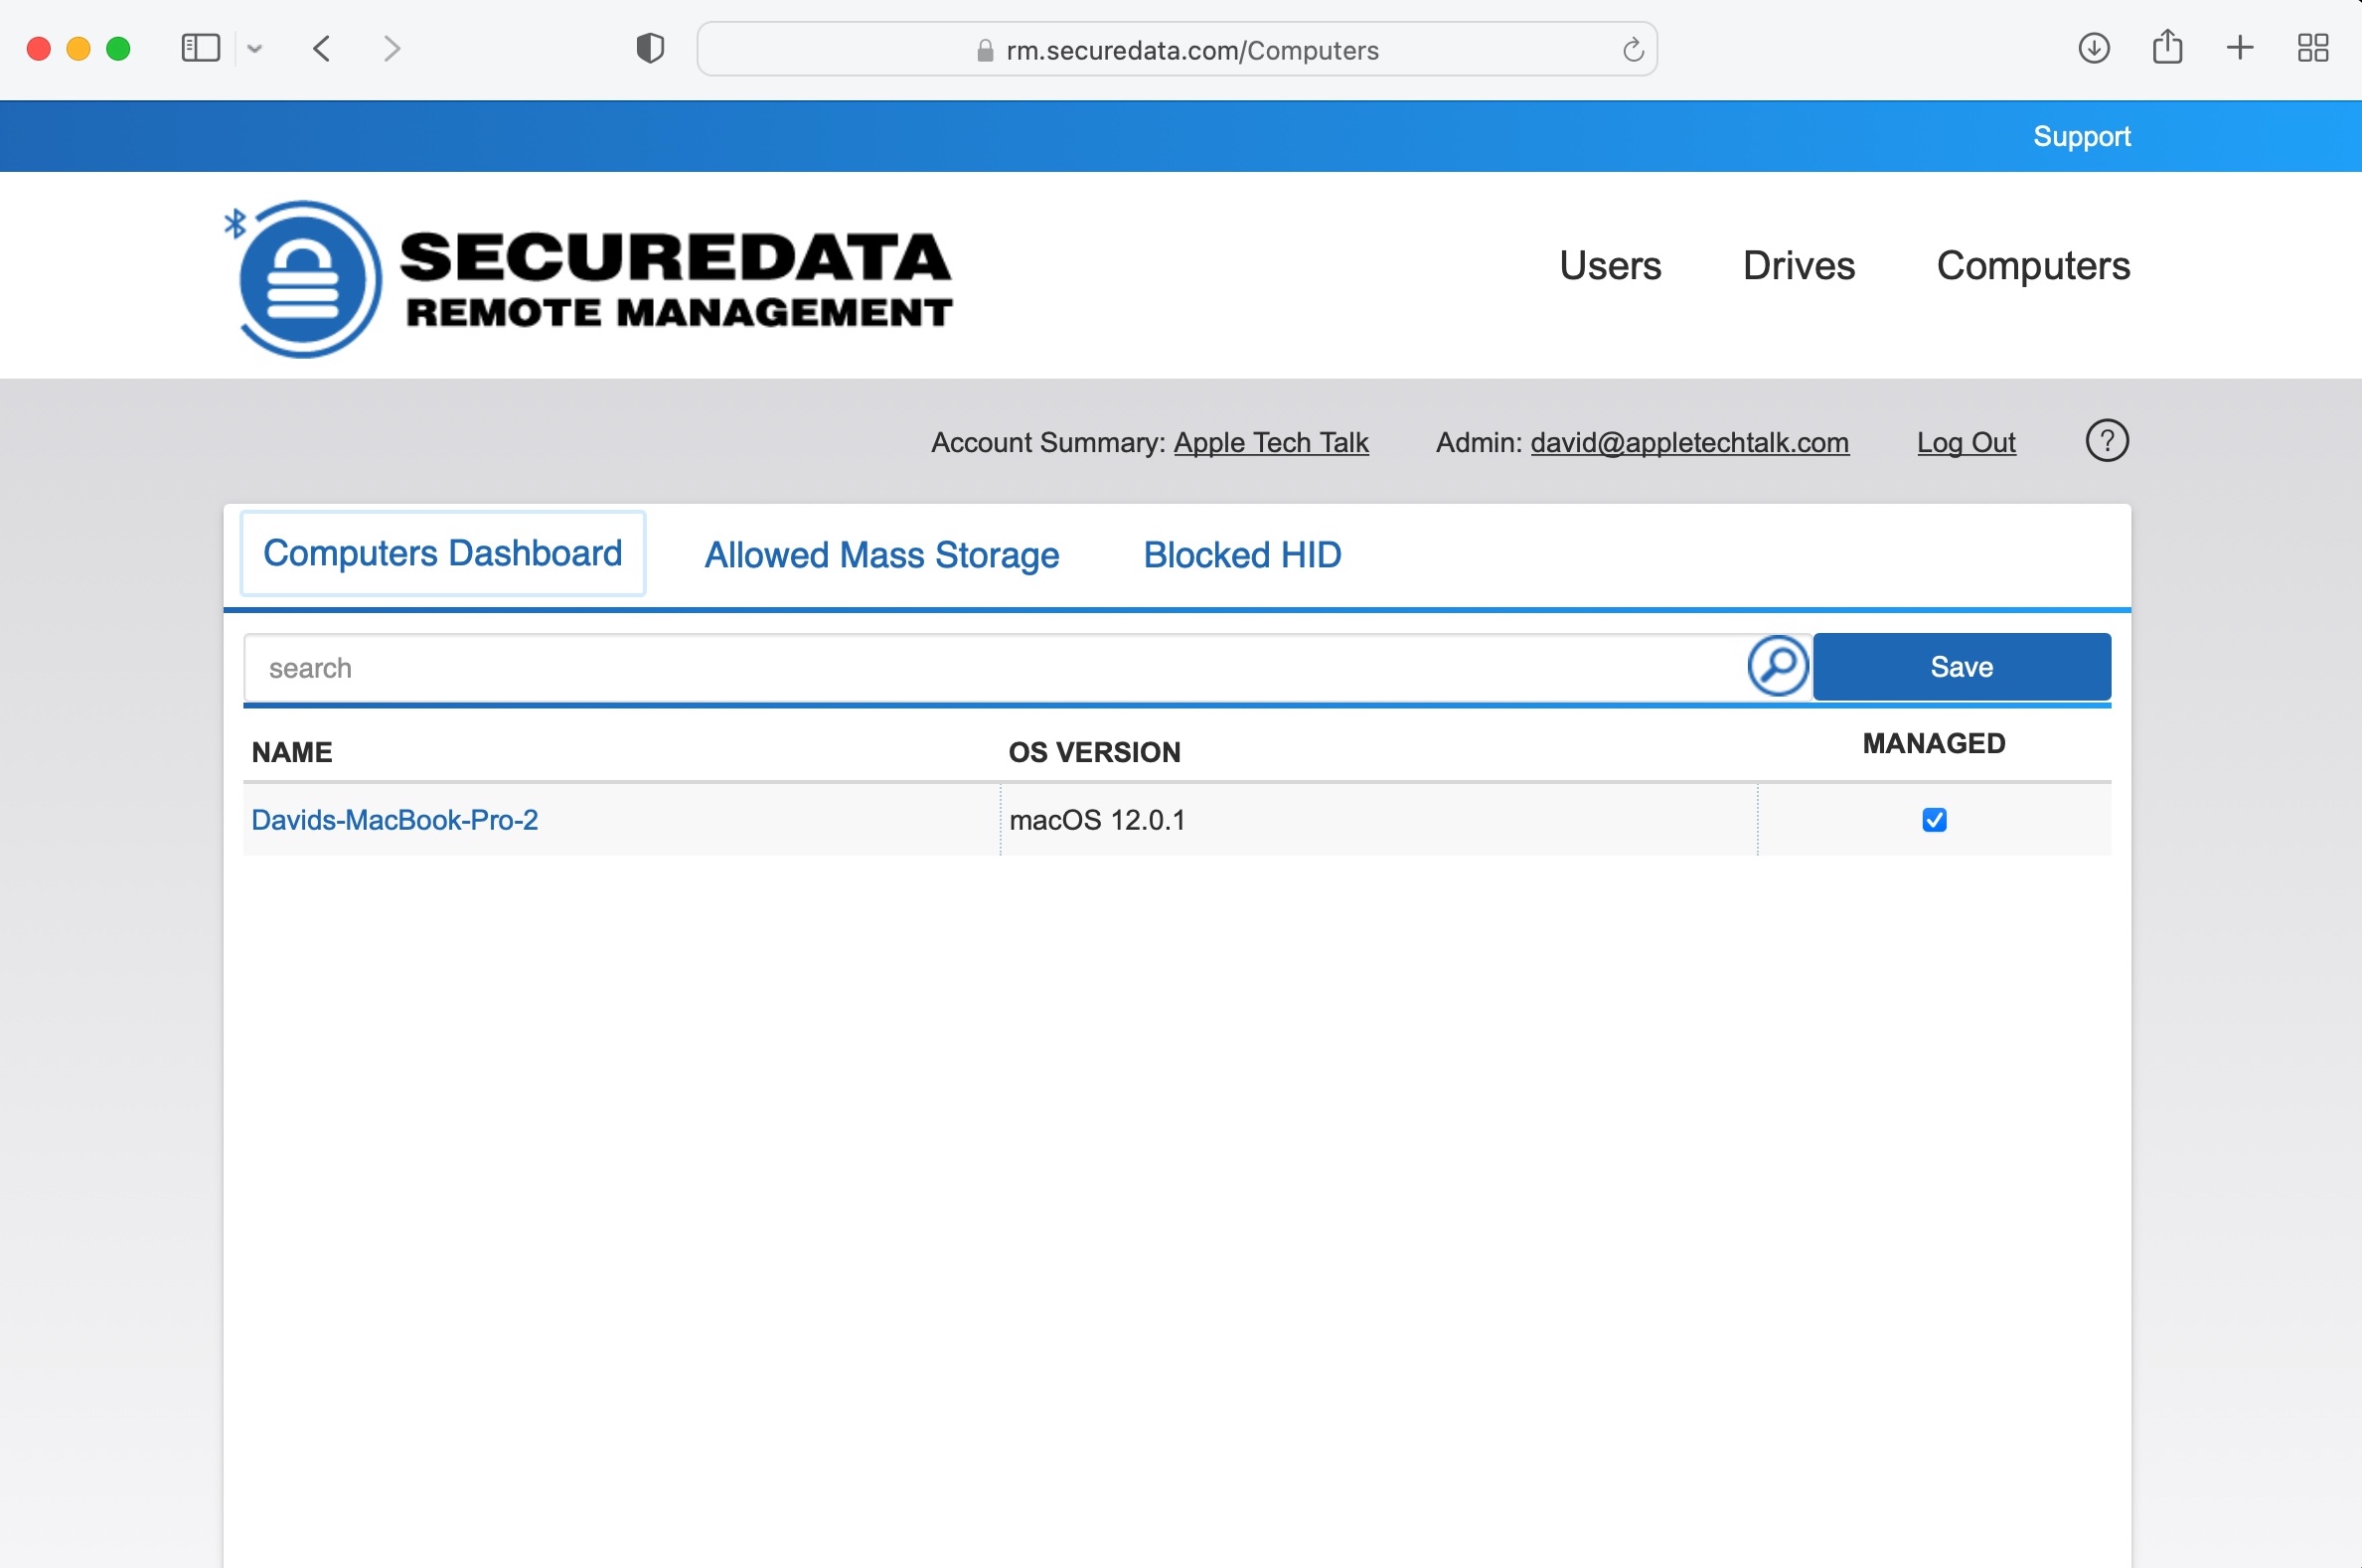
The screen for the RM application is basically the same as what we saw when we tested the SecureDrive BT and SecureUSB BT drives, except there was now an additional option called Computers.
This is the option that is used to authenticate USB devices for the registered computers.
To Register a USB device, you need to know the Vendor ID (VID), Product ID (PID), the device Serial Number SN) or the Revision Number (REV). There is also a place to enter the name of the device (more on that in a moment).
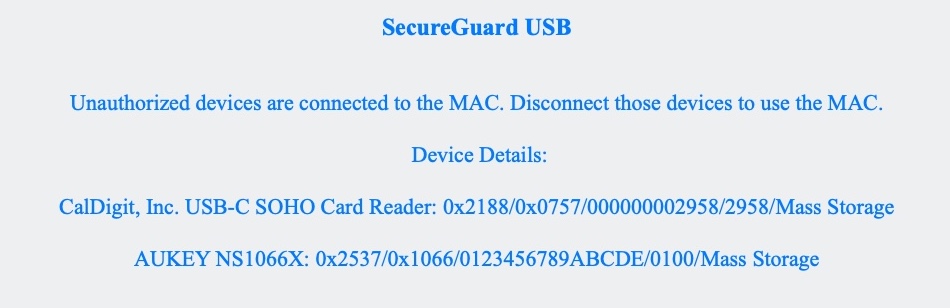
Our initial issue was to authenticate our CalDigit SOHO Dock and our Time Machine drive and our first thought was, how would we possibly get the VID, PID or any of the other details we needed. We then realized that the SecureGuard USB software we installed on our MacBook Pro, gave us everything we needed.
As we looked at the screen that popped up when we connected the Dock and the drive, it occurred to us that all of the information was on the screen in the following format:
Device Name, VID, PID, SN and Rev
We also later noticed that the RM console logs all attempts to connected a device whether it is authorized or blocked. The log lists a device name and the VID, PID and SN so the information is easily available to the RM administrator.
We simply entered these details into the RM application screen and the devices were once again able to be plugged into our computer and were usable.
We should point out that the RM application gives you a choice to authenticate a device for a specific registered computer, or as an “Allowed Mass Storage” device on a system wide basis. What that means is you can authenticate a device by a VID or PID and all devices within that category will be allowed access on all registered computers. This can be quite efficient for a company that wants to distribute the same information to a large group of people using a common brand drive, or to allow a group of people to exchange a single device between them.
SecureGuard USB – Test Results
With our MacBook Pro back to its regular working configuration, we wanted to see how SecureGuard USB worked with a USB Flash Drive, since that was really what it was intended for.
To do this, we used three (3) USB Flash drives, a Lexar USB Drive, a SanDisk Cruzer Blade and a generic no-name flash drive.
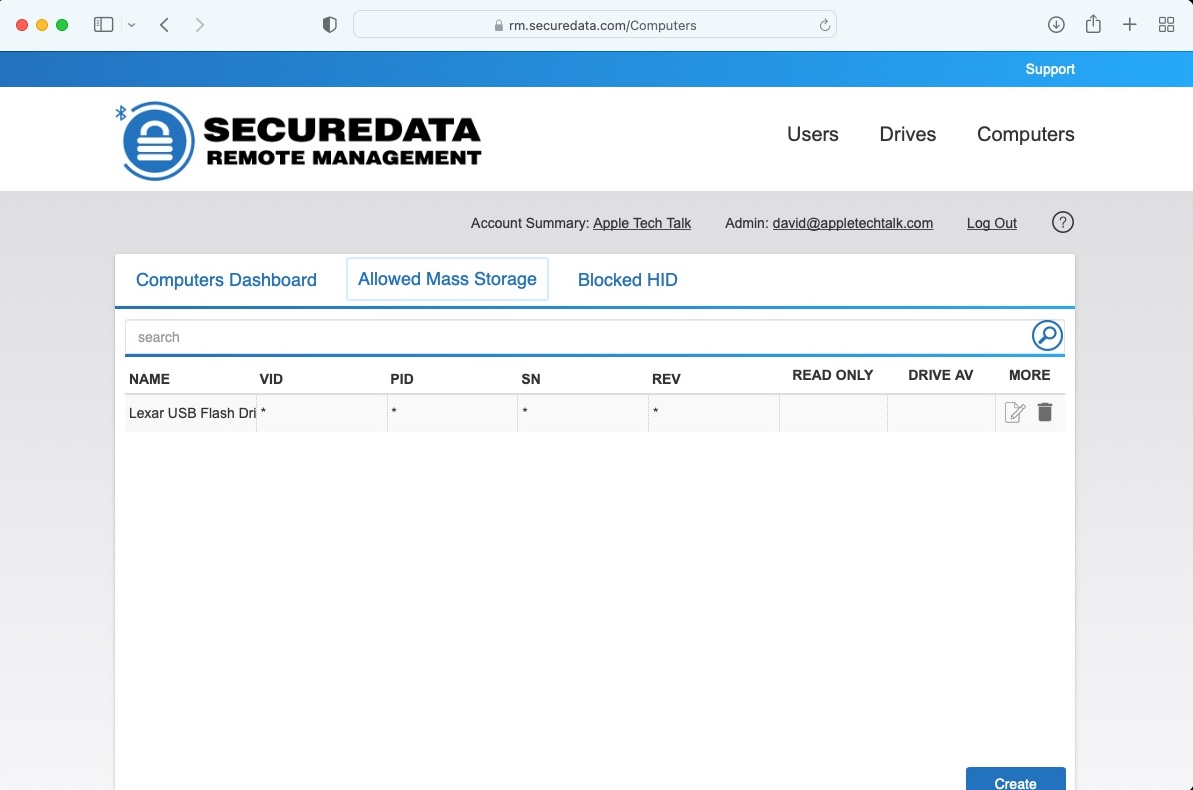
When we plugged in the Lexar drive into the USB-A port of the CalDigit dock, we got the expected unauthorized device screen. We decided to authorize this as an Allowed Mass Storage device to see what would happen.
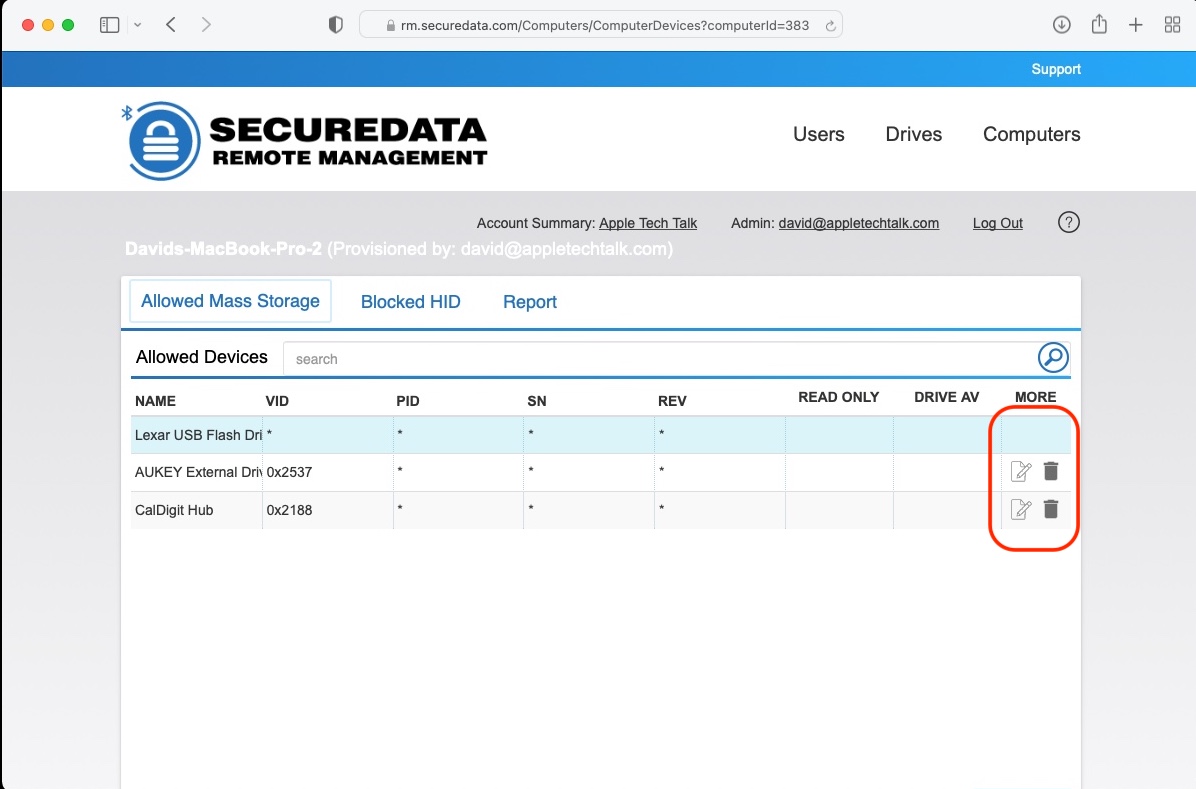
As expected, when we went back and looked at the allowed devices for our MacBook Pro, the Lexar flash drive was now listed along with our dock and Time Machine drive. We were also interested to see that the Lexar drive did not have the options to be modified or deleted from the MacBook Pro, unlike the two devices specifcally registered to the computer. It’s important to note that unlike the items we registered for the computer, we only identified the USB flash drive by its name and not by a VID or PID.
We next tried to register the SanDisk flash drive. We connected it to the CalDigit dock, expecting to see the unauthorized device screen. So we were surprised when the drive mounted on our desktop and was fully available to copy data. The same thing happened when we connected the generic drive. We also connected those devices directly to the computer, bypassing the CalDigit dock and got the same results.
We ran this test several times authentication the SanDisk drive and the generic drive by name only. In each test, all of the drives were usable.
We went one step further and deleted all of the flash drives from the RM application and also removed the VID of the CalDigit dock so that it was only identified by its name. We then connected the flash drives to the dock and they had full access.
We reported our findings to the folks at SecureData and their technical team jumped right on it. After doing some research, they determined that the “*” symbols in the VID, PID, SN and Rev fields act as wild cards and if the only identifier entered is the name, it potentially opens up the system to similar devices that are not authenticated. This of course defeats the entire purpose of the SecureGuard USB application. SecureData has already patched this issue and has deployed the update which now requires the application to have at least one identifier other than the name, to ensure the software stays secure. This fix by SecureData eliminates this issue completely.
SecureGuard USB – One Final Test
Since it was clear from our initial testing that the application blocked all unregistered devices, we wanted to see if we could bypass the SecureGuard application by uninstalling it from our MacBook Pro.
The SecureGuard USB application was installed in its own folder in our Applications folder. Inside that folder was an Uninstall program. We launched the uninstaller and it opened a terminal session and asked for our computer administrator password.
This is obviously the first line of defense since in most cases, users of business computers do not have administrator access to their computers. But if they did (like we did), they could get past this roadblock.
So we entered our admin password and the uninstaller continued for a couple of seconds when a screen, similar to the install screen, asked for the administrator credentials for the RM application. This was the second line of defense which would seem impenetrable. At this point, you would be at a dead end and the uninstaller would stop.
The Bottom Line
Someone needs to tell Hollywood it’s time to change the script. The days of plugging in a USB drive to a computer and stealing the government’s secrets are over. If you are an individual, or especially a business, that needs to safeguard that your sensitive data cannot be copied off of your computers, you need SecureGuard USB.
With its easy set-up and multiple layers of protection, SecureGuard USB provides an easy to use and cost effective way to secure your data without taking away the functionality your user community needs.
While we have focused on data transfer, SecureGuard USB can also be used to allow or prevent access to a wide variety of USB devices like printers, keyboards, mice, card readers and more.
SecureData also has a comprehensive User manual which provides all the details of the application. You can read or download a copy of the manual here.
SecureGuard USB is available for around $20.00 per computer per year and you can find out more about it on the SecureData web site, here.
We would like to thanks the folks at SecureData for providing access to the RM application so we could test out the SecureGuard USB application.
How do you protect the data on your Mac from being copied or transferred? Why not join the conversation and leave a comment below.
If you liked this article, please consider sharing it with your friends and leaving a comment below. Also, don’t forget to “Like” us on Facebook and add the Apple Tech Talk channel to your Apple News app.
Apple Tech Talker

Leave a Comment
You must be logged in to post a comment.