
Over the past several months, we have been testing many different Wi-Fi routers (you can read our reviews here). Each company had its own unique style and feature set, they were all very similar in how they worked. Personal preference aside, it is hard to find one that pulls away from the pack. Enter eero, a mesh network system that takes a whole new approach to personal wi-fi and may just be the break-away product we have been looking for.
Apple Tech Talk Scorecard
| Pros | Cons |
| Unbelievably easy set-up | No USB support |
| Automatic firmware upgrades |
What is a Mesh Network
In its simplest terms, a Mesh Network can be thought of as a Wi-Fi system that uses multiple access points to distribute the signal over large distances. The signal passes between the various devices on the network. Users of a Mesh Network connect to the closest access point as they move through the area based on which access point is providing the strongest signal. Unlike more common range extenders, the signal quality is not supposed to degrade as it passes from one mesh unit to another.
Anyone who has been in a large hotel, conference center, airport or office building and has had strong Wi-Fi as they moved through the building has probably experienced a Mesh Network.
While Mesh Networks are not new, the idea of putting them in a home is, and while other companies are rushing to be part of the Mesh Network concept, it looks like eero is one of the first-to-market with this interesting concept.
eero unboxing
Being the Apple fans that we are, we tend to use their product design and packaging as the benchmark against which all others are judged. As soon as we opened the eero package, we had to take a closer look to be sure it didn’t have the “Designed in Cupertino” somewhere on the box.
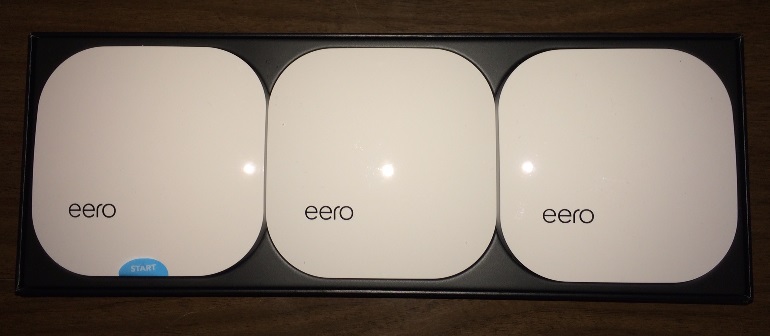
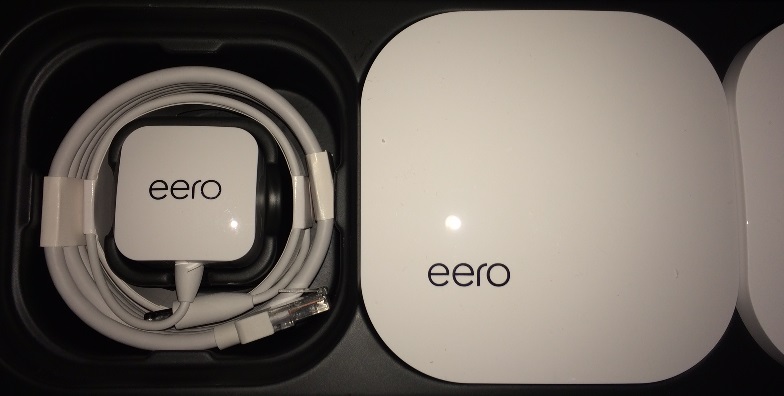
From the white plastic case to the hidden power cords and cables and the no included manuals, this is the packaging Apple would use, if they made eero. Even the little blue “START” tab to indicate which eero to use first is very Apple like.
There is actually no difference in the three units packed in our system. You could actually take any of the three and make it the “primary” unit. What makes the one on the left the unit to start with is that’s the one that has an Ethernet cable in addition to the power cord underneath the eero.
Overall, we loved the clean and easy packaging of the eero system.
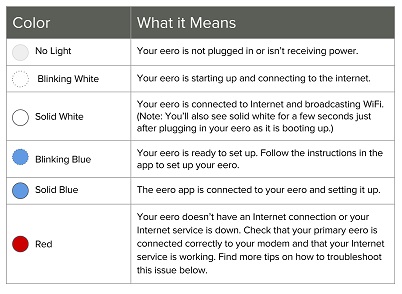
As we have mentioned in some of our other reviews, there seems to be a trend to make routers look massive. Companies seem to be making routers bigger and loading them up with multiple external antennas as a way to boost speed and performance and an array of LEDs to indicate all of the current functions and activity. eero takes a very different approach. There are no external antennas and the only LED is a single multicolored one in the center of the front edge to provide the current status of the erro based on its color.
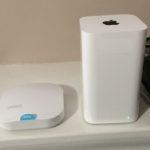 We have used our Apple Airport Extreme Base Station (“AEBS”) as the benchmark for clean router design. Its lack of external antennas and its single LED indicator makes it easy to place in almost any room without being intrusive or unsightly. The eero goes even further by being a fraction of the size of the AEBS. In fact, at 4.75” square and 1.34” high, it is only slightly bigger than the current Apple Airport Express and Apple TV both of which measure about 3.9” square. Finding a convenient location for your eero will not be a problem.
eero Set-up
Of all the routers we have tested, the eero is by far, the easiest set-up we have seen.
When you remove the first eero from the box, a blue card underneath it acts as the User Guide and instructs you to download the free eero app from the iOS App store. That’s about the hardest part of the set-up process. When you fire up the app it walks you through the following steps.
- Disconnect your old router and unplug your modem
- Connect your eero to your modem with the supplied Ethernet cord
- Plug in your eero and modem to AC power
- The app automatically starts looking for the eero
- The app tells you when it found it
- You select a room to help identify where your eero is located
- You create your network by picking a network name (SSID) and password.
You’re done! The eero automatically finishes configuring your network and the app asks you to set up an eero account but by then, your network is up and running.
After the first eero is set up, the app asks if you want to set up another one or if you are all set. Given that the whole point of the eero system is to create a mesh network, it seems silly not to set up the second one right away be we decided to wait a bit before we moved on to our second eero.
Here is a short video produced by eero that shows the set-up process.
https://www.youtube.com/watch?v=YysjcLqinHs
eero Hardware
The set-up process is simple and straight-forward, and that concept carries through to the hardware itself. But just because it looks simple on the outside, doesn’t mean it’s simple on the inside.
Each unit is powered by a 1.0 GHz dual-core processor and contains 512MB of RAM and 4GB of flash storage. Despite its small size, it contains two 802.11ac Wi-Fi radios for both the 2.4 GHz and 5 GHz bands and five antennas. It is compatible with the 802.11a/b/g/n and ac standards and supports WPA2 personal wireless encryption along with DHCP, NAT, VPN Passtrough and UPnP.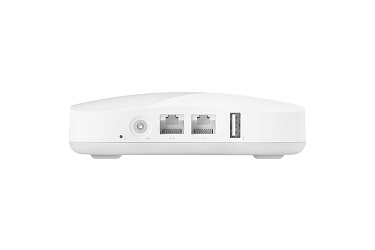
The rear contains the bare minimum of connections. There are two Ethernet ports, a USB port, a power connection and a reset button. Even someone with the most limited understanding of router hardware will probably understand what these connections are for. The most interesting thing not included on the back of the eero is a marking of which Ethernet port is the WAN connection and which is the LAN connection. This wasn’t a design error. The ports aren’t marked because they are interchangeable. You can use either one as the WAN or LAN connection. Connect either port on any of the eero units to a modem, and the software will figure out what is connected and configure the port automatically for that use. It really doesn’t get any easier than that.
Granted, with only one available Ethernet port left you may find that you have quickly run out of connections for other Ethernet connections. The simplest answer is to purchase a separate Ethernet switch, like the TP-Link 5 Port Desktop Ethernet Switch. In addition, as you add more eero units to your network, the two Ethernet ports on each unit become available for connections so you may actually find this a more convenient set-up since it now puts an Ethernet connection in more locations of your home without having to run wires through a wall.
The single LED indicator on the front on the eero provides basic information about the system’s status as follows:
Our only disappointment regarding the hardware itself is the fact that the USB port on the back is not currently intended for consumer use. It is primarily a service port for eero technicians. It is our understanding that some USB devices may work if attached to the port but don’t count on it and there is no support from eero if your device doesn’t work. We attempted to connect our Drobo 5D (read our review here), but had no luck getting it to work. We understand that eero is may make the USB port usable in a future firmware update.
The other big difference between eero and almost every other router is that the system is able to update itself with no involvement from the user.
When we hooked up our eero is was running firmware version 1.0.0. Almost immediately upon activation, we were informed through the iOS app that the eero would be updated overnight with the latest firmware available. Sure enough, the next morning we had an email waiting for us to confirm that the software update had been completed and when we checked the network details on the eero app we could see that the eero units were now at version 1.1.1.
The eero team says that the ability to push updates to the eero units will ensure that the hardware is always up to date and will allow them to provide feature enhancements and performance improvements automatically, without bothering the user to download and install new software. Of course, that also means that your network is constantly being monitored by the eero master system, which they cal the “C;pid Controller”, but according to eero CEO Nick Weaver, no personal information or network data is shared with eero. Their monitoring is strictly for managing system performance and to allow the eero technical staff to troubleshoot any issues you may have. More on that in a moment.
The eero hardware is covered by a 1 year limited warranty.
eero Software
 The iOS app is pretty straight-forward. Once the system is set up, there may not be much need to refer to it often and while the app does what you need to set up your system, it does lack some features compared to other routers we’ve looked at.
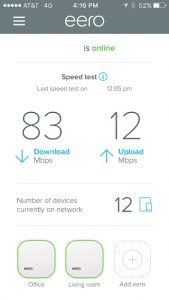
The main screen provides a nice overview of the network. It confirms that it is online, provides the results of your latest speed test, which is built right into the eero unit, confirms the number of devices currently on the network and shows the eero units set-up.
If you click on the number of devices you are taken to a detail screen that lists each device by name (if available), and going one screen further gives you IP and MAC addresses and the ability to assign a nickname to the device for easier identification. You can also create Profiles and assign a device to a Profile to help control access times.
Other functions are controlled by a drop down menu. From that menu you are able to create a 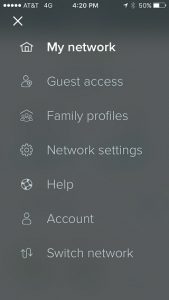 Guest Network with the simple flip of a switch and share the main network or your Guest network by inviting user’s right from the app.
This is also where you can create Family Profiles. This allows you to set times when a devices can connect to the network so you can, for example, shut down the Internet at dinner time or at bed time to help manage excessive usage. A profile can have as many devices as you want but a device can only belong to one profile. Unfortunately, there is nothing that allows you to block certain URLs or regulate which sites a particular device can connect to.
The Network settings section has an Advanced selection which includes the ability to make address reservations and do port forwarding. But many of the more advanced router settings and controls are not available.
Options like Quality of Service (“QoS”), to control which devices take priority on the network, Dynamic DNS settings to host your own web site, manual wireless channel selection, etc. which we have seen on many of the newer routers we tested, are not available for eero. While some users may find these omissions a concern, we think that the vast majority of users will find that this application gives them enough control for most of what they are concerned about. Frankly, while many of the router management applications we have looked at provide significantly more granular control, we found them to be intimidating and well beyond what most people would be comfortable working with. Sometimes, too much is not a good thing.
What really sets the eero application apart is that it is always available to report the status of your network, even when your iPhone is remote to the network. Best we can tell, the eero app is actually connecting to the main eero servers which, as we said before, are always monitoring your network’s status and condition. This could be a big help if you happen to be the family help desk. Even when not within your local network, you can open the app and see if the network is on line or if a particular device still has an IP address. What we didn’t see on the app is a way to cycle an eero device remotely.
The folks at eero boast that you will “Never reset your router again”. They say that in the event of a problem, your system can automatically reboot itself. That’s great, but what if your system doesn’t realize it has a problem? We would like to, at least have an option within the app that allows you to cycle the hardware at will, especially if you are remote to your network, even if the ability to do that is nothing more than an IT security blanket (old habits are hard to break). Perhaps that is something for a future upgrade.
With our eero up and running it’s time to see what it can do. Check out the test results of the erro Wi-Fi system in Part 2 of our review here.
If you liked this article, please consider sharing it with your friends and leaving a comment below.
Also, don’t forget to “Like” us on Facebook and “Follow Us” on Twitter.
APPLE TECH TALKER

Leave a Comment
You must be logged in to post a comment.