
Unlike the NAS units we have been reviewing, the Drobo 5D is designed for local storage of a single computer. If your data storage needs go beyond the capacity of your computer, the Drobo 5D may be your perfect solution.
Apple Tech Talk Scorecard
| Pros | Cons |
| BeyondRAID technology provides single or dual drive redundancy | Initial set-up attempt was not successful. |
| Supports Mac OS X HFS+ format | |
| Mix any brand, speed and capacity drives |
Drobo 5D Hardware
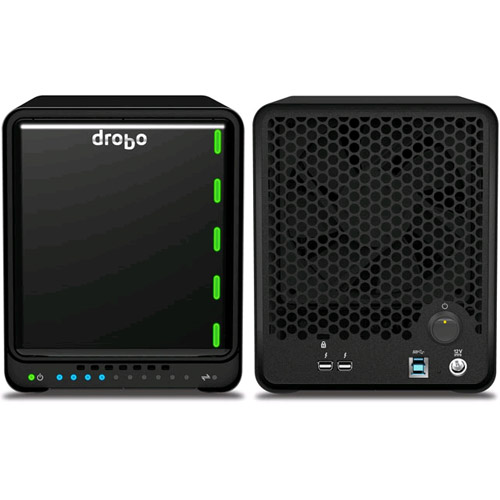
The Drobo 5D is sold as a 5-bay diskless storage array and screams quality the minute you open the box. Under the lid is an accessory box that contains the 6 ft. power supply and AC cable, a 6 ft. USB 3.0 cord to connect the Drobo 5D to your computer and a Quick Start Guide. Under that is the Drobo 5D that comes wrapped in a cloth tote bag rather than the usual plastic bag packing.
The Drobo 5D is a solid unit measuring 5.9” wide x 7.3” high x 10.3” deep and weighs 8.5 lbs. without the power supply or hard drives. It’s got a very stable feel to it and you should not have any concerns that this unit is going to tip over or even move on the desk or shelf it’s placed on, and crash the disks, which can happen with many of the single external drive units that people use.
The front of the unit has an interesting magnetic cover that hides the 5 drive bays. There are 5 LEDs that provide a status of the drive in each bay. A green light means the drive is healthy. Yellow means the drive has reach 85% of its capacity and an additional drive or upsizing the existing drive should be done soon. A solid red indicator means the drive is 95% full and should be replaced while a blinking red light indicates the drive has failed and must be replaced immediately to prevent data loss. A blinking green and yellow light means the data on the Drobo is being optimized among all of the drives. This is a normal state and you should let the Drobo finish. You can still use the Drobo as usual while this process is completing. Don’t worry about trying to remember any of that because everything you need to know about the Drobo’s lights are shown on the back of the drive bay cover.
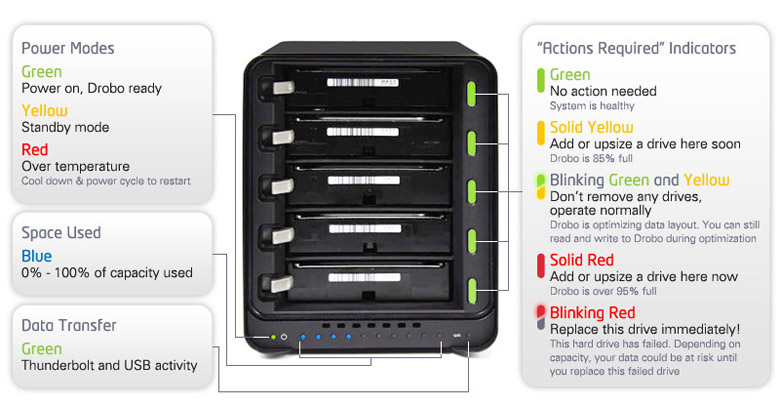
Along the bottom of the Drobo’s front panel are 10 blue LEDs with each one representing 10% of the Drobo’s total capacity being used. This is a nice way of letting you know how much storage is still available without the need to log into control panels or other software. There is also a power indicator and a disk activity LED.
The rear of the Drobo 5D has two Thunderbold ports as well as one USB 3.0 port for connection to your computer, a receptacle for the AC power connector and a rocker style switch to power the unit on and off. There are also dual, variable speed cooling fans.
The Drobo 5D has the easiest drive installation we have seen. There are no trays or drive rails to be installed. You simply push a 3.5” SATA drive into the slot until it clicks into place. That’s it! The drives can be from any manufacturer, capacity, and spindle speed and can be mixed within the disk pack. That makes it very easy to start small and let the Drobo grow with your storage needs.
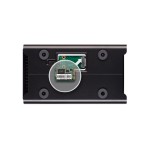 On the bottom of the unit is a small door that also requires no tools to open and covers the compartment for an mSATA module which is used to cache the most commonly used data and improve overall system efficiency. We couldn’t find anything on the Drobo site that speaks to whether there is a limitation on the capacity of the mSATA module that is supported.
The Drobo 5D has a built-in battery intended to allow any active data to be written to the disk in the event of a power failure. Although the battery is not user serviceable, it automatically recharges within the Drobo and is designed to operate for the life of the Drobo 5D unit.
Set-up of the Drobo 5D was effortless. After taking everything out of the box, we slipped in the two 1TB Seagate NAS quality drives (Model # ST1000VN000) provided to us by Drobo for our testing, plugged the unit into the AC and powered it on.
Since this isn’t a Network Attached Storage (NAS) device, it doesn’t have as robust an operating system like what is found on the Synology DS-216 we previously reviewed or the Netgear ReadyNAS RN202 current being tested, so we aren’t going to spend a lot of time discussing software. That said, the Drobo 5D is not just a collection of disk drives attached to your computer.
One of the features that lets Drobo stand out from some of their competition is their BeyondRAID technology. At a very high level, BeyondRAID takes all of the advantages of RAID protection and adds a layer of simplicity to it. With the BeyondRAID system, you can choose between single and dual disk redundancy. You have the ability to upsize and/or add additional drives to the array without the need to manually reconfigure the RAID pool or copy data off of the old drive. All of that is handled on-the-fly by the Drobo BeyondRAID system. More on that in a minute.
Drobo offers the Drobo Dashboard for Mac (currently at version 2.7.1) which can be downloaded from the Drobo support site. Once installed on your computer, it provides a window into the Drobo’s operations and condition. Using the Dashboard you can format the installed drives in native Mac HFS+ format, see a graphic representation of the disk consumption and handle some basic administration of the Drobo including the BeyondRAID settings.
Our first attempt to attach the Drobo 5D to our Mac was not as smooth as we had hoped. Even though it was connected to our MacBook Pro directly by the USB cable, neither the Mac nor the Drobo Dashboard recognized the device. After doing a little checking on the Drobo Support site, we disconnected the Drobo from the Mac, did a uninstall and reinstall of the Drobo Dashboard application and rebooted both the Drobo and the Mac. This time, the Mac immediately recognized that an unformatted disk was attached to the computer and the Drobo Dashboard immediately recognized the device.
Once recognized, the Drobo Dashboard proceeded to format the disks and update the 5D firmware and was ready to run. After that it was smooth sailing.
While the Dashboard is important to have for the initial set-up and good for occasional checks on the hardware, we don’t expect you will need to spend much time in it once the Drobo is set up and operating as this appears to be a very low maintenance piece of hardware. There really is nothing to learn about using the Drobo 5D as it functions just like any other external hard drive you may attach to your computer. It just happens to be a hard drive that provides almost limitless expansion on the fly with ultimate data protection from the built in redundancy offered by the BeyondRAID system.
The support for the native HFS+ disk format and the inclusion of Thunderbolt connectivity on the Drobo 5D is a sure sign of Drobo’s dedication to Macs. But if you need more proof, a quick glance at their on-line help files and some of the printable documentation will seal the deal. The reference to Macs is widespread and often is the first example presented when referencing Mac and Windows options. Perhaps the folks at Drobo just like to put things in alphabetical order but we would like to believe (and we suspect we’re right), that they really do focus on Macs more than almost any other third party product provider we have seen to date.
Drobo 5D – Who Is It For?
Probably the biggest question someone would ask about the Drobo 5D is, “Who needs something like this?”
The most obvious candidate for a Drobo 5D is a creator of large content files. Professional photographers and video editors immediately come to mind. Here is some simple math.
By some estimates, a professional photographer shoots about 1,500 pictures on an average wedding day. If you shoot one wedding a week, that’s over 75,000 photos a year. If each photo is about 40MB (the average size of a RAW photo file), you would need a 4TB hard drive to store all of your work. Of course, being a professional photographer you want to save and back up all of your pictures so you now need a second 4TB drive to back up the first one. Then, you’ll need to spend some time cloning the two drives. And when all of that is finally done, you’ll need to get two more drives for year two. I think you see where this is going.
The same is true for video editors. Applications like Final Cut require large scratch files in order to edit and render your video projects. Add to that the hours of raw video footage that goes into making a final project. It doesn’t take long to fill up an external hard drive, and that’s just for the current project. Keeping a copy of the final video files takes even more space.
When you consider how much real estate it would take to keep all of those external hard drives on your desk and then manage them, and compare that to the benefit of a single, multi-drive storage array like the Drobo 5D, the choice seems pretty obvious. But creators of large amounts of data for business purposes aren’t the only ones that should consider the Drobo 5D.
As the cost of storage media continues to drop, people are saving more and more data. We have moved from floppy disks to CDs, to DVDs and now to external hard drives. We’re willing to bet that everyone you know, has at least one external hard drive that they use to archive data, clone their computer or use it as a Time Machine back-up. In most cases, they probably have one or more drives dedicated to each of those functions. And while the cost of these external drives are relatively low, they are still more than the cost of a bare 3.5” SATA hard drive of comparable capacity. What if you could replace all of those individual drives with a single device? Add to that the RAID protection and easy expansion of your storage capabilities, and the Drobo 5D suddenly proves to be a very attractive value proposition.
But during our testing we had another thought. The Drobo 5D is a Direct Attached Storage (DAS) device, and most people think of that as directly attached to a single computer. But what if you have multiple computer and/or multiple users in your home? Does everyone need his or her own Drobo?
Many routers include a USB port that allows you to connect a printer or USB hard drive for sharing. We wondered, what would happen if we replaced the Western Digital MyBook currently attached to our Airport Extreme 802.11ac Base Station with the Drobo 5D? As it turns out, the Airport Extreme treats the 5D like any other hard drive. The 5D was immediately visible across our entire network.
Granted, since the USB port on the Airport Extreme is only USB 2.0, we don’t get anywhere near the speed that the 5D is capable of, using Thunderbolt or USB 3.0, but it is certainly no worse than we got with the MyBook, but now we have the data redundancy we were sorely lacking with a single hard drive and we no longer have to spend time taking the shared drive off the network to do a clone or other back-up on a periodic basis. We also found that the 5D is more available to the network, even if the unit has been asleep due to long periods of no activity. Where we used to wait a minute or two for the MyBook to be recognized and available on the network, the 5D data is available almost instantly.
Then we decided to take things one-step further. One of the benefits of having a NAS device is that most of them have the ability to be a DLNA server. With our entire movie library safely stored on the Drobo 5D, wouldn’t it be great if we could stream them to our LG TV. As it turns out, we can. In doing a little research on the Drobo web site, we found a support article that explained how to configure the Plex Media Server app on our MacBook Pro so it could read the Movies directory on the Drobo 5D. It took us less then 10 minutes to download and install the free Plex Media Server app and configure it, and we can now stream all of our movies at the touch of a button.
To be clear, we are not suggesting that the Drobo 5D is a replacement for a full-blown NAS server. In fact, Drobo offers the 5N, which connects to your network router using Ethernet as a more appropriate option. We’re not even sure how the folks at Drobo would feel about us using the 5D as a file sharing device on the network or if they would offer support in that configuration, but if all you are looking to do is share files across your local network, and have no need for remote access, the Drobo 5D may be an excellent option which gives you piece of mind with a high level of comfort against data loss.
And speaking of data loss, we wanted to see just how good the BeyondRAID system was so we decided to put it to another test.
As currently configured, with only two drives installed, the Drobo data is probably at its most vulnerable. With the Drobo fully functional, we simulated a complete failure of one drive by ejecting it from the Drobo unit. Almost immediately, the 5D went into recovery mode with the drive indicator for the “failed” drive turning red. We noticed that the capacity indicator at the bottom of the device jumped up from 20% to 30% used. Our guess is that the 5D began writing additional data to the one remaining drive as a “last resort” to protect the data.
To further test the system we decided to simulate that the failed drive was being replaced with a new drive, so using a SATA to USB adapter, we connected the removed drive to our Mac to reformat it.
The Mac immediately detected the connected drive but we got a message window indicating that the drive was not “initialized” and OS X could not mount the drive. We selected the “Initialize” option which brought us into Disk Utility which identified the disk as an “ASMT” drive. Since Disk Utility saw the disk, we could erase and format the drive after which it was immediately mounted, with an icon on the desktop.
We reinstalled the newly formatted drive into the 5D and almost immediately the Drobo lights started flashing yellow and green, which is an indication that the BeyondRAID system is in recovery mode and rebuilding the data redundancy. We let the system run over night and when we checked it the next morning, the drive lights were all green and the unit was back to its normal operating state. Granted, we currently only have about 200GB of data on the 5D so loss of a fuller or larger drive could take longer to rebuild.
During this entire process, we retained the ability to access our data and no data was lost. We even added some new files to the Drobo while it was recovering and it operated normally. Overall, it was a pretty impressive demonstration of the level of data protection the Drobo 5D offers as well as the ease of upsizing or adding a new drive to the unit.
We were also happy to see that it is fairly easy to repurpose a drive that has been in a Drobo. As your data storage needs grow and you have to upsize a drive, you can easily reformat the old disk for use in another device or put it into an external drive case and use it somewhere else.
Drobe 5D – The Bottom Line
The Drobo 5D DAS is a premium storage array that everyone should consider. Its excellent build quality matched with its expandability and ease of use makes this a great addition to anyone that has the need to store any type of data external to their computer.
The Drobo 5D comes with 90 days of free technical support and a one year manufacturer’s warranty on the hardware. Optional DroboCare extended warranty plans are also available. In addition, the Drobo web site has an extensive Support section including a very active User Forum with a knowledgeable community very eager to help both newcomers and seasoned Drobo users.
The Drobo 5D is not inexpensive with an MSRP of $699.00 but if you consider what your data is worth and what it would cost to protect it using more conventional storage and back-up methods, the value proposition makes a lot more sense. The Drobo 5D is available from Amazon for $599.99
We would like to thank the folks at Drobo for providing a Drobo 5D and Seagate hard drives for this evaluation.
If you liked this article, please consider sharing it with your friends and leaving a comment below.
Also, don’t forget to “Like” us on Facebook and “Follow Us” on Twitter.
APPLE TECH TALKER

The problem is that Drobo doesn’t repair their own equipment unless you purchase their expensive “DroboCare” plan, and unless you’ve purchased continuously from the moment your included warrantee expired, they won’t even sell you insurance.
I wish they would focus more on what is best for their customers. I own three Drobo units, and I like them, but since I didn’t buy DroboCare, the only solution if one dies is to buy another… Drobo won’t repair them, or even speak with you. Seriously, you can’t even talk to someone there unless you buy their insurance policy.
don’t even bother with drobocare, i have it, have a failed drobo unit, and have been trying for over a week now to get them to replace my unit, despite daily emails to them, and phone calls… I’m being ignored…