
As we all collect more and more data, the need to store that data off of our physical computer grows. If you want to share that data with others, a plain external hard drive isn’t enough. That’s where Network Attached Storage (“NAS”) comes in, and the choices available are growing. So we thought it made sense to take a look at some of the options available to you and we start with the Synology DiskStation DS216 NAS.
The Synology DS216 NAS Hardware
 The Synology DS216 NAS is a 2-bay NAS server. It runs a 32-bit, Dual Core 1.3GHz Marvell Armada 385 CPU and has 512 MB of DDR3 system memory. The unit is sold as a diskless enclosure and supports a wide variety of 3.5” and 2.5” SATA III and SATA II Hard Disk and Solid State Drives. It will support drives up to 8TBs for a maximum capacity of 16TB, which is also the maximum single volume size. The drives are mounted in hot swappable drive trays that allow for quick, tool free installation.
The server includes 1 USB 2.0 port mounted on the front of the case along with a USBCopy button to allow for easy data loading and also includes 2 USB 3.0 ports on the back for fast data transfer to attached external drives or connection of a shared printer. There is also a single gigabit Ethernet port on the back for connection to your local network router.
The server configures the internal drives in the EXT4 format but supports multiple file formats for any external drives attached via USB, including EXT4, EXT3, FAT and NTFS (Mac OS X Journaled). It also supports HFS+ but only as Read-Only and with a maximum volume size of 2TB.
The server measures approx. 6.5” high, 4.25” wide and 9.2” deep and weighs in at about 2.8 lbs. In addition to the USB port and USBCopy button, the front panel has a power switch and four LED indicators for Status, LAN connection and one for each of the internal drives.
Synology give a two year warranty on the hardware.
The DSM Software
As a company, Synology’s main focus is Network Attached Storage and the software certainly makes that point clear. Synology NAS units, whether the single drive home unit or the data center multi-bay rack mounted unit, all run the same DiskStation Manager (“DSM”) operating system (currently at version 5.2). This may very well be one of the most robust NAS operating systems we’ve seen to date. Unlike some of the NAS operating systems we have tested, Synology does not provide a scaled-down version of their software for their smaller units or allow only certain add-ons depending on the hardware model. You get the full DSM experience right from the start. This makes it very easy to move to larger hardware in the future without having to relearn how to use the hardware. It also eliminates the need to “over-buy” a piece of hardware just to get the fuller operating system experience.
DSM 5.2 supports up to 256 volumes on the internal drive. The DS216 supports RAID 0, RAID 1, JBOD, and BASIC configurations as well as Synology Hybrid RAID (“SHR”). Here’s how Synology describes SHR.
“A Synology Hybrid RAID volume optimizes storage capacity and performance when combining hard drives of different sizes. SHR volumes consisting of two or three hard disks provide 1-disk fault tolerance, while SHR volumes consisting of four or more hard disks can provide 1- or 2-disk fault tolerance.”
DSM 5.2 supports 2048 User Accounts which can be configured into a maximum of 256 Groups and supports 256 Shared Folders. It also supports up to 128 concurrent CIFS/AFP/FTP connections.
DSM 5.2 supports a variety of client platforms including Mac OS X 10.7 or later, Ubuntu 12 or later and Windows XP or later as well as Safari 7 or later, including iOS 7 or later on iOS devices, Firefox, Chrome (both on the desktop and Android 4.0 on tablets) and Internet Explorer 8 or later.
These are some pretty impressive statistics for a server that is simple enough for a consumer to use but clearly powerful enough to support a home office or even a small to medium size business. But if all of this wasn’t enough to impress you, then take a look at the “Add-On Packages”, which is Synology’s version of an “App Store”. At last count, there were 88 packages to choose from with all (or almost all) of them being free. These packages cover a wide variety of services including backup, multimedia business applications, utilities and security and there are too many for any review to cover but we will focus on some of basic ones as we put the DS216 through its paces. It’s hard to think of a situation where a user would need (or want) to install all of these packages, but it’s also hard to imagine a user’s needs that won’t be addressed through one or more of the packages currently available. In addition to these packages, Apple’s App Store hosts a compliment of iOS apps (again, all free), which expands the power and usefulness of the DS216 as you’ll soon see.
Setting Up The Synology DS216 NAS
In the box is the Synology DS216 NAS, an accessory box which contained the power supply which has a four foot cord to connect to the server, a two foot standard three prong electric cord to connect to the power supply, a five foot Cat 5e Ethernet cable, a small package of screws, used to mount a 2.5” drive into the provided trays and a Quick Installation Guide.
The Synology DS216 NAS ships as a diskless unit but the evaluation unit supplied to us by the good folks at Synology included two 3.5” 4TB Seagate NAS HDD (Model #: ST4000VN000). These drives are built for the 24/7 environment that is a NAS and these specific drives are rated at 1M hours MTBF. In case you’re curious, that’s a little over 114 years.
Mounting the drives couldn’t be easier. The drives sit behind a plastic cover that mounts to the front of the DS216 with rubber bushings. After lifting away the cover, you release the trays by pressing a small tab on the top of the unit. There are plastic mounting bars on the side of the tray that you pull off. Slide the drive into the tray, replace the plastic bars and you’re done. Slide the mounted drives back into the unit until they click into place. It took us less than five minutes to install both drives.
If you don’t pay attention to the installation guide, you could get confused as to which way the tray slides back into the unit. There is a small arrow on the front of the tray to indicate the top but since it is black on black it is a little difficult to see. We would have liked it if the arrow was a little more noticeable.
Connect the Ethernet cable to your router and the power cord to its dedicated connection and you are ready to go.
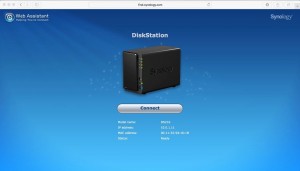 To get the unit up and running just press the power button on the front of the unit. The guide then instructs you to enter a simple address into your browser (http://find.synology.com) and the DS216 was immediately located on our network.
Clicking connect brings you to a Login screen where we actually got stuck. We couldn’t figure out the correct credentials to log in. A quick search on the revealed that we needed to enter a User Name of admin and no password to get us to the next screen. That would be a good tip to include in the installation guide.
At this point, the DS216 appears in the Finder sidebar as a Shared Device and you can transfer files from your Mac to the DS216 with the same drag-n-drop easy of any other device and while there may be reasons to do that at times, you probably want to do most of your work in DSM.
The next step suggests you set up a Synology Quick Connect Account which allows you to reach your server remotely without the need to set-up port forwarding on your router. As we soon found out, Quick Connect is a very useful tool so this is something you want to do immediately.
The final step was a suggestion to install the most common “Station packages” from the Synology site. These include things like the cloud service, audio and video packages, etc. There are six suggested packages and the entire install process took less than two minutes.
That took us to the main management screen with a brief tutorial of what some of the icons meant. It also let us know there was a DSM update that needed to be installed. The entire process from download to install completion took about ten minutes.
While we didn’t put a stopwatch on the entire process, the time from opening the box to completing all of the software installations and upgrades took less than an hour and with the exception of our little stumble about the initial ID and password, was extremely easy to follow.
With everything set up and ready to go, the next step will be to set up some user accounts, load up some data and start seeing what the DS216 can do. And we’ll report on that and more in Part 2 of our review.
The DS216, the Seagate NAS drives we tested as well as other compatible hard drives are available from Amazon
If you liked this article, please consider sharing it with your friends and leaving a comment below.
Also, don’t forget to “Like” us on Facebook and “Follow Us” on Twitter.
To continue to Part 2 of our review, click here.
APPLE TECH TALKER

[…] have looked at several Synology NAS units in the past, like the Synology DS216 (read our review here), the Synology DS418j (read our review here) and the Synology DS218+ (read our review here). This […]