
We continue our series on Network Attached Storage (NAS) with a look at the Netgear ReadyNAS RN202. This is a unit that shows a lot of promise but may fall short for some of your needs.
Apple Tech Talk Scorecard
| Pros | Cons |
| Extremely easy disk mounting | Poor set-up documentation |
| Dual Gigabit Ethernet Ports | |
| Supports the Brtfs File System |
Netgear ReadyNAS Hardware
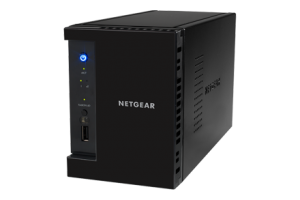 The Netgear ReadyNAS RN202 is a two bay NAS server and is sold in three configurations, Diskless, 4TB (2 x 2TB Drives) and 6TB (2 x 3TB Drives). Our evaluation unit, provided by Netgear came diskless but we were also provided with two Seagate Barracuda 7200 series, 1TB drives.
In the box was the RN202 server and an accessory box which contained the power supply, three power cords (US, GB and Europe), an Ethernet cable, disk mounting screws (which are only needed if you are using 2.5” drives), an information packet which has a small instruction book in several languages and a quick start guide.
Netgear does provide an online manual which covers all of its NAS units but there are only a few pages dedicated to each model and really doesn’t do much more than explain the lights and buttons on the units.
The hardware measures just 3.9” wide X 5.6” high and 8.6” deep and weighs 4.47 lbs. without the disks installed.
The front panel has a lighted power button, a disk activity indicator light and LEDs for each of the two disks, all in a bright blue color. The front panel also has a backup button that is used to start a manual backup to an external disk. The drive trays sit behind a plastic door that swings open for easy access.
The Netgear ReadyNAS RN202 is powered by a 1.4GHz dual core High Performance ARM Cortex A15 processor and has 2GB of RAM. The drive trays can accommodate either 2.5” or 3.5” SATA or SSD disks. Although the 2.5” disks need to be mounted with screws, the 3.5” disks have tool-less installation and are hot swappable.
The RN202 has 1 USB 3.0 port mounted on the front of the unit for easy connection of a USB hard drive or flash drive, as well as two USB 3.0 ports mounted on the back. There is also an eSATA port on the back to support additional storage.
The RN202 also has dual Gigabit Ethernet ports on the back and, if your router supports it, can be used to aggregate the transfer speed between the RN202 and the router. This is a feature we would expect to see on server’s costs significantly more.
We were immediately impressed with the build quality of the RN202. Even without disks installed the RN202 has a solid feel but still manages to feel compact. The metal drive trays have an interesting design.
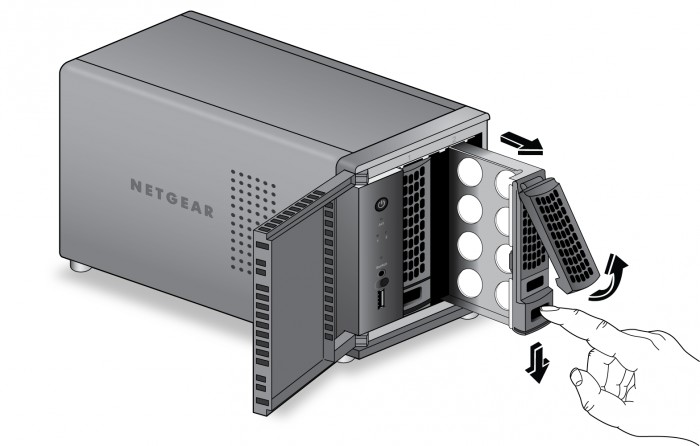
To release the tray you press a button on the bottom of the holder. That releases the front of the tray which acts as a handle to facilitate removal from the server. Once removed you slide the same locking mechanism to the left and that releases the plastic drive guides which slide down towards the end of the tray. Pins on the guides line up with the mounting screw holes in the drive and then you just slide the drive into place and slide the tray back into the server. Press the front handle down and the tray is locked into place.
The process is very simple, and took us less than a minute to mount each drive. There is a small diagram on the drive tray itself that helps explain the process but that presumes you have figured out how to release the tray in order to see it. Admittedly, we had previously seen a video that explained the drive mounting process. The installation guide doesn’t provide details but does give a url for a video that explains the process.
We felt the quick start guide and instruction booklet were generally lacking in how to get the unit up and running and perhaps Netgear should consider improving the documentation (a theme that has repeated itself several times during our tests).
With the drives mounted, we plugged in the RN202 and it immediately started up without us even touching the power button. The instruction book said to wait until the LEDs stop flashing before proceeding with the set-up. Unfortunately, it wasn’t clear which LEDs they were referring to and we may have rushed things a bit.
Since we were using new drives, the system automatically started a process to verify the drives. That process ultimately took several hours which kept the activity light flashing the entire time. We tried to set-up the server as soon as the Power Button stopped flashing. However, our first few attempts to complete the set-up failed as we received a message that the server could not be found.
We eventually were able to complete the set-up but instead of taking us directly to the ReadyCloud set-up as described in the booklet, we were dropped directly into the administration panel of the ReadyNAS OS. There was supposed to be a step that required you to press the Backup button on the front of the RN202 to secure the server to your network. We never got that as part of our set-up process. Netgear considers this a security feature to show that you have physical control of your unit, so we were surprised we could complete the set-up without that important step.
We’re not sure where we went wrong and ultimately it didn’t seem to cause any harm but again, a little more detail in the instructions would have been appreciated.
We ultimately found that there are several videos available from Netgear and others that shows the install process and you would be well served to review these before you start the set-up process.
All-in-all, we found the set-up process to be fairly easy, and had we not hit these minor speed bumps along the way, we would have gone from opening the box to running on the network in under 15 minutes.
Netgear ReadyNAS Software
The Netgear ReadyNAS RN202 is running the latest version of ReadyNAS OS 6 (6.4.2). This is a robust NAS operating system with all of the built-in functionality you would expect in a quality NAS unit. In addition, while the hardware set-up had minimal documentation Netgear has prepared an extensive 235 page User Manual for OS 6.4 which is available from the Netgear web site.
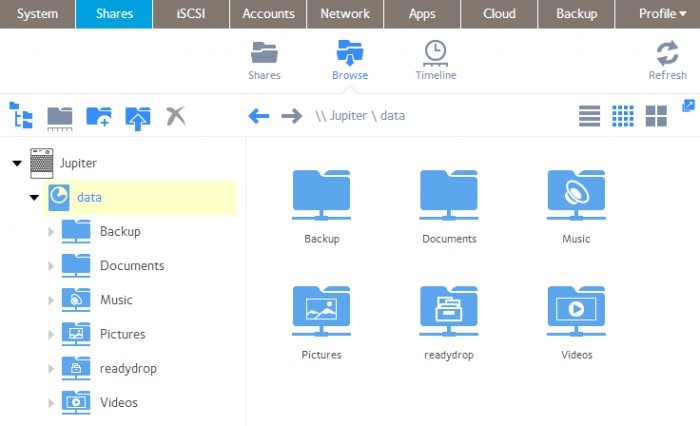
The NAS functions and hardware administration run in a web browser and overall has a clean design which is uncluttered and easy to follow. Even without referring to the User Manual, most users should be able to figure out what they want to accomplish with little trouble.
Unlike most Linux based consumer and SOHO NAS units that run the EXT4 file system, Netgear’s ReadyNAS OS6 runs the Btrfs file system internally. It is not the intention of our review to discuss in detail, the benefits of the Btrfs file system other than to say Btrfs is intended to address the lack of pooling, snapshots, checksums, and integral multi-device spanning in Linux file systems. For a detailed explanation of the history and benefits of Btrfs you can read the Wikipedia article here.
ReadyNAS OS supports several external file system including: EXT3, EXT4, NTFS, FAT32, HFS+.
Multiple client file protocols are supported including Microsoft (CIFS/SMB), Apple OS X (AFP 3.3) and Linux/Unix (NFS v3)
Depending on the number of disks in the hardware, ReadyNAS OS 6 supports Single Disk, JBOD RAID Levels: 0, 1, 5, 6, 10 as well as Netgear’s proprietary X-RAID which Netgear describes as:
X-RAID is an autoexpandable RAID technology that is available only on ReadyNAS systems. With X-RAID, you do not need to know intricate details about RAID to administer your system. X-RAID allows you to add storage space without reformatting your drives or moving your data to another location. Because the expansion happens online, you can continue to use your ReadyNAS system while the volume capacity increases.
The RN202 can support up to 8,192 Users and Groups although Netgear recommends you keep that count to no more than 250. The users can be controlled through the local database which resides on the NAS or through connection to an Active Directory server.
By default, the system creates several shared folders as part of the set-up process. These include Music, Photos and Videos. Additional shares are easily created with full administration control to grant access to individual users and/or groups.
User set-up is just as easy and only requires a user name and password along with an optional email address. We didn’t see any way to automatically notify a new user that their account creation from within the system so you would be required to send a separate email or notify them of their log on credentials in some other way. While that isn’t an issue for immediate family members, it could become somewhat of a bother for remote users. Perhaps that is something Netgear should consider in a future update.
There are several functions built into the ReadyNAS OS 6 that require nothing more than to turn them on in the Administration Panel. This includes Anti-virus support, DLNA Server, iTunes Server and Time Machine for the Mac clients on your network.
Perhaps the biggest feature built in to the ReadyNAS OS 6 is its support of “Pointer Based Snapshots”. This is possible because of Netgear’s use of the Btrfs file system and not something you will find on any of the competing NAS drives we have reviewed.
It is beyond the scope of our review to explain in detail how the Snapshot function works but we can tell you that it provides an unlimited number of hourly, daily, weekly and monthly block based snapshots of your data for continuous data protection. These snapshots are stored right on your NAS volume and take practically no additional space from the actual data being stored. In addition, the Snapshot provides an almost instant restore of data from any prior point in time, without the need to recover an entire backup file. Snapshots can be scheduled or done manually when needed and can be managed directly in the ReadyNAS admin panel or through the ReadyCloud interface.
Snapshots are not, in our opinion, a replacement for a good backup strategy and we would still recommend that you use the backup services built in to the ReadyNAS to copy your full data set to an external disk but the Snapshot function is an important addition that is not usually seen outside of large datacenter infrastructures.
That’s a look at the ReadyNAS hardware, set-up and OS 6 functionality. It’s now time for us to put it through its paces and you can read about that in Part 2 of our review of the Netgear ReadyNAS RN202.
If you liked this article, please consider sharing it with your friends and leaving a comment below.
Also, don’t forget to “Like” us on Facebook and “Follow Us” on Twitter.
APPLE TECH TALKER

Leave a Comment
You must be logged in to post a comment.