
We have looked at several dedicated document scanners (see our reviews here), which do a great job of scanning all the paper you have to deal with, but they have their limitations. That prompted one of our readers to ask about a dedicated scanner for all the old photos they have. So today we’re going to look at the Epson Perfection V19 Scanner.
Apple Tech Talk Scorecard
| Pros | Cons |
| Compact and lightweight | Slow scanning speed |
| USB powered | No support for negatives |
| Ability to scan multiple photos at once |
Epson Perfection V19 – Unboxing
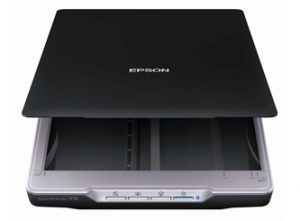
It’s been a long time since we’ve used a dedicated flatbed scanner. They used to be big, bulky and fairly noisy pieces of hardware that required its own power supply as well as a lot of desktop space to place the machine on. The Epson Perfection V19 Scanner is proof that things certainly have changed.
 In the box is the Epson Perfection V19 Scanner, a USB cable to connect the scanner to your Mac, a CD with the software and a “Start Here” installation guide. What isn’t in the box is any power adapter, because the Epson Perfection V19 scanner is powered by the USB bus of your Mac.
Once we removed all the packing, we were surprised at just how light and compact the Epson Perfection V19 scanner really is. Measuring 9.9” wide x 14.4” deep x 1.5” high and weighing just 3.4 lbs. it has an overall profile very similar to our MacBook Pro, and easily fits on even a crowded desk.
The Epson perfection V19 scanner has a CIS (Contact Image Sensor) with an optical resolution of 4800 dpi, with 48-bit per pixel internal and 24-bits per pixel external Color Bit Depth. The scanner uses Three-color RGB LEDs as a light source and does not require the warm up times we used to experience in older style photo scanners.
The scanner bed can accommodate photos and documents up to 8.5” x 11.7” and the scanner lid opens to a full 90 degrees or can be completely removed to accommodate larger items or books.
The included USB cable has a standard USB 2.0 connection for the Mac and a Micro-B connector for the scanner side.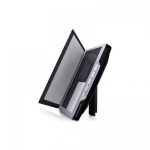
There are four (4) function buttons on the front edge of the scanner, each dedicated to a specific function, including the PDF button, the send button, the copy button and the start button. There is also an LED status light.
The scanner also has a small “kickstand” tucked into the bottom of the unit which allows you to stand the Epson Perfection V19 upright in those situations where desk space is at a premium.
Epson Perfection V19 – Test Results
Although the included CD has all of the required software, our preference is always to download the latest version form the manufacturer’s web site and Epson provides a Combo Package (currently epson16315.dmg) on their site here, if you are using OS X 10.6.x. or later. The combo package contains the following items:
- Scanner Driver and EPSON Scan Utility v3.9.4.2
- ICA Scanner Driver v5.7.14
- Epson Document Capture v1.3.3
- Epson Copy Utility v4.0.1
- Epson Event Manager v2.51.22
- Epson Software Updater v2.15
and installation was quick and easy.
The scanning process is controlled mostly by the Epson software which is fairly easy to understand but for those looking for more detailed documentation, Epson had a 112 page User Guide available as an HTML document on their website, here, or as a downloadable pdf document here.
From a hardware perspective there really isn’t much to know about the Epson Perfection V19 scanner. You place the photo or document on the glass, start the scanning function and wait for it to complete. As you face the front of the scanner, you align the photo with the front left edge of the scanner glass, with the top edge of the photo facing you. But doing so can slightly crop the top and left edges of your photo. It is stated in the User Manual that you can (should) leave about ¼” from the front and side edge of the scanner glass to avoid this unwanted cropping. While that does resolve one problem, it could cause another as we found it difficult to place the photo perfectly straight once we no longer had the scanner bed edges as a guide.
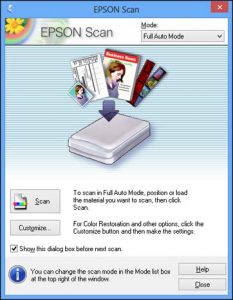
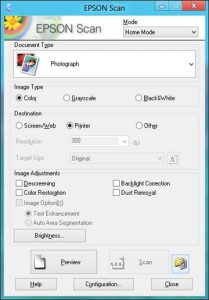
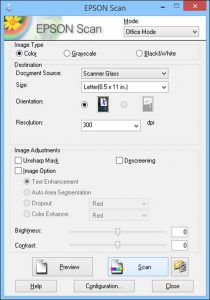
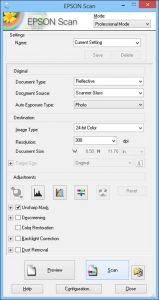
The software used by the Epson Perfection V19 Scanner is the same software we looked at when we reviewed the Epson DS-560 Document Scanner (read our review here), so we won’t duplicate that information again. What we can say is that as a photo scanning application, the Epson Scan software provides many more options. To begin with, the Epson Scan application provides multiple scanning modes including Full Auto, Home, Office and Professional Mode. As you can probably guess, the different modes add additional settings and adjustments to provide greater control of the final results. The screen shots below will show you the major difference in the controls each mode offers.
Overall, we were satisfied with the scanning quality of the Epson Perfection V19 scanner. As a USB 2.0 device, it won’t win any contests for speed. The scanner is rated at color 300 dpi at about 10 seconds and color 600 dpi at 30 seconds. We did not get anything close to those times/speeds. We found that the overall scanning time had as much to do with the size of the original photo as it did with the dpi of the scan.
We did all of our scanning using the Home Mode of the Epson software. For our first test, we scanned several old black and white photos all of which were about 4 x 3 but that size included a rather large white border around the edges. We did these cans at 96 dpi, which is the suggested pre-set for web or online viewing. Before you do the actual scan, you need to do a Preview scan. This took between 30 and 45 seconds. Once the preview was completed, the software allows you to make some minor corrections like rotate the image and crop it. Once that is done, you complete the actual scan, which took about the same time as the Preview scan.
One feature that we especially liked was the ability to place several prints on the scanner glass at the same time. The software had no trouble identifying the multiple prints and allowed us to crop each one individually. When we completed the actual scan, the software produced an individual file for each of the prints. Overall, we saw little difference in scanning time whether we scanned one or multiple prints so this could be a big time saver overall.
Next we scanned a large (8 x 10) color photo at 96 dpi, 300 dpi and 600 dpi. Times for the Preview scan was relatively the same regardless of the final resolution selected and averaged about 45 seconds. We also found that the final scan time between the 96 dpi and 300 dpi scans were very close at 39.35 seconds for the 96 dpi scan and 41.89 seconds for the 300 dpi scan. The 600 dpi scan took a little over two minutes to complete the final scan.
We scanned all of our pictures in the .jpeg format and the software did a nice job of compressing the final file. The 96 dpi file came in at 166 kb, the 300 dpi at 915 kb and the 600 dpi at 4 MB. As expected, we saw a significant improvement in image quality as we increased the dpi count of the final scan.
As you can see in the comparison below, the frame on the left, from the 96 dpi scan becomes very pixelated as we zoomed in on one area of the photo (a necktie). While the center photo at 300 dpi is better, the pattern of the necktie is much clearer on the right 600 dpi frame. That said, there is also more evidence of dust and marks at 600 dpi and while the Professional Mode of the software may have allowed us to correct that, we did not do another scan.

As a final test we scanned a small wallet size color photo at the 300 dpi setting. Like all of our other scans, the Preview scan too 43.15 seconds but the actual final scan took only 18.43 seconds. It’s clear that once you define the actual photo from the Preview scan panel, the scanner understands that it can stop scanning once it “sees” the final defined image.
Our test results didn’t present any real surprises although we would have expected the final scan time of the 96 dpi photo to be much shorter then the 300 dpi scan. Of course, we were probably bumping up against the limitations of the hardware itself so it just may not have been able to scan much faster than that, given the size of the original.
We were very pleased with the scanning quality and the results were what we would expect. For photos that will be seen on line without any enlargement, the 96 dpi scan is probably all you need. If we intended to print the photos, the 300 dpi works well but for any significant enlargement, whether for printing or on-line viewing, we would suggest nothing less than the 600 dpi setting.
For us, the “sweet spot” seems to be 300 dpi. The final size of the image file is not that much bigger than the 96 dpi file and the file on your computer will be large enough to leave you the option to print it in the future if you wish. We would have no objection to storing the 600 dpi photos at their larger size, especially given the massive storage we have available on our Drobo 5D (read our review here), but the significantly longer scan time makes us think twice about scanning a large volume of photos at that higher resolution.
To be fair, the Epson Perfection V19 Scanner is clearly an entry-level device and is intended for the occasional scanning project. If you are a professional photographer or have a massive print library to scan, there are other scanners in the Epson line up that would better suit your needs. In addition, the Epson Perfection V19 does not have the ability to scan negatives and if that is part of your collection you should consider a different Epson model.
The Bottom Line
The Epson Perfection V19 Scanner is a great entry level photo scanner for the occasional scanning project. The ability to scan multiple pictures at one time will save you some time but overall, this scanner is not very fast.
The small profile of the scanner and it USB power make this almost a portable scanner and could certainly fit in a backpack or other bag if you wanted to do some scanning remotely.
The Epson Scan software is a robust package and the multiple scanning modes lets you decide just how much control you want over the scanning process.
The Epson Perfection V19 Scanner is very affordable with an MSRP of $69.99 and is available with free shipping from Amazon. At that price, we think it’s worth having this scanner as part of your technology collection even if you only have a small quantity of photos that need to be scanned.
We wish to thank the folks at Epson for providing the Epson Perfection V19 Scanner for our review.
If you liked this article, please consider sharing it with your friends and leaving a comment below.
Also, don’t forget to “Like” us on Facebook and “Follow Us” on Twitter.
APPLE TECH TALKER

[…] back in 2016, we reviewed the Epson Perfection V19 flatbed scanner (read our review here). This was a great scanner designed to scan photos and documents, with a very affordable price […]