
Over the years, we have tried several different desk lamps. While most of them worked well, we always had the same complaints. They either took up too much valuable space on our desk, or we could never position them in just the right location. We had just about given up hope. But then we discovered the Quntis Computer Monitor Light, which may just be the perfect solution if you need additional desk lighting without sacrificing precious desktop space.
Disclosure: Apple Tech Talk participates in various affiliate marketing programs and may receive compensation if you purchase a product through one of our links, and/or in the form of product donations from the companies whose products we review . Unless otherwise specifically stated, Apple Tech Talk does not receive any other compensation for its reviews. The opinions expressed are based solely on our independent testing, are our own and are not shared with anyone prior to release on our site.
Apple Tech Talk Scorecard
| Pros | Cons |
| Excellent design for secure fit | No USB-C adapter included |
| Long power cord included | Takes the space used by a web cam |
| Excellent lighting controls |
Quntis Computer Monitor Light – Unboxing
When we first heard about the Quntis Computer Monitor Light, we didn’t really know what to expect. It wasn’t until we opened the box that we got excited about our opportunity to check it out.
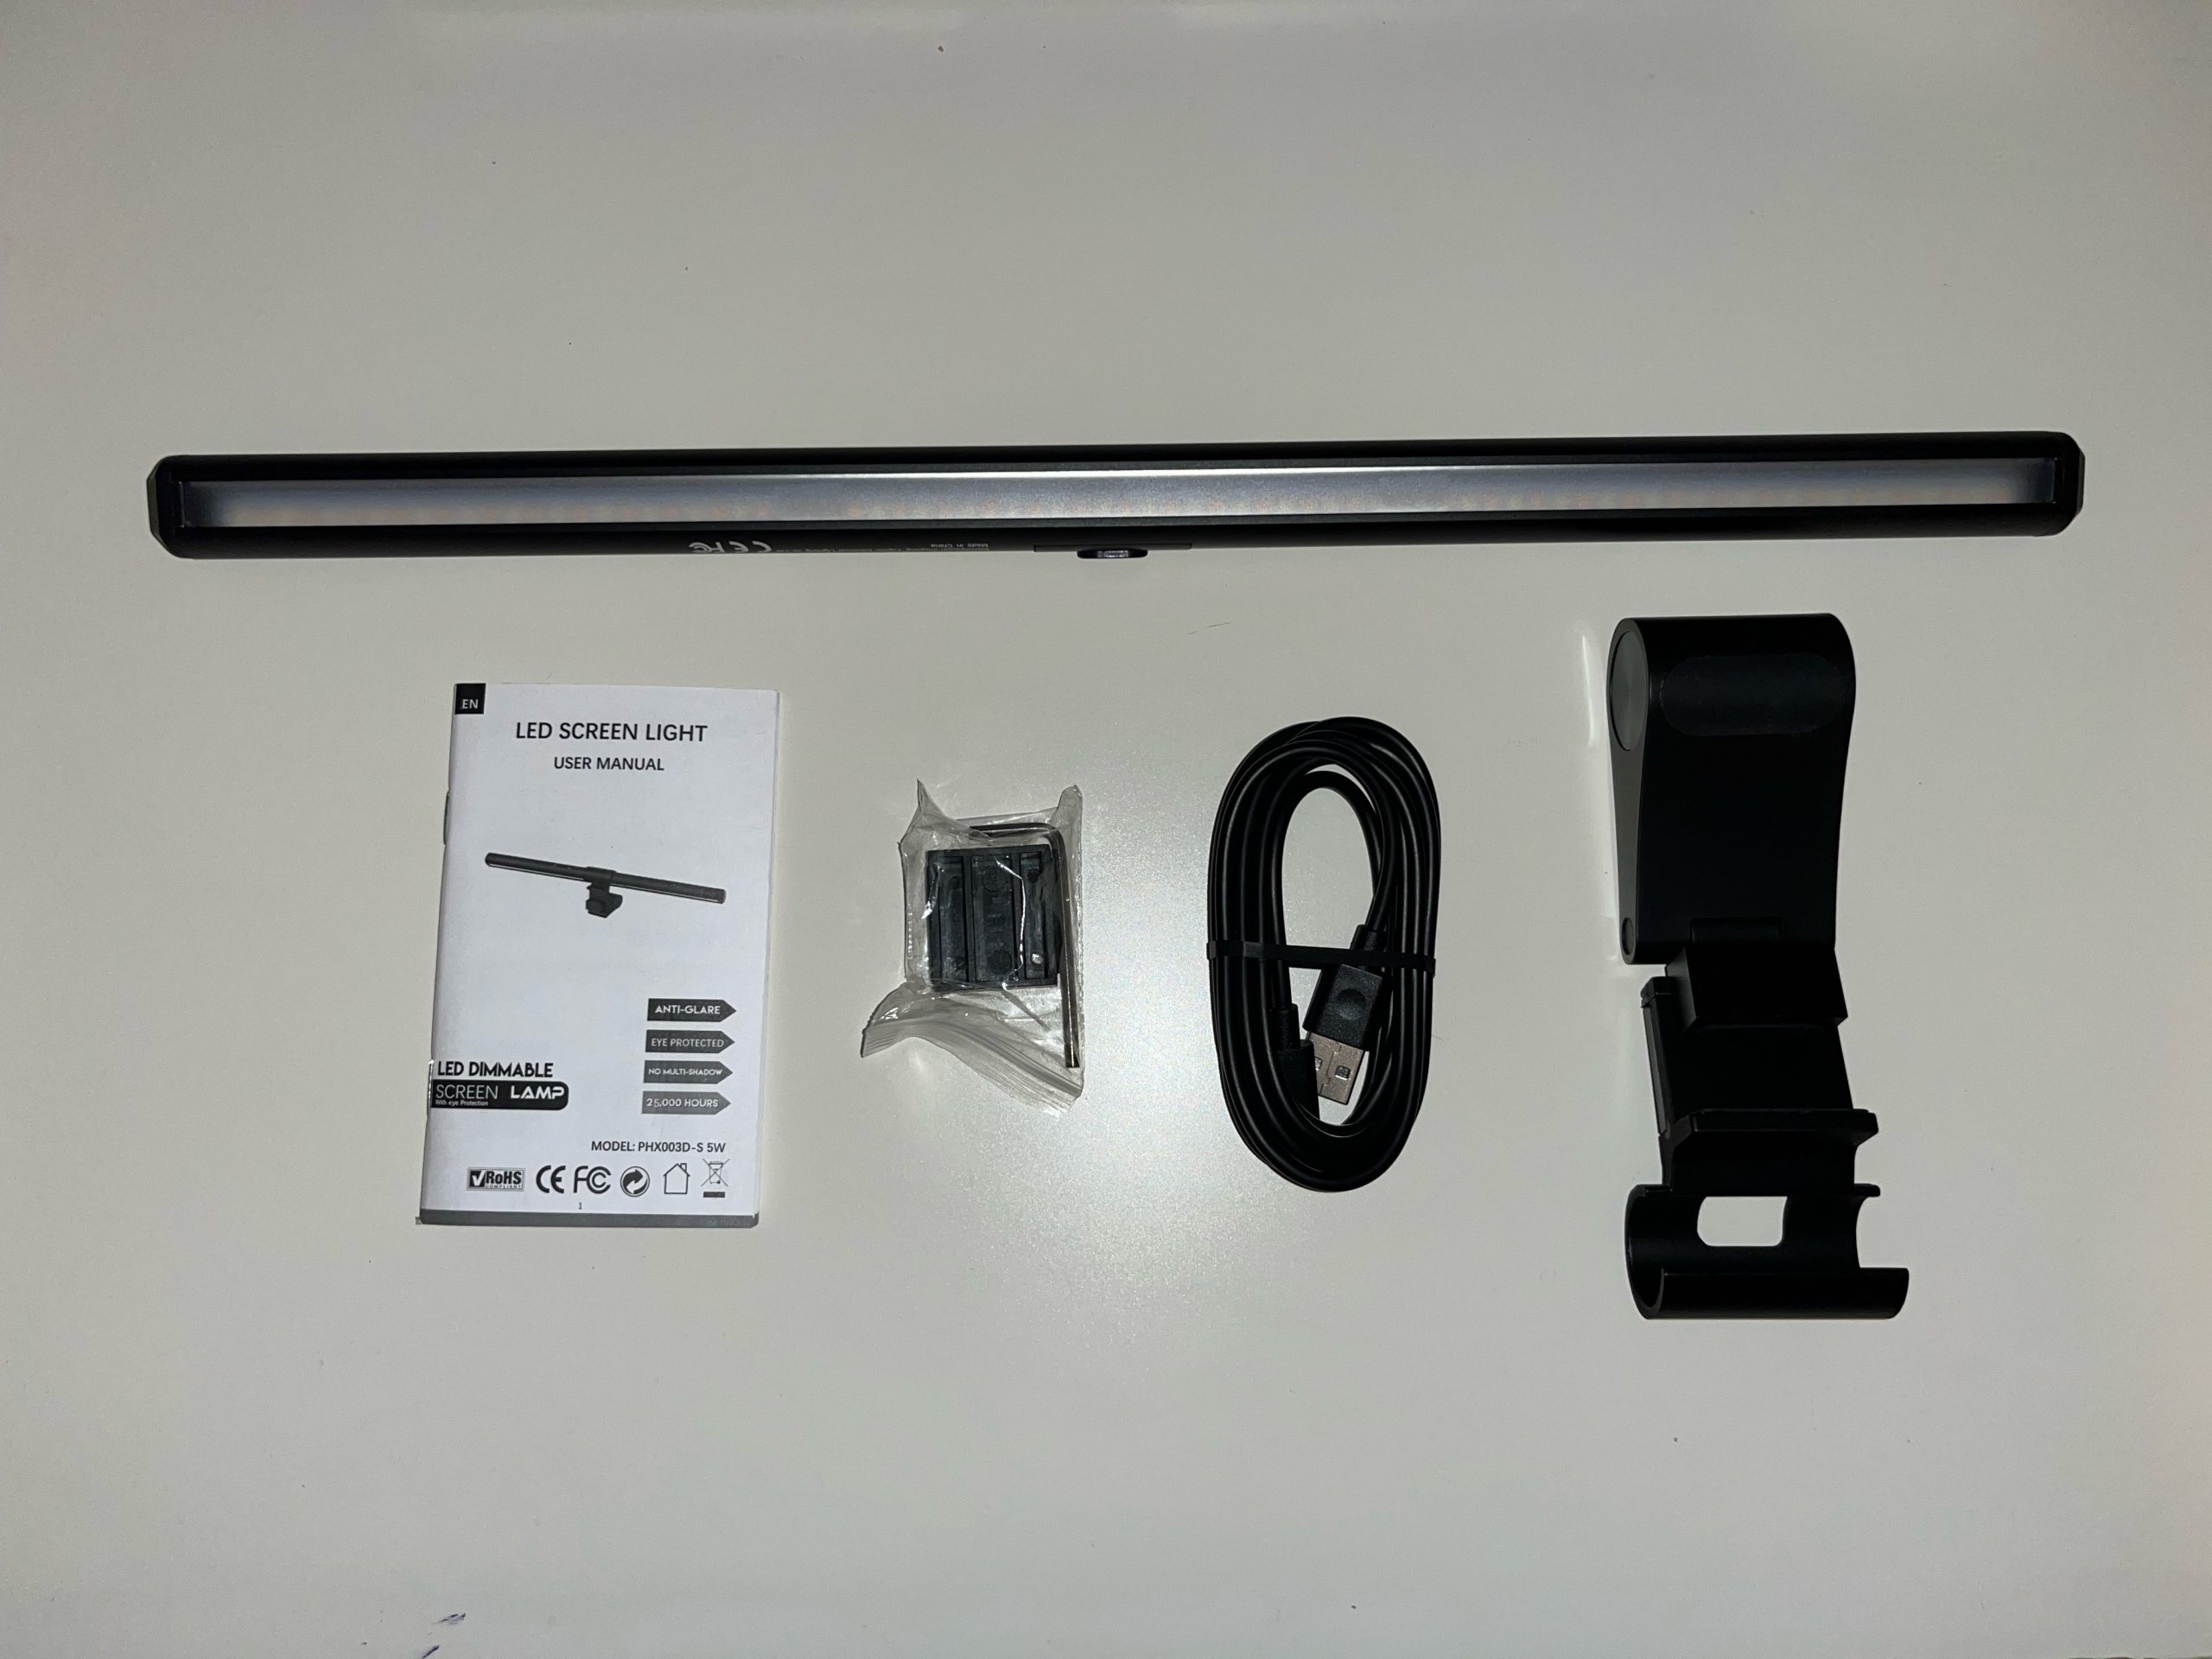
In the box is the Quntis Computer Monitor Light (Model #: PHX003D-S 5W), a USB-C to USB-A power cord, a parts bag with a monitor spacer and an Allen wrench and a User Manual.
The light bar is made from an aluminum alloy and measures 15.7” long x 0.78” high x 0/78” deep. The light bar is basically round but has flat surfaces on the top edge where all of the touch controls are located.
It can be powered by any power source that provides DC 5V-1A and a maximum wattage of 5W, and produces a Illuminance ≥700 lux.
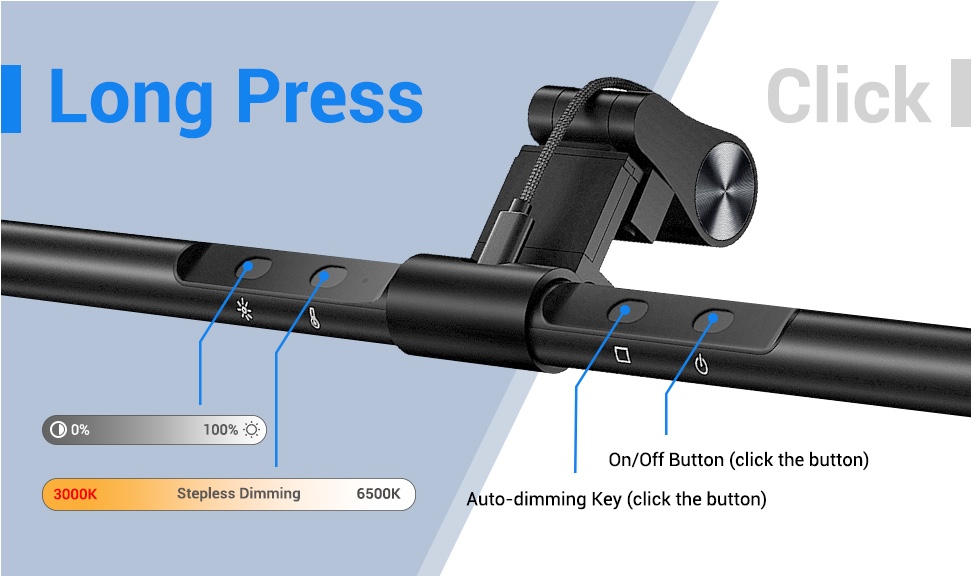
Speaking of touch controls, there are four (4) touchpads on the top edge which include an On/Off button and an Auto-Dimming Sensor button which are both touch to activate buttons. On the left side of the bar are touch controls for light dimming and color temperature. These can either be pressed to step through the choices, or you can press and hold for an almost limitless transition of color between 3000K and 6500K and 0% – 100% brightness.
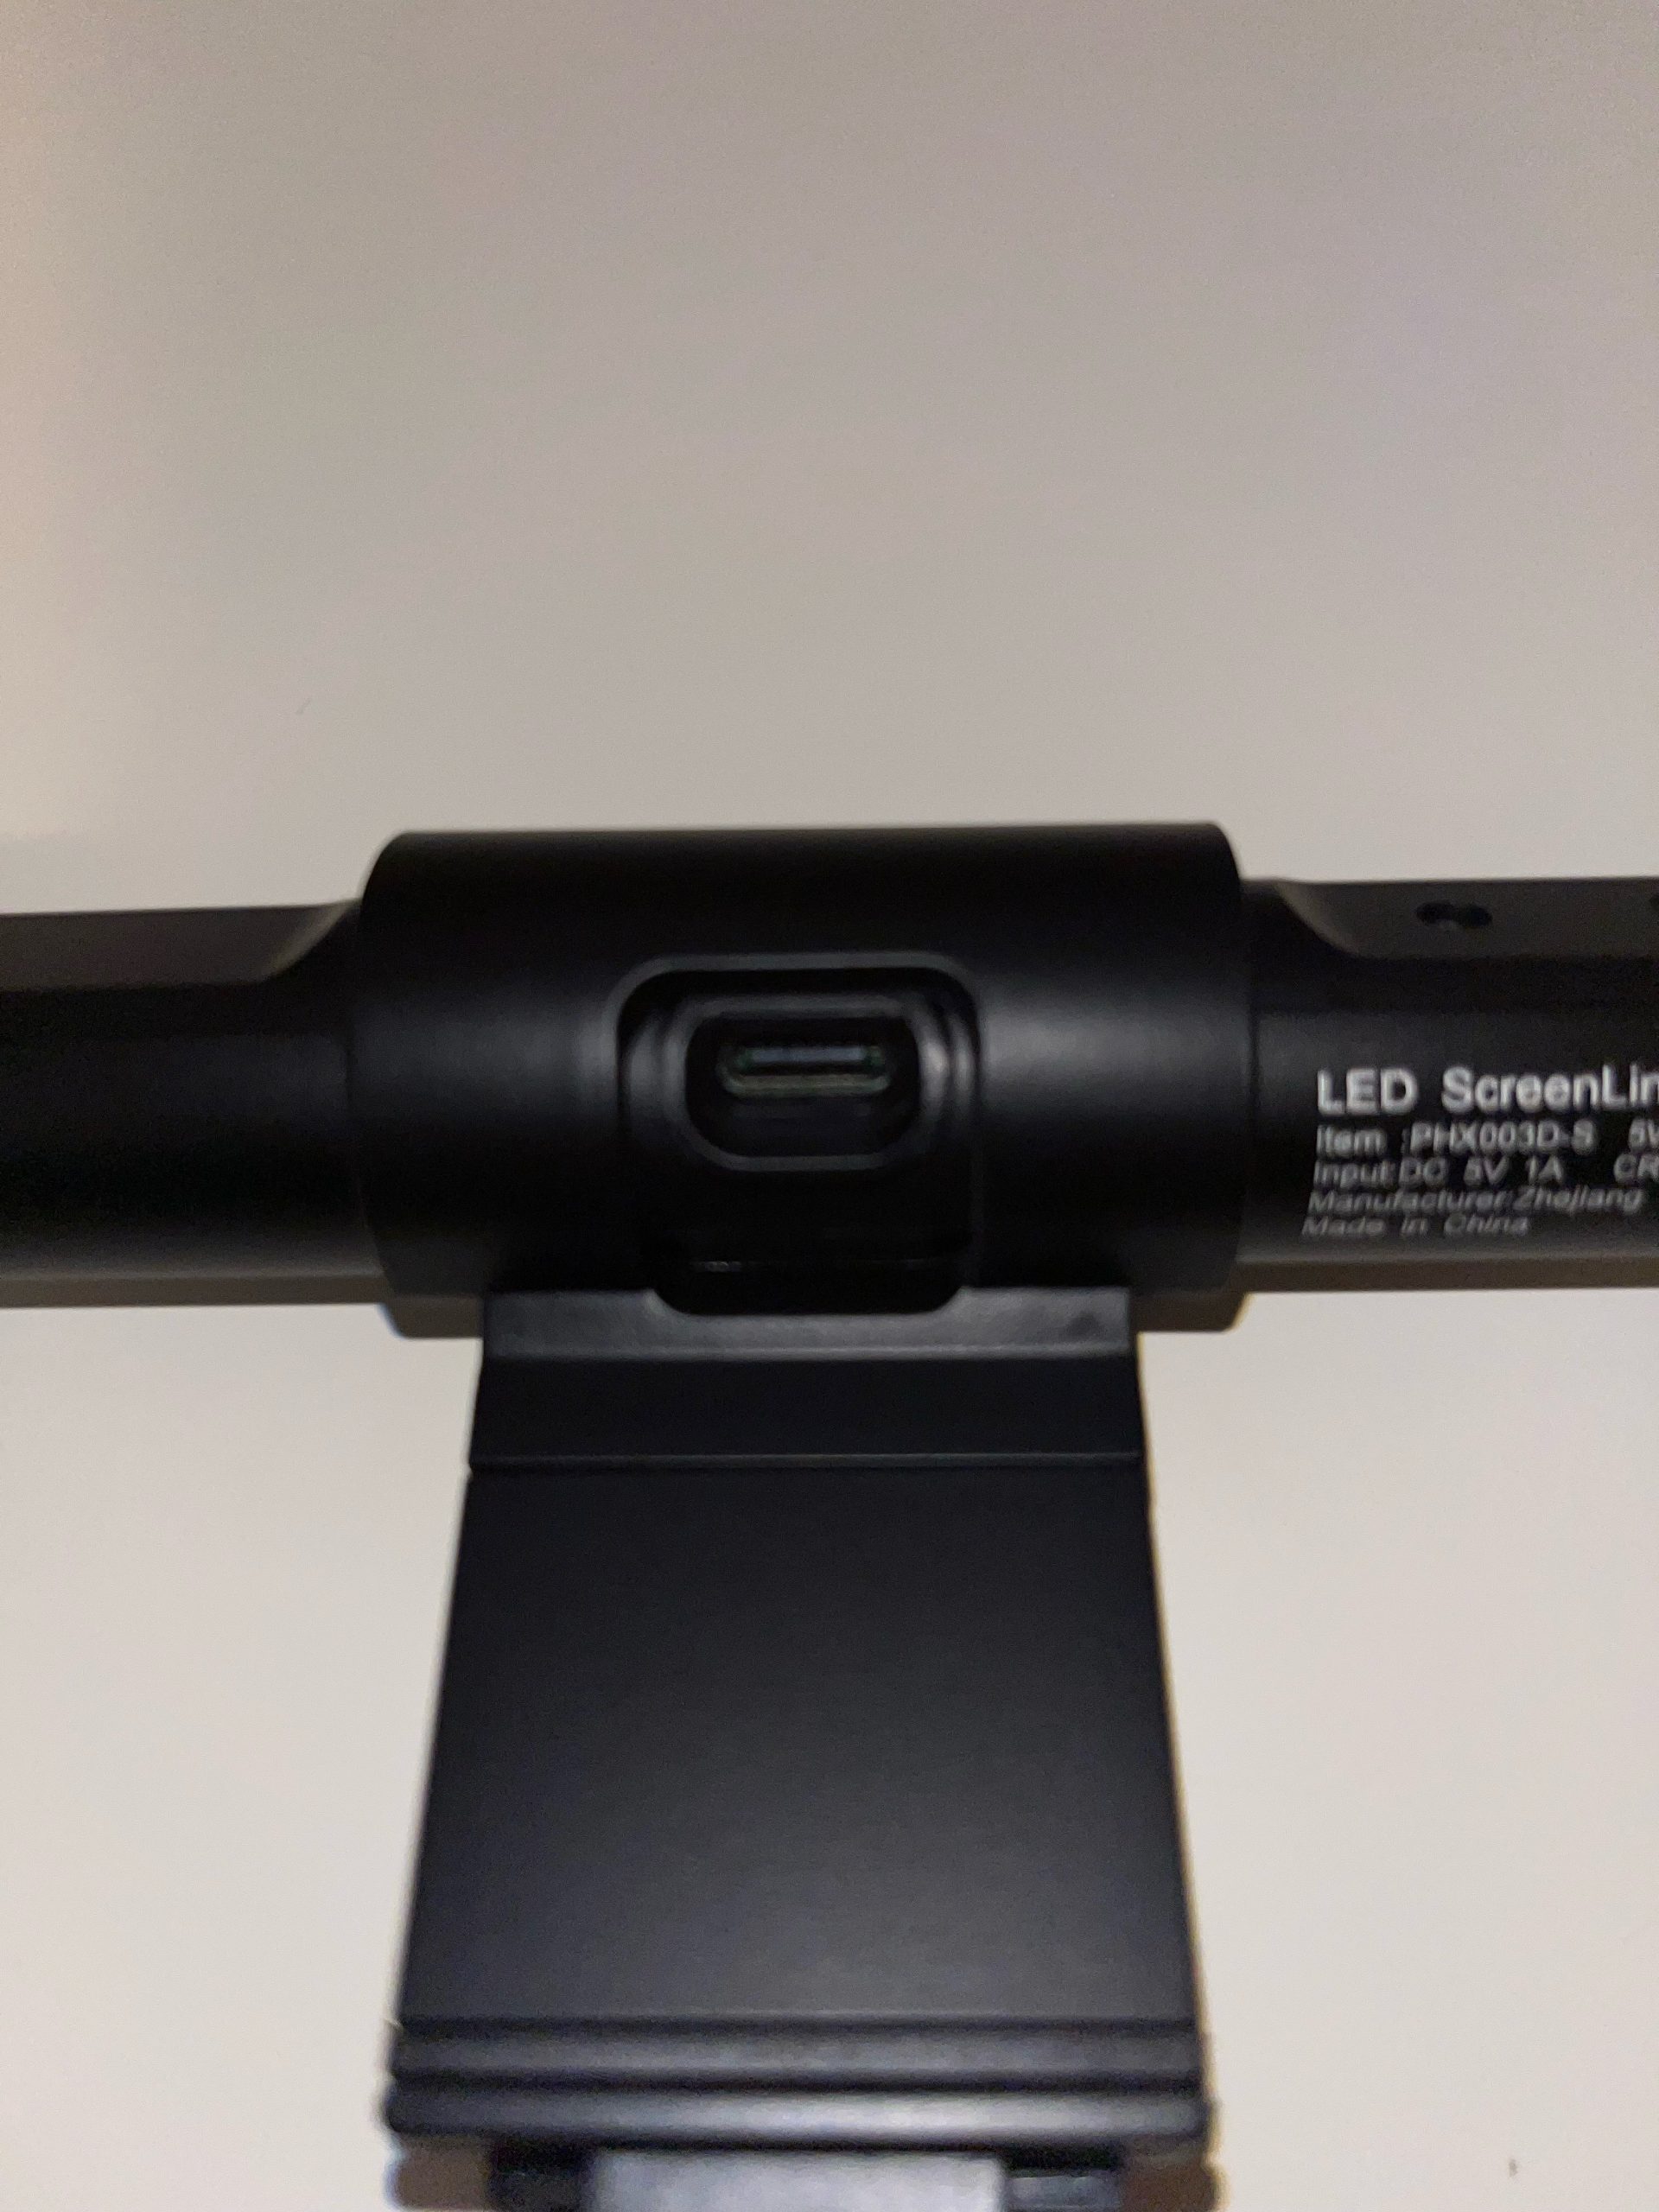
On the back edge of the light bar is a USB-C outlet. This is where you connect the includes USB-C to USB-A cable to power the light bar. We appreciate that the included cable measures 6.6 ft (2 meters) long, This is certainly long enough to reach any USB outlet you may have on your desk or to a USB power brick in a nearby electrical outlet.
In our case, we have a powered USB hub connected to our MacBook Pro. The hub has both USB-C and USB-A so we had no problem finding a power connection for the Quntis Computer Monitor Light. That said, many more modern power bricks come only with a USB-C port, in which case, you will need to provide your own cable or use a USB-A to USB-C adapter. Quntis may want to consider including such an adapter.
Quntis Computer Monitor Light – Set-up
Setting up the Quntis Computer Monitor Light was not difficult, but we definitely recommend reviewing the User Manual before you start.
Included with the Quntis Computer Monitor Light is a weighted bracket. The curved end of the bracket is designed to slip over the center section of the light bar and has a cut-out that provides access to the USB-C port on the back of the light bar. The User Manual is very clear that you should work the clip over the light bar, rather than slide it from the side. At first, we were a little concerned that we would break the clip so take your time and ease it over the bar, and you should not have any trouble.
The Quntis Computer Monitor Light also comes with two (2) spacers. One is preinstalled on the bracket and one (the larger of the two), is included in the accessory bag. These spacers are intended to secure the fit of the bracket on your monitor.
The mounting bracket has a small plastic lip on the front edge. The spacer slips on to the rear of the bracket. The bracket is spring loaded between the front and rear. To install the bracket on to the top of your monitor, pull back on the rear of the bracket to spread the front edge from the spacer, slip the bracket onto the monitor and release the spring. This allows the spacer to rest against the rear degree of the monitor.
If you have a thinner monitor, try using the larger spacer to take up any gap. In our case, the monitor has a wider top edge and we didn’t use a spacer at all, which turned out to be a perfect fit.
Once you have set the correct width, bend the counterweight down to balance the light bar on your screen.
This whole process is much easier than it may sound, and it only took us a couple of minutes to get the light bar set up on our monitor.
You can see in the picture above, that the light bar is tilted towards our screen. The opening on the mounting bracket is slightly larger than the USB-C port and gives you the ability to rotate the light bars lightly. But be careful. You need to make sure you do not put too much pressure on the light bar or the bracket. Also, we found it is easier to adjust if you remove the light bar from the monitor and unplug the power cable.
Quntis Computer Monitor Light – Test Results
We were pleasantly surprised at the results we got from the Quntis Computer Monitor Light.
We found that it not only covers the screen with light but lights up the working surface on our desk, without taking up any space at all. Here are some examples of how the Quntis Computer Monitor Light enhances the work area;

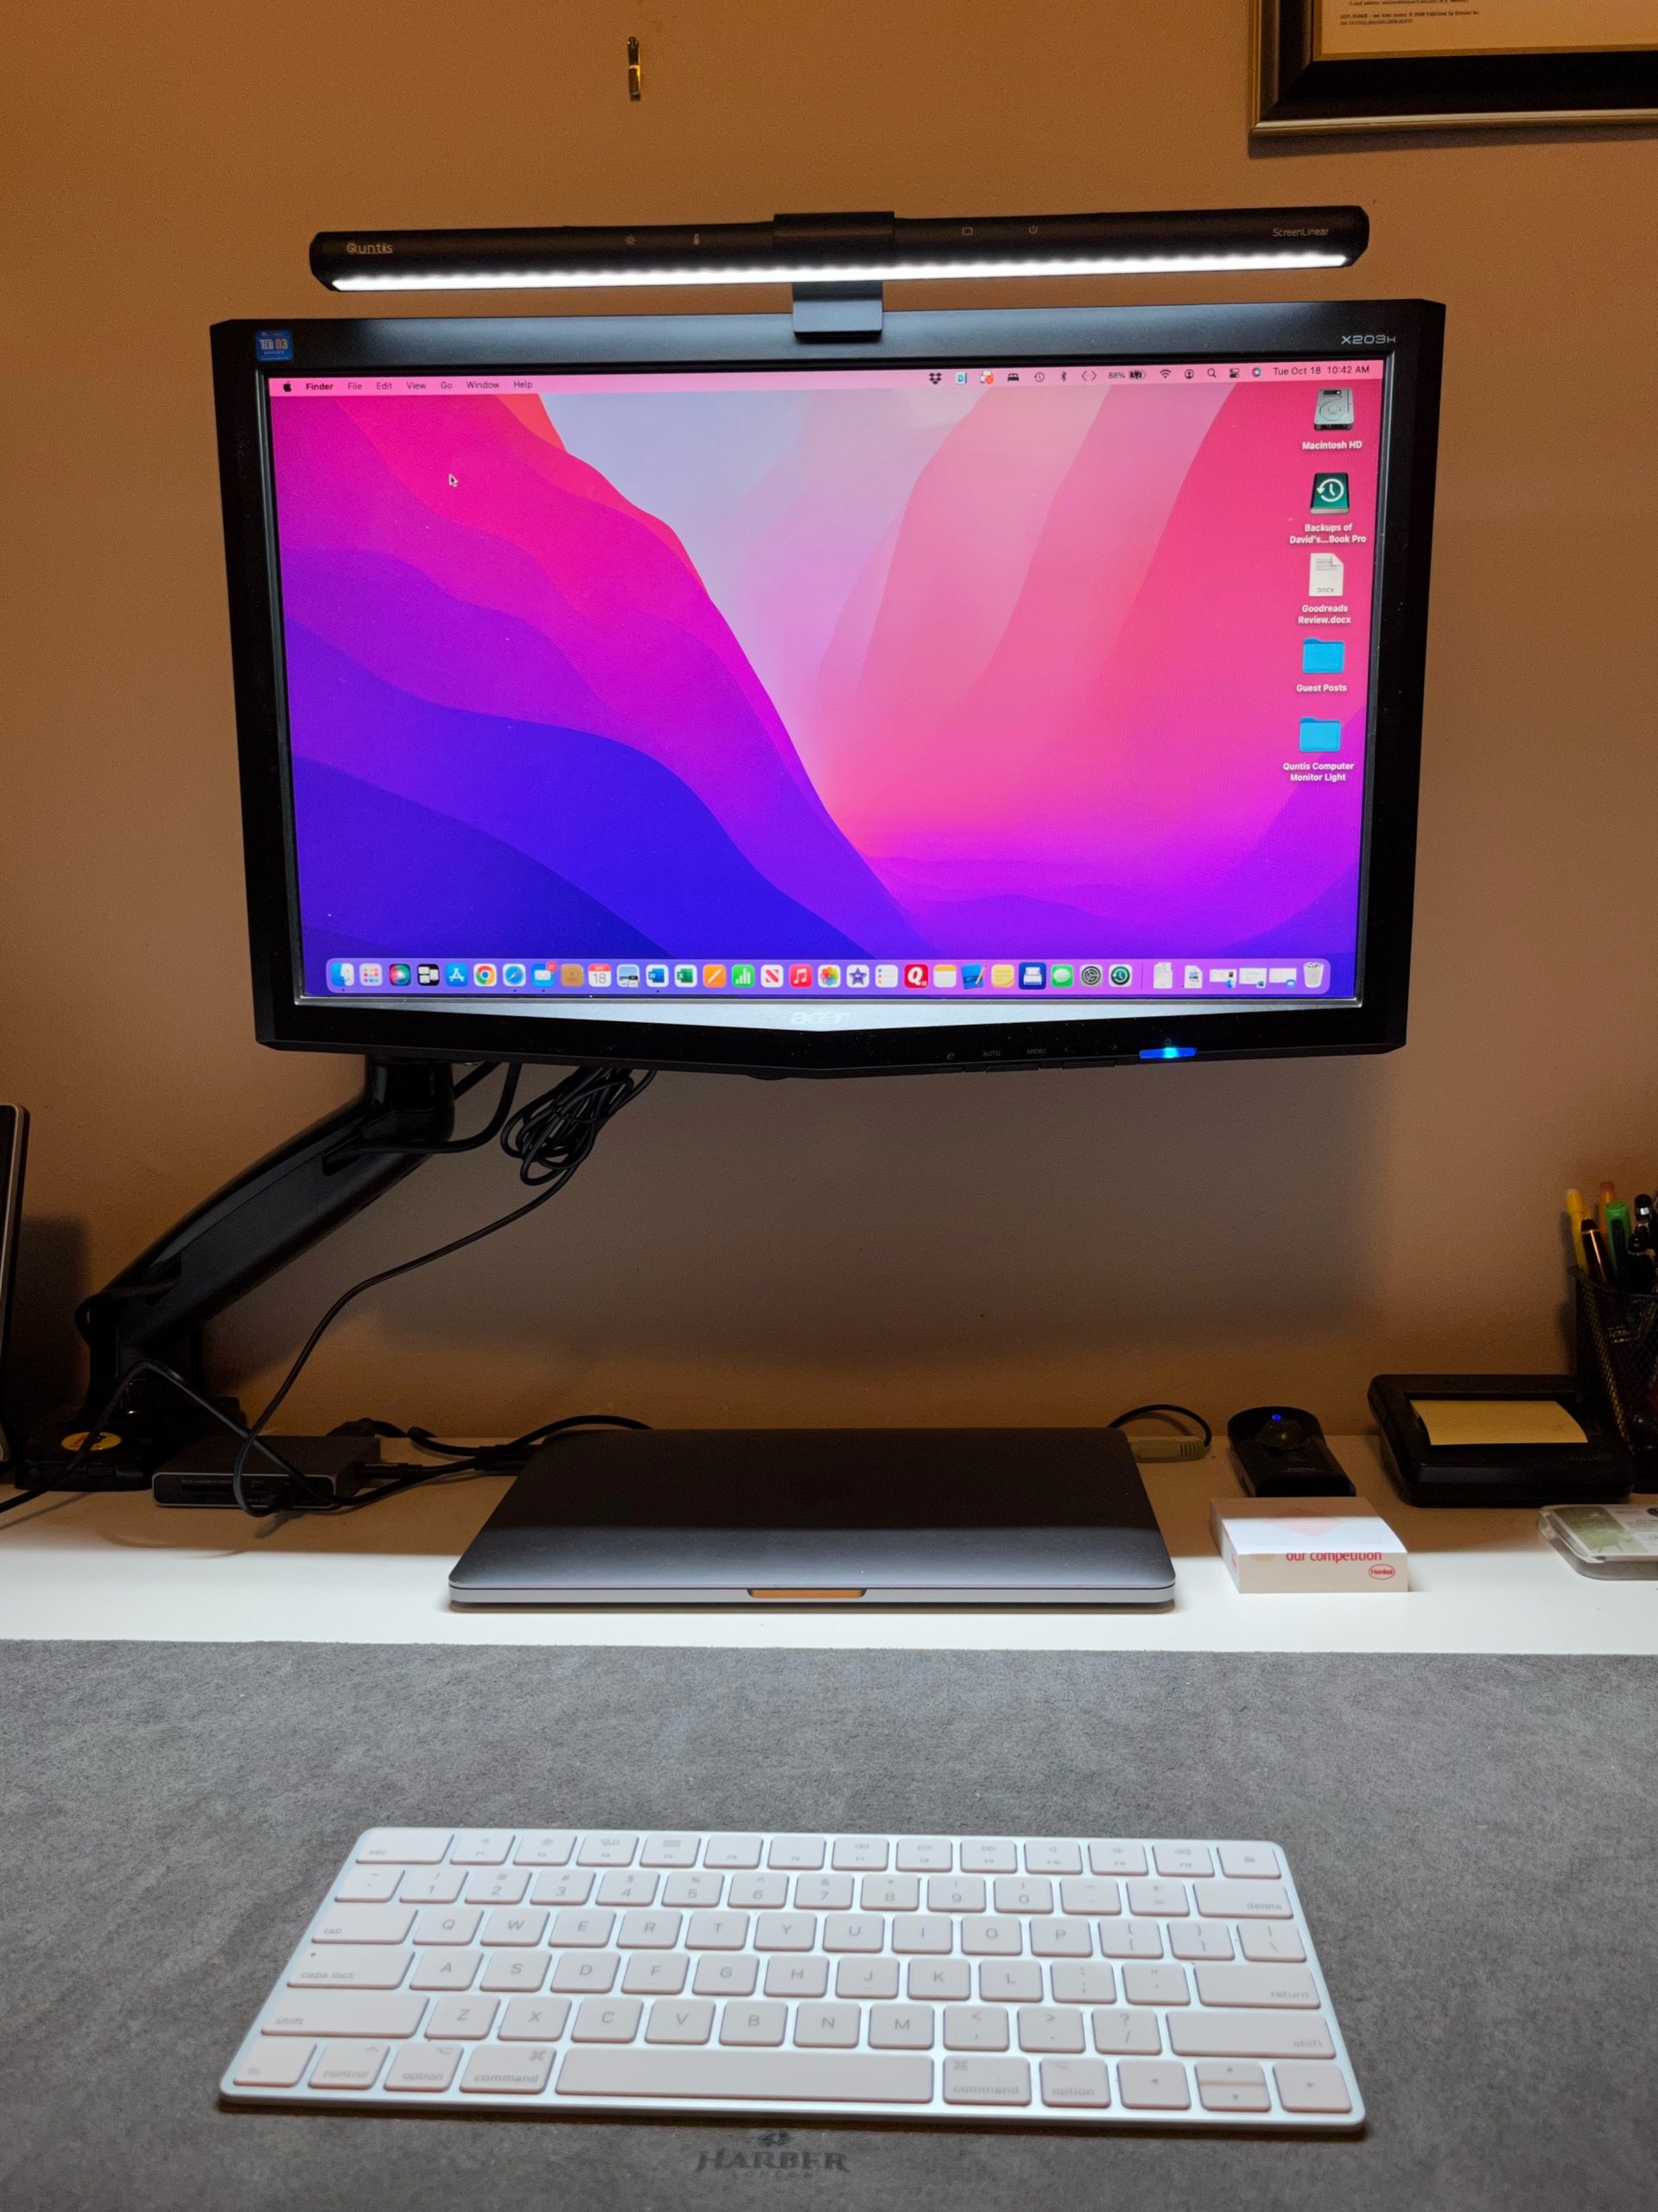
On the left is our desk with only the normal room lighting and the Quntis Computer Monitor Light turned off. We have used this set-up for years and was generally satisfied.
On the right is the same room lighting but with the Quntis Computer Monitor Light turned on.. Notice that the monitor has more brilliance and that the colors on the screen are richer. More importantly, notice the lighting on the keyboard and the area between the keyboard and our MacBook Pro. The entire area is more evenly lit and in those times when we use both our external monitor and our laptop screen, the lighting is much more even.
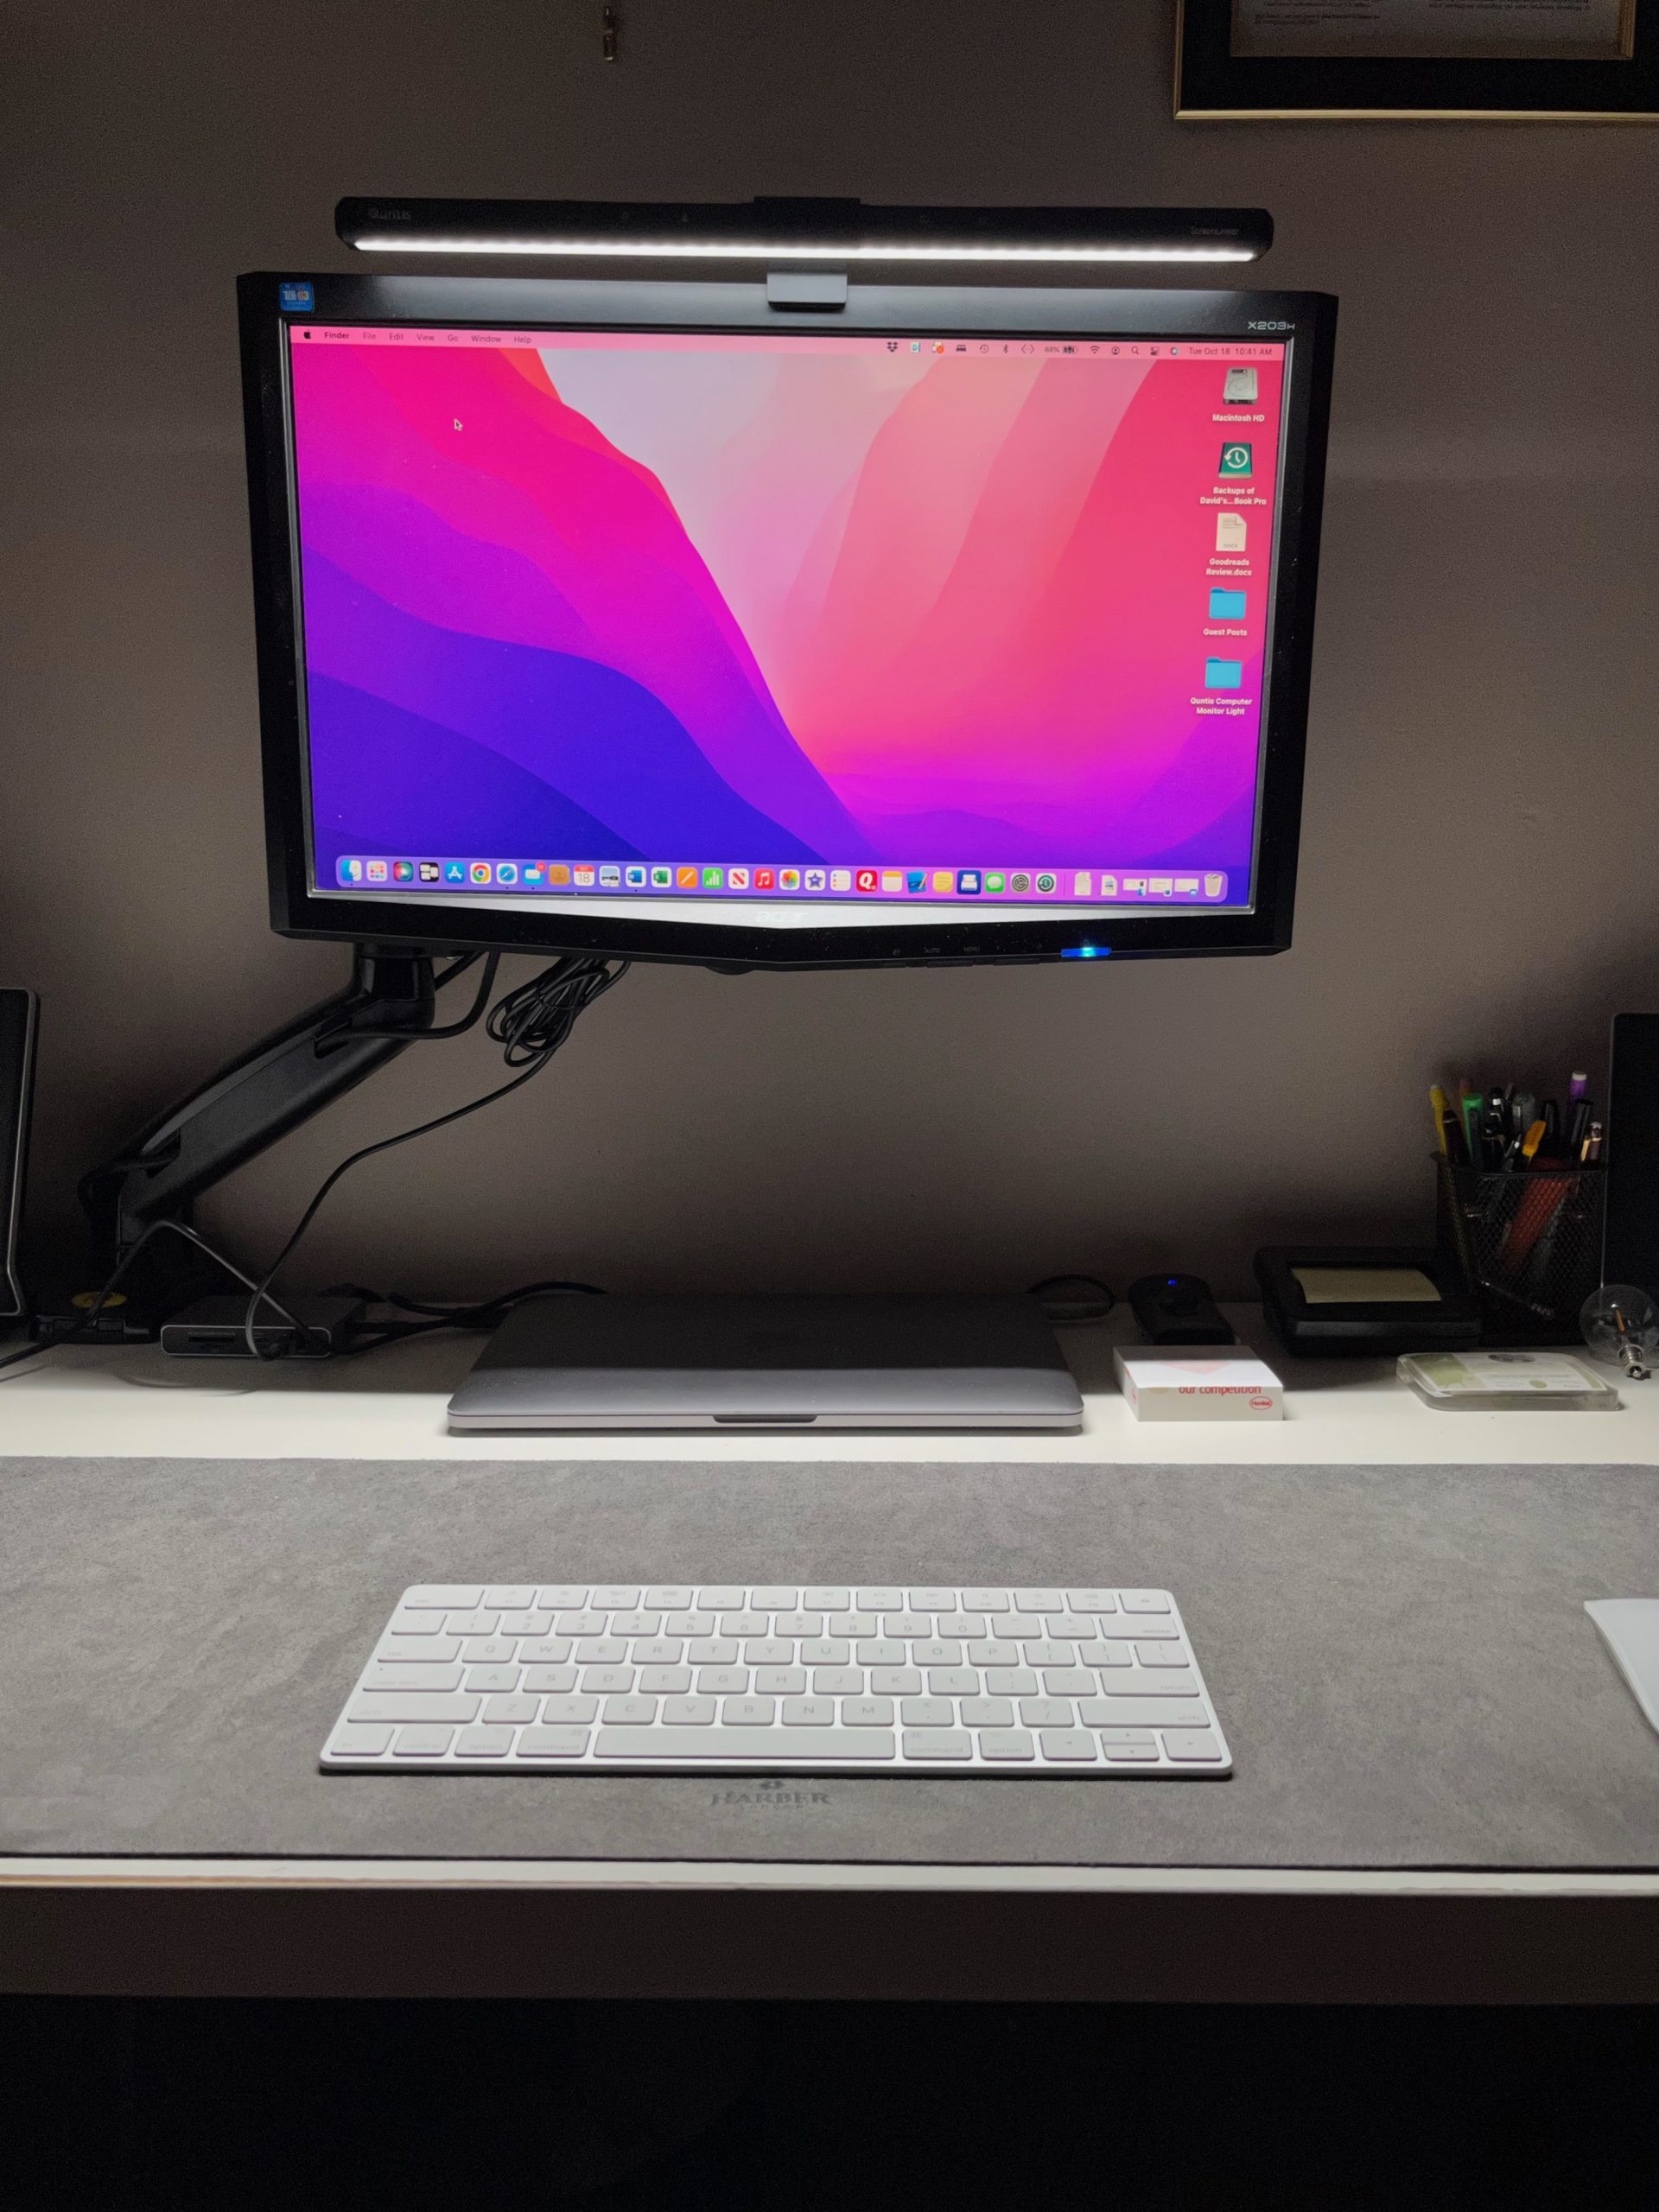
We also wanted to see what would happen in a room with poor ambient lighting.
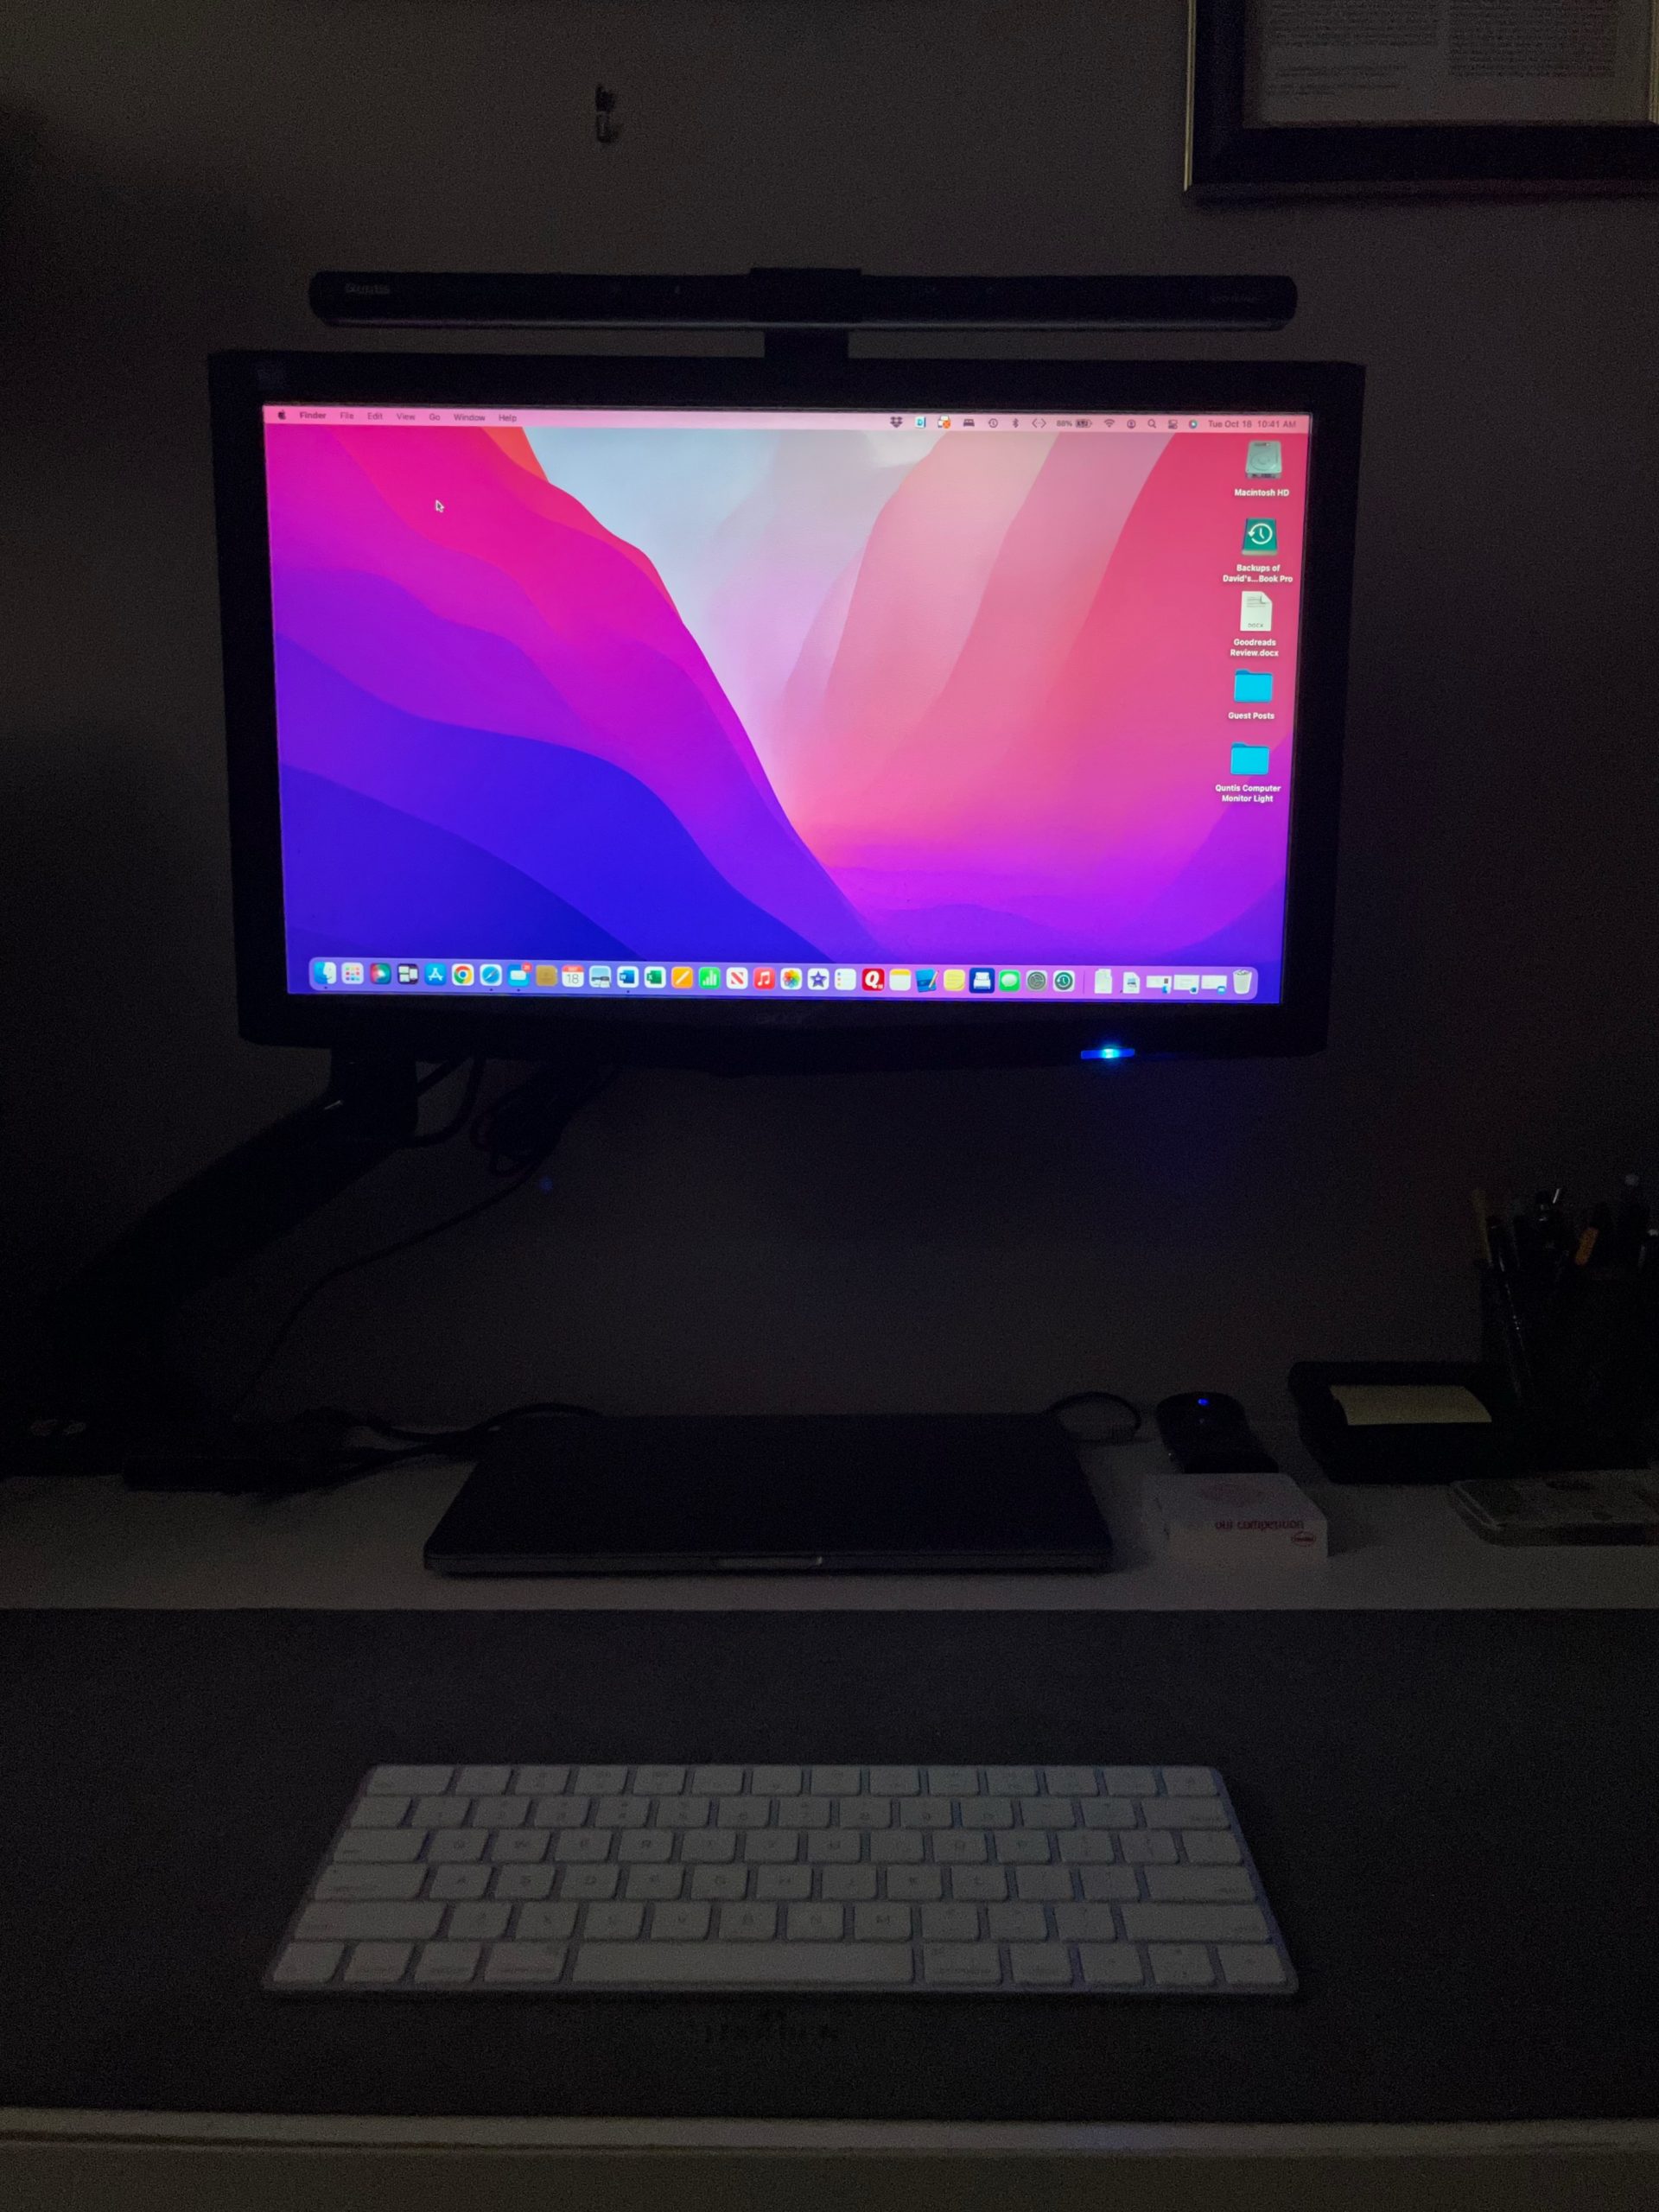
While admittedly extreme, on the left is our office with the overhead lighting turned off. While the monitor is clearly visible, the work surface and keyboard are too dark to be usable.
On the right is the same dark room but with the Quntis Computer Monitor Light turned on. Once again, the keyboard and work surface is well lit and we had no trouble working, “in the dark.”
We should also note that you can see in the photos that the light bar is facing outward slightly. After we did this test we rotated the light bar, as described above, to be more at a 90 degree angle. This didn’t change the over light pattern but did reduce some of the glare in our eyes.
The light bar also has an integrated light sensor which you can turn off and on as desired. The purpose of the light sensor is to adjust the output of the light bar based on the amount of ambient light in the room. In our testing we did notice some very subtle changes in the light output if we darkened the room with the sensor activated. Turning the room lights back on dimmed the lights accordingly.
Our only complaint, and we’re not really sure this qualifies as a complaint, is that with the Quntis Computer Monitor Light mounted on our monitor, we have lost the ability to place our external web cam on the monitor, since they occupy the same area at the top of the monitor.
Of course while it is easy enough to remove the light bar and place the web cam on the monitor, it would be nice to be able to use both at the same time. This is especially true now that Apple has released Center Stage for the iPhone 14 Pro, which allows you to show your desktop on a Face Time call.
The Bottom Line
A monitor light bar is something we would never have considered using, mostly because we hadn’t heard from them. After trying the Quntis Computer Monitor Light, we don’t think we can ever be without one again.
With its easy installation, extra-long included power cord, variable brightness and color temperature levels, it is sure to meet anyone’s lighting needs.
Most importantly, we love that it doesn’t take up any rom on our desk. Between our MacBook Pro, external keyboard and mouse, desk supplies and speakers, desktop real estate is at a premium. The Quntis Computer Monitor Light gives us the extra lighting we need, without getting in the way.
The Quntis Computer Monitor Light comes with 12 months worry-free product support and carefree customer service, and is available from Amazon.
For a limited time, Apple Tech Talk readers can get 10% off of your purchase by using the promo code HU5LB4J3 at checkout.
We would like to thank the folks at Quntis for providing the Quntis Computer Monitor Light for our testing and review.
What kind of lighting do you use on your desktop? Do you thing the Quntis Computer Monitor Light is a good idea? Why not join the conversation and leave a comment below?
If you liked this article, please consider sharing it with your friends and leaving a comment below. Also, don’t forget to “Like” us on Facebook and add the Apple Tech Talk channel to your Apple News app.
Apple Tech Talker

[…] in October, we introduced you to the Quntis Computer Monitor Light (read our full review here.) This is the perfect addition to any desk that has a laptop or standard external monitor. But […]