
With the Coronavirus continuing to dominate the news, many companies, including Apple are taking steps to reduce traffic in their stores. Many of the Today at Apple classes have been cancelled, chairs at the Genius Bar are being removed to reduce the number of people congregating in the stores and customers at retail stores are no longer being offered the opportunity to try on an Apple Watch or AirPods. In some areas, Apple has closed retail stores, although none in the United States yet. For many people, even if they can still go to an Apple retail store, they would prefer not to for fear of coming in contact with a potentially infected person.
With all of these barriers, if you have an issue with your Mac, iPhone or iPad and need help, what can you do? In many instances, there are some simple things you can do on your own to resolve problems.
The information below was taken from Apple’s official Support pages and is reprinted here for convenience.
iPhone
If your iPhone is running slow, freezes or is otherwise acting strange, your problems can often be resolved by doing a reset of the device. Depending on your iPhone model, there are different ways to do that.
How to restart your iPhone X or 11
- Press and hold either volume button and the side button until the power off slider appears.
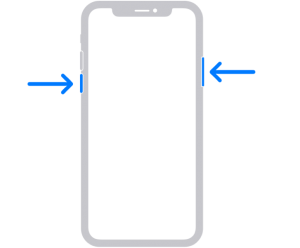
- Drag the slider, then wait 30 seconds for your device to turn off.
- To turn your device back on, press and hold the side button (on the right side of your iPhone) until you see the Apple logo.
How to restart your iPhone 8, 7, or 6
- Press and hold the side button until the power off slider appears.

- Drag the slider, then wait 30 seconds for your device to turn off.
- To turn your device back on, press and hold the side button until you see the Apple logo.
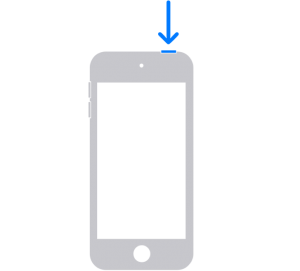
How to restart your iPhone SE, 5, or earlier

- Press and hold the top button until the power off slider appears.
- Drag the slider, then wait 30 seconds for your device to turn off.
- To turn your device back on, press and hold the top button until you see the Apple logo.
iPad
How to restart an iPad that has Face ID

- Press and hold either volume button and the top button until the power
off slider appears.
- Drag the slider, then wait 30 seconds for your device to turn off.
- To turn your device back on, press and hold the top button until you see the Apple logo.
How to restart an iPad that has a Home button
- Press and hold the top button until the power off slider appears.

- Drag the slider, then wait for 30 seconds for your device to turn off.
- To turn your device back on, press and hold the top button until you see the Apple logo.
iPod Touch
How to restart your iPod touch
- Press and hold the top button until the power off slider appears.
- Drag the slider, then wait 30 seconds for your device to turn off.
- To turn your device back on, press and hold the top button until you see the Apple logo.
You can view Apple’s official Support page here.
Restore From a Backup
If your problem occurred right after you did a software update and the rest did not resolve your issues, it may make sense to restore your device to a prior state (i.e. the older iOS) and either retry the install or wait for the next release, in case there is an issue with the OS itself.
Here is what Apple suggests to restore your device.
Restore your device from an iCloud backup
- Turn on your device. You should see a Hello screen. If you already set up your device, you need to erase all of its content before you can use these steps to restore from your backup.
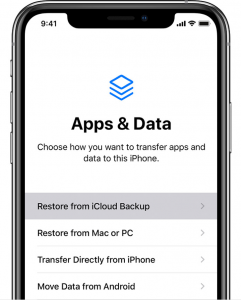
- Follow the onscreen setup steps until you reach the Apps &
Data screen, then tap Restore from iCloud Backup.
- Sign in to iCloud with your Apple ID.
- Choose a backup. Look at the date and size of each and pick the most relevant. After you choose, the transfer starts. If a message says that a newer version of software is required, follow the onscreen steps to update (If you don’t see onscreen steps to help you update, learn what to do).
- When asked, sign in with your Apple ID to restore your apps and purchases (If you’ve purchased iTunes or App Store content using multiple Apple IDs, you’ll be asked to sign in to each). If you can’t remember your password, you can tap Skip this Step and sign in later. But you won’t be able to use the apps until you sign in with your Apple ID.
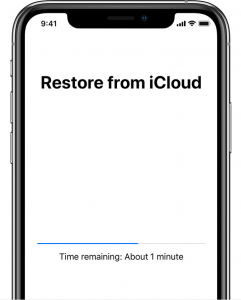
- Stay connected and wait for a progress bar to appear and complete. Depending on the size of the backup and the network speed, the progress bar might need a few minutes to an hour to complete. If you disconnect from Wi-Fi too soon, the progress will pause until you reconnect.
- Now you can finish setup and enjoy your device. Content like your apps, photos, music, and other information will continue to restore in the background for the next several hours or days, depending on the amount of information there is. Try to connect often to Wi-Fi and power to let the process complete.
Restore your device from a backup on your computer
- On a Mac with macOS Catalina 10.15, open Finder. On a Mac with macOS Mojave 10.14 or earlier, or on a PC, open iTunes.
- Connect your device to your computer with a USB cable.* If a message asks for your device passcode or to Trust This Computer, follow the onscreen steps. If you forgot your passcode, get help.
- Select your iPhone, iPad, or iPod touch when it appears in the Finder window or iTunes. If your device doesn’t appear, learn what to do.
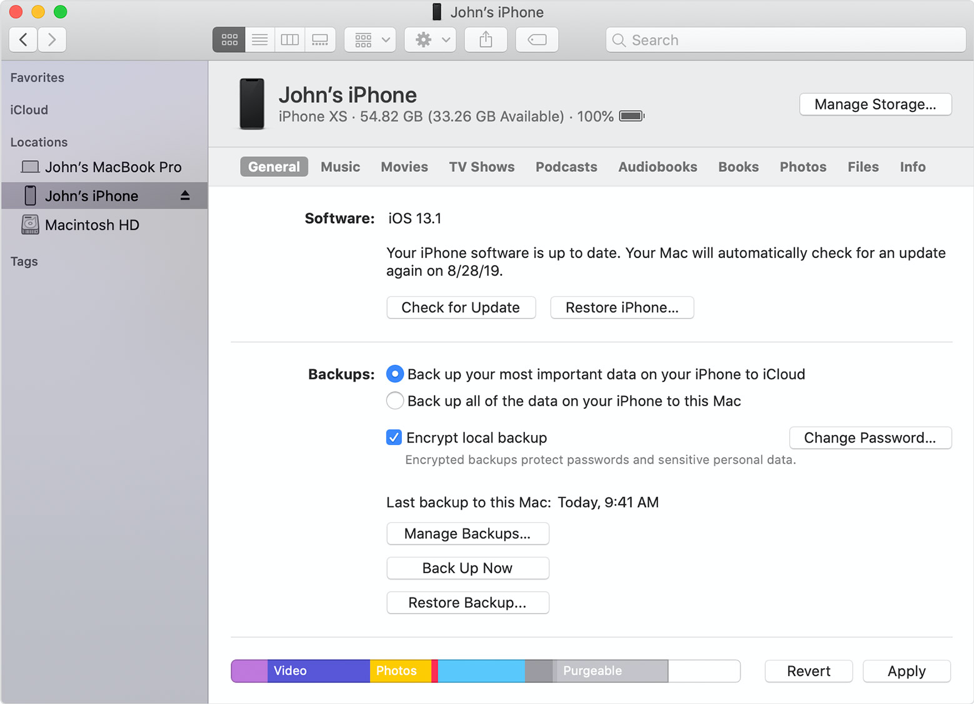
- Select Restore Backup. If a message says that your device’s software is too old, learn what to do.
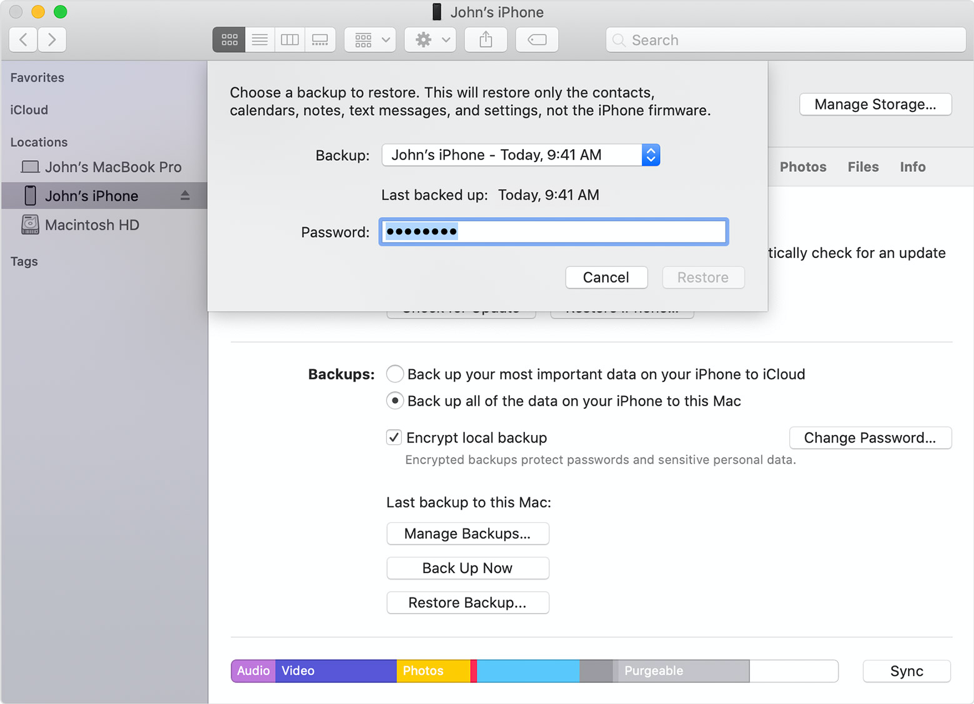
- Look at the date of each backup and pick the most relevant.
- Click Restore and wait for the restore time to finish. If asked, enter the password for your encrypted backup.
- Keep your device connected after it restarts and wait for it to sync with your computer. You can disconnect after the sync finishes.
- Get help restoring from a backup.
You can view the Apple’s official Support page here.
Reset You Mac
If your Mac is acting strange, resetting the NVRAM can often cure many minor problems. Here is how to do it.
Reset NVRAM or PRAM on your Mac
If your Mac has issues related to settings stored in NVRAM or PRAM, resetting it might help.
NVRAM (nonvolatile random-access memory) is a small amount of memory that your Mac uses to store certain settings and access them quickly. PRAM (Parameter RAM) stores similar information, and the steps for resetting NVRAM and PRAM are the same.
Settings that can be stored in NVRAM include sound volume, display resolution, startup-disk selection, time zone, and recent kernel panic information. The settings stored in NVRAM depend on your Mac and the devices that you’re using with your Mac.
If you experience issues related to these settings or others, resetting NVRAM might help. For example, if your Mac starts up from a disk other than the one selected in Startup Disk preferences, or a question mark icon briefly appears before your Mac starts up, you might need to reset NVRAM.
How to reset NVRAM

Shut down your Mac, then turn it on and immediately press and hold these four keys together: Option, Command, P, and R. You can release the keys after about 20 seconds, during which your Mac might appear to restart.
- On Mac computers that play a startup sound, you can release the keys after the second startup sound.
- On Mac computers that have the Apple T2 Security Chip, you can release the keys after the Apple logo appears and disappears for the second time.
- If your Mac has a firmware password, you must turn it off before trying to reset NVRAM.
When your Mac finishes starting up, you might want to open System Preferences and adjust any settings that were reset, such as sound volume, display resolution, startup disk selection, or time zone.
You will find the official Apple Support page here.
Other Resources
If none of those fixes work, or you have a specific issue you need to address, check out the Apple Support pages at: https://support.apple.com. There you can search all kinds of topics for all Apple products and get other tips and tricks to help solve your problems.
If that still doesn’t help, check out the Apple Communities at: https://discussions.apple.com/welcome. There you will find almost limitless topics and answers. While most participants in the Communities are regular Apple Users, they have years of experience as Apple Users and are always eager to help solve problems.
AppleCare
If your Apple device is still under the original warranty or covered by AppleCare, help is just a click or phone call away. You can go online to: https://getsupport.apple.com or call them at: 1-800-APLCARE. You can speak or chat with an authorized Apple representative who can help diagnose and often resolve your issues quickly. In the event your device needs service, they can assist you in scheduling a visit to a nearby Apple Retail Store or Authorized Apple Repair Center, or setting up mail-in service for you.
The Bottom Line
We all love our Apple products, in part because of how reliable they are. But sooner or later, your iPhone, iPad, Mac or other Apple device may have some issues. Apple provides many resources, on-line and by phone to help you get your devices running like new, without the need to visit an Apple Genius Bar.
What is your favorite way to get your Apple devices up and running? Why not joint the conversation and leave a comment below?
If you liked this article, please consider sharing it with your friends and leaving a comment below. Also, don’t forget to “Like” us on Facebook and add the Apple Tech Talk channel to your Apple News app.
Apple Tech Talker

[…] we gave you some tips on how to be your own Apple Genius (read the article here). Since then, Apple has closed all of their stores outside of China and with it, the chance […]
[…] No other climate action has polled so high, with wind energy coming second at 85%. If you are an iPhone owner and a solar power fan, why not combine both interests and use your phone to learn more about […]
[…] is perfect, so you still might encounter some issues related to your Apple device. Knowing how to solve issues on Apple is a great start to taking care of your precious […]