
We previously reviewed the Arlo Q Wi-Fi camera (read our review here). Today we take a look at another option offered by Netgear (the makers of Arlo). As the name says, what sets this camera apart from all of the others we have reviewed is that the Arlo Wire-Free System does not require the camera to be plugged in to an AC power source.
Apple Tech Talk Scorecard
| Pros | Cons |
| Cameras are Wireless | Battery replacement is a recurring expense |
| Good night vision |
Arlo Wire-Free – Unboxing
 Netgear bills the Arlo Wire-Free camera system as the “first and only” 100% wire-free Wi-Fi camera. The Arlo Wire-Free system is available in several configurations, to meet your needs. Our evaluation system came with two cameras.
Aside from being wireless, the other thing that makes this system different from all of the other cameras we have reviewed to date (see all our reviews here), is that these cameras don’t connect directly to your home’s network. Instead, the cameras connect to a dedicated “base station” to capture the video from the cameras.
In the box were the two (2) 100% Arlo Wire-Free cameras, the Netgear Smart home base station with a power supply, an Ethernet cable to connect the base station to your router, four (4) magnetic mounting bases for the cameras, a package of mounting screws, eight (8) CR-123A Lithium batteries, a Quick Start guide and a window decal.
Arlo Wire-Free Hardware
The Arlo Wire-Free cameras have configurable resolution up to 1280 x 720 in the H.264 format. The full color CMOS sensor has auto-adaptive white/black balance and exposure. The cameras are some of the smallest we have seen in this category, measuring 2.8” x 1.7” x 2.6” and weighing in at a mere 4.3oz.
The fixed focus cameras provide a sharp image as close as 2 feet with a 110o field of view which is on the lower side of some competitor cameras but because of the wireless feature we had much greater flexibility on where we could place them and the slightly narrower field of view was not an issue.
The cameras are “outdoor ready” which means they are suitable for outdoor use and can tolerate rain and snow but we would not call them “water-proof” and would suggest they have at least minimal protection if you plan to have them out in the elements. With an operating temperature range of 14° to 122° F, they can be outdoors year round but you may need to keep an eye on the weather depending on your location.
The Netgear home base station measures 8.5 x 2.25 x 6.5 in and weights 0.25lbs. It’s powered by a 500 Mhz MIPS 74 K processor and has 128 MB Flash Memory, providing 802.11n Wi-Fi on the 2.4GHz band. It is rated for a range of 300+ feet line of sight.
On the front of the base station, along the bottom edge are five (5) LEDs to indicate Power, Internet, Camera, Smart Home and USB but the Smart Home and USB indicators are apparently reserved for future use and do not currently do anything.
The rear of the base station has a single Fast Ethernet port, an AC power outlet, an On/Off power button, a Reset button and two (2) USB 2.0 ports, although like the LED indicator on the front, are not currently active.
Arlo Wire-Free Set-Up
Set-up of the base station takes only a minute. You connect the provided power supply to the power input on the back of the unit, connect the provided Ethernet cable to the only Ethernet port on the back of the base station and the other end to an available LAN port on your router and power up the unit.
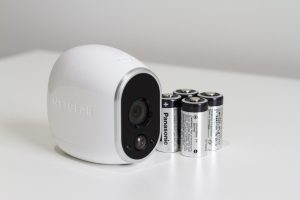 The camera set-up is almost as easy. Each camera requires four (4) CR-123A Lithium Photo batteries, which are included with the Arlo Wire-Free system. The cameras have an estimated battery life of 4 – 6 months but that assumes you are only using the cameras in a motion detection capacity. If you were doing continuous viewing, we suspect the batteries would only last a couple of days so battery cost should be figured into the total cost of ownership.
Just to get an idea of cost, we assumed that we would get the lower estimate of 4 months out of a set of batteries so we would need three (3) sets per year or 12 batteries. We check on Amazon and a 12-pack of Duracell CR 123A batteries costs $23.26. But we would need one package for each camera so the total cost for batteries would be $46.52 per year. That works out to about $1.94 per battery. If you’re willing to try a generic brand, Amazon sells a 48 pack of “Surefire” batteries, which would be a 2-year supply for two cameras. They have a 10-Year shelf life, a 4.5 star customer rating and cost $69.97, which comes out to a slightly cheaper $1.45 per battery.
To access the battery compartment in the camera you slide a small (perhaps a little too small) tab on the bottom of the camera and slide the battery door back about an inch. You then lift the battery door up to reveal the battery compartment. Perhaps it was because the cameras were new but the battery door needed a fair amount of pressure to lift them up and we were a little afraid we would break it if we pushed too hard.
With everything powered up, we followed the instructions in the Quick Start Guide which gives the option to use the Arlo app or a web browser to complete the set-up process. Since we already had the app on our iPhone from our test of the Arlo Q camera we decided to start there, but we didn’t get very far.
The instructions tell you to start by selecting “Set-Up A New System”. Selecting that takes you to a screen to create a new Arlo account but since we already had one we wanted to skip that step. We did not see any way to proceed without setting up a new account so we started over, this time logging into our account and selecting “Add Device”. That didn’t help either. The only options offered to us was the Arlo Wire-Free camera or the Arlo Q camera. We tried the Arlo Wire-Free option but we quickly hit a dead end since you need to add the base station to your account before you join the cameras to the base station.
We decided to try the web browser set up and that provided much better results. After logging in to our “My Arlo” account we again selected “Add Device” and this time got an option to add the Arlo base station. You can tell when that is completed because the Internet LED on the base station turns a solid green to indicate that the base station has a Wi-Fi connection. While we could have completed the set-up from the web browser, was went back to the Arlo app to join the cameras to the system.
That too was relatively easy. The most important part of the process is to be sure the camera is very close to the base station to ensure a strong signal. There is a “Sync” button on the side of the base station that you press for about 2 seconds and then release it. Almost immediately, the Camera LED on the front of the base station will start to blink.
At that point, press the “Sync” button on the top of the camera, again for about 2 seconds and then release it. A blue LED on the front of the camera will start to blink slowly. Within about 10 seconds the blue LED should start to blink rapidly, indicating that the sync process is completing. The Camera LED on the base station will turn green and the LED on the camera goes off. At that point the sync process is complete. You repeat the process for additional cameras.
All in all, we found the set-up process very easy and we had the entire system up and running in under ten minutes.
Nertgear has a nice video going through the set-up process and you can see it below.
Arlo Wire-Free Test Results
With the cameras set up, you can place them almost anywhere. If they are going to sit on a flat surface like a table or shelf, no additional mounting is required. Being wire free, we were able to place the camera in locations previously off limits due to no nearby electric outlet. In addition, the small size of the camera makes them almost unnoticeable.
Being wire-free you can also easily mount them on a wall. Our two camera system actually has four (4) wall mounts included in the package. These can be screwed to the wall with the included mounting hardware or, as suggested in the video, adhered to the wall with 3M Command strips.
The back side of the camera has a small indentation that matches the curve of the magnetic ball on the mounting plate and
gives a wide variety of angles that you can position the camera in. Without wires to limit you, the camera could be mounted high on a wall to give a good overall view of the room or outdoor area. For ceiling mounting there is a slightly different style of magnetic mount that provides a broader choice of angles.
 The magnetic mounts make is very easy to position the cameras and even move them to additional locations very quickly. That also means that anyone who gets access to the camera’s location can also quickly remove it. Aside from the obvious expense of replacing a missing camera there is the security issue of someone coming up to the camera out of its field of vision and taking it off of its mounting, thus defeating the whole point of having the camera.
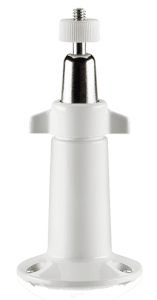
We could also imagine a curious cat thinking this is a new toy and jumping up to investigate it further. In those situations or, in our opinion, for any exterior application, we suggest purchasing the optional mounting bracket that uses the built in threaded mounting point on the bottom of the camera. While that option won’t completely eliminate the possible theft of the camera, it will certainly make that process a little more difficult and time consuming and may be just enough to deter a potential wrong-doer.
Once the cameras are placed where you want them, they take care of themselves. Since the Arlo Wire-Free system uses that same app as the Arlo Q camera we previously reviewed here, we will not go through those details again. The biggest different this time around is that we are testing two cameras instead of one so we are seeing a slightly different presentation both on the app and on the My Arlo web site.
Setting up the modes is also the same process except you need to remember to add every camera into a single mode if you want to have them all active at the same time.
Because these cameras are battery operated, the Setting menu offers three video options, best battery life, optimized between battery life and video quality and best video quality. We found that for general viewing, the three settings gave very similar results. It was only when we enlarged the picture using the 8X digital zoom that the picture became somewhat pixelated and then only when we got close to the full 8X magnification. We liked that each camera can be adjusted individually so depending on your application, some may need the extra detail of high quality video while others may be fine using the best battery life option. We decided to leave both cameras on the Optimized setting.
Unlike the Arlo Q, these cameras do not have audio support so you cannot monitor sound in the room nor can you set up the camera to start recording if sound is detected. On the other hand, we found the night vision of the Arlo Wire-Free cameras to be superior to the results we got from the Arlo Q. The Arlo Wire-Free specifications say the 850 nm LEDs can illuminate up to 25 feet. We think that might be a bit of a stretch but it did a nice job showing detail in what was otherwise a very dark room. We also found that for anything less than very bright light, the camera tended to go into the night vision mode to ensure a good visual result.
The motion detection was generally acceptable although we found we needed to raise the detection level to the 100% setting to detect anything that wasn’t right in front of the camera. However, that seemed to trigger what appeared to be some false positives. The app notified us of motion detected but when we watched the resulting video, we did not see anything. Granted, we had the cameras sitting up fairly high so it’s possible the motion was just out of the field of view but still enough to trigger the camera. We suspect that with some finer adjustments, we could find the happy medium for motion detection.
Like the Arlo Q, the Arlo Wire-Free system comes with the free Basic storage plan for recorded videos. While most home users will probably find the Basic plan enough to suit their needs, more commercial use may prefer one of the paid plans. All of the plans are described below.
| Basic | Premier | Elite | |
| Cloud Recording | 7 Days | 30 Days | 60 Days |
| Total Storage | 1GB | 10GB | 100GB |
| Number of Cameras | Up to 5 | Up to 10 | Up to 15 |
| Support | 3 Months (Limited) | Unlimited | Unlimited |
| Monthly Cost | Free | $9.99 | $14.99 |
| Annual Cost | Free | $99.00 | $149.00 |
The Bottom Line
Netgear calls the Arlo Wire-Free system the first and only 100% wire free camera and from our brief research on-line, that may still be true. The battery operated cameras don’t need to be plugged in, which gives you the freedom to place them just about anywhere you can imagine.
While the 110o field of view is less than most of the cameras we have tested, that is more than off-set by the flexibility you have for camera placement. While the regular color image produced in a well-lit room was on par with other cameras, including the previously reviewed Arlo Q, we think the night vision in the wireless camera far exceeds what we saw from the Arlo Q and is at least equal to some of the other cameras we have tested.
The Arlo Wire-Free system is available in numerous combinations starting with a single camera system for $179.99, up to a 5 camera system at $649.99. There are also combination systems that include 3 wire-free cameras and 1 Arlo Q camera for $629.99 or 4 wire-free cameras and 2 Arlo Q cameras for 799.99 (all prices are MSRP). These are not inexpensive systems and don’t forget that a 5 camera system could cost you another $90 or more per year in batteries.
It’s clear that Netgear has plans to expand this system in the future as evidenced by the two USB posts and the Home LED already built into the base station but no one knows what or when that might be.
The Arlo Wire-Free camera system is available in all of its different combinations at Amazon.
We wish to thank our friends at Netgear for providing the Arlo Wire-Free camera system for our evaluation and review.
If you liked this article, please consider sharing it with your friends and leaving a comment below.
Also, don’t forget to “Like” us on Facebook and “Follow Us” on Twitter.
APPLE TECH TALKER

Leave a Comment
You must be logged in to post a comment.