
We recently looked at the D-Link W-Fi Water Sensor (read our review here), and overall, was very impressed by its capabilities. The one area that gave us pause was the very low audible warning the sensor gives off. The D-Link Wi-Fi Siren (Model DCH-S220) is the proposed solution for that so we decided to test it out.
Apple Tech Talk Scorecard
| Pros | Cons |
| Easy set-up | We could not get the Actions to delete |
| Variety of alarm sounds | Dependent on AC power |
D-Link Wi-Fi Siren Set-Up
 If you read our review of the D-Link Wi-Fi Water Sensor, you know there wasn’t much in the box and the Wi-Fi Siren has even less. In the box was the siren, a GPL License pamphlet and the Set-Up card.
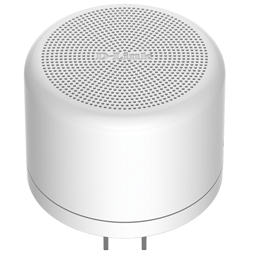
The siren looks almost identical to the water sensor except it is missing the RJ-11 jack on the bottom, where the sensor cable would attach and also has a perforated front panel which covers the siren speaker. There is also an LED on the front panel to alert you that the siren has been triggered.
Set-up of the D-Link Wi-Fi Siren was straightforward and similar to the process we followed for the water sensor in that we had to select the SSID listed on the Set-Up Card on our iPhone. However, this time, the app asked if we wanted to join the same network the water sensor was linked to and proceeded to complete the set-up and set our iPhone back to the primary network without the need for us to make any other changes. D-Link has a short video that walks you through the set-up process using the WPS feature, which is even easier than our manual set-up and you can view the video here.
The last step in the set-up process is to use the mydling Home app to create one of more Actions, which links the siren to the D-Link Wi-Fi Water Sensor. We found the process to create an Action straight forward and had no trouble figuring out what to do just by looking at the screen in the app. In our case, we created an Action that said, when water was detected, sound the siren, in addition to sending a notification to our iPhone.
D-Link Wi-Fi Siren Test Results
Once the D-Link Wi-Fi Siren is connected to your network it pretty much takes care of itself, but there are several adjustments you can make to customize its operation. We found the settings pretty straight-forward just browsing the mydlink Home app but if you want something a little more formal, D-Link does offer a 34 page User Guide on their support site and you can download a copy here.
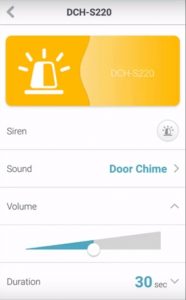
The D-Link Wi-Fi Siren has six (6) built in siren sounds. This comes in very handy one siren can be linked to more than one D-Link device and you can set different tones for different Actions. For example, perhaps a water leak detected in the laundry room would trigger the “Emergency” sound while a different water sensor in the kitchen would trigger the “Police” sound.
Since the D-Link Wi-Fi Siren can also connect to other D-Link products, motion detected from the D-Link Wi-Fi HD Camera (read our review here) might have a different sound from water detection.
You have the ability to adjust the volume of the alarm as well as the duration once it has been triggered, but those are global settings that apply to all Actions.
There isn’t much involved in testing the D-Link Wi-Fi Siren. Once the Action is created, it just works.
We ran several tests by activating the water sensor and in each case, the siren sounded an alert, as expected. We set up several different Actions, to include additional notifications via email and the mydlink Home app and again, got the expected results.
The only issue we ran into was deleting Actions that we no longer wanted in our list. According to the User Guide, Actions are deleted by swiping from right to left to expose the usual Delete panel. For some reason, we could not get that to work so we were not able to delete any of the Actions we created. We’re not really sure what the problem was.
We could certainly see the siren being built in to the water sensor but in discussing this with D-Link, we learned that there were some technical issues that prevented that. In addition, the ability to link multiple devices to a single siren supports it being its own unit.
If we had one suggestion for the D-Link technical team, it would be to find a way to make these units less dependent on AC power, since a power failure becomes a single point of failure for this entire system. We would love to see a built-in battery back-up or perhaps an additional module the siren and other units could plug in to, which would allow the units to still work for some period of time, in the event of a power failure. At the very least, it would be great to have a way for the siren to sound if the AC power was lost. There may be technical hurdles to something like this too, and we’re sure it would increase the price point of these devices but it may be something to consider in future updates.
The Bottom Line
The D-Link Wi-Fi Siren is a perfect companion to the D-Link Wi-Fi Water Sensor and provides the extra level of protection you need in case you have an unexpected water problem in the middle of the night. We would suggest that if you have a need for the water sensor, you really should have the siren also. The mydlink app makes set-up and management of the siren quick and easy.
Individually, the Water Sensor has an MSRP of $59.99 and the Siren has an MSRP of $49.99 but you can buy them as a discounted package from Amazon.
We would like to thank our friends at D-Link for providing a D-Link Wi-Fi Water Sensor and D-Link Wi-Fi Siren for our evaluation.
If you liked this article, please consider sharing it with your friends and leaving a comment below.
Also, don’t forget to “Like” us on Facebook and “Follow Us” on Twitter.
APPLE TECH TALKER

Leave a Comment
You must be logged in to post a comment.