
We previously reviewed the Seagate Backup Plus Slim hard drive (read our review here) and discussed how to grab a hidden icon file off the drive. Since then, we have received several requests from readers for more details about how to show hidden file, and then hide them again.
What are hidden files?
macOS is a very sophisticated operating system and it takes thousands of files to make it work. If you look in the System folder of Macintosh HD, you see a lot of folder and files. But there are a lot more that you can’t see, and this is done intentionally to prevent, or at least discourage users from poking around in places that can cause serious damage to the operation of your Mac. The same is true for the applications you install. What appears to you as a single icon is really a complex collection of files that all work together to do whatever they were designed to do.
Delete one wrong file, and a program may not work correctly. Delete one wrong file from macOS and your computer may become completely unusable. To help prevent this, files that a user does not, or should not be touching are hidden from regular view hidden.
We recommend that unless you know exactly what you are doing, there is really no need to go into the hidden folders and files on your computer. Of course, as we pointed out in our Seagate review, there may be times that you want to reveal hidden files for a very specific purpose. If that happens, here are some suggestions on how to view hidden files.
Use a Third-Party App
There are a couple of apps that make it easy to show and hide hidden files on a Mac.
Commander One 2.1 – This is a dual-pane Finder alternative that includes a switch to show and hide hidden files. Of course, as a Finder replacement, it does a lot more. We recently did a full review of Commander One 2.1 and you can read about it here.
Funter – If you’re
not looking to replace Finder, a good alternative is Funter. This application acts as a plug-in for Finder
and allows you to show and hide hidden files with just two clicks.
Funter works on macOS 10.10 and higher. You can learn more and download the free application here.
Finder Keyboard Shortcut
If you don’t have a need to show hidden files on a regular basis, you may not want or need a third-party app. If you are running a recent version of macOS (Sierra or newer), Apple has a keyboard shortcut that is easy to use.
Open a Finder window and navigate to the location where you want to expose the hidden files and press the following keys together;
Shift + Command + . (the period)
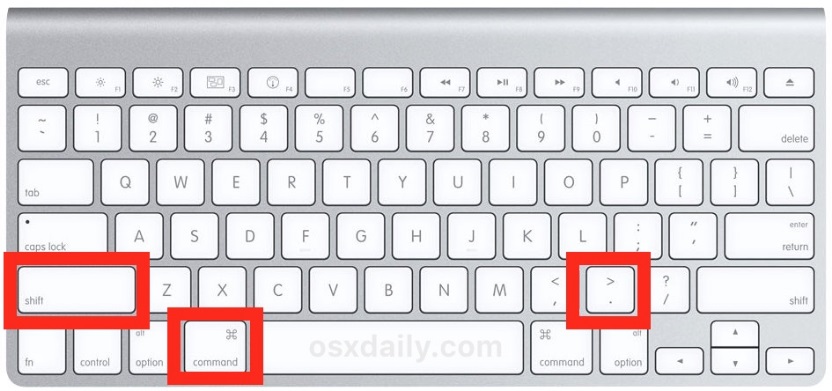
To hide the files again, just repeat the same shortcut.
Use Terminal
For anyone still running an older version of macOS (OS X), you will need to run a Terminal command each time you want to show or hide hidden files.
To start, go to Applications > Utilities > Terminal and open the application. To show hidden files, enter the following command at the blinking prompt.
defaults write com.apple.finder AppleShowAllFiles true; killall Finder
To hide the files again, enter the following command at the blinking prompt.
defaults write com.apple.finder AppleShowAllFiles false; killall Finder
All these methods work equally well so choose the one that works best for you.
How to make a hidden folder or file.
The whole point of hidden files is to prevent, or at least make it difficult for the average user to see the folders and contents. Because of that, some people have asked how they can make a hidden folder or file to protect sensitive information? For that, you can once again look to Terminal for a solution.
Open a new Terminal window and enter;
chflags hidden
and press the space bar.
Then, drag the folder or file you want to hide from Finder into the Terminal window, and press the enter key. The folder or file will now be hidden. To make the folder or file visible again, enter the following into Terminal;
Chflags no hidden
press the space bar and drag the hidden folder or file into Terminal, and press enter.
Remember, you will have to make hidden files visible to do this.
If the thought of Terminal scares you, the easiest way to create a hidden folder or file is to add a period “.” In front of the name. To make a hidden folder or file visible, expose the hidden folder or file and remove the period from the front of the name.
A regular file might have a name like: document.docx
To hide that file, make the name: .document.docx
It’s that simple.
Of course, you don’t want hidden files scattered all over your computer. If you have a need for a high level of protection, consider using File Vault which is included in all the latest versions of macOS. File Vault encrypts your disk and requires a password to access your data.
If you don’t want to encrypt your entire disk but need to hide a few files, consider creating a single folder and storing all your sensitive files in the one folder and then hiding that folder. Some folks suggest hiding a folder in the ~Library, since that is hidden by default and is easily made visible by clicking on the Go option in the Finder menu and pressing the Option key. That certainly works, although like other hidden file, the Library can cause a lot of trouble if you accidentally delete the wrong file.
The Bottom Line
The information we provided here may never be used by many of our readers and for you, we hope you at least found it interesting and it helps you understand macOS a little better. For others, this may be repeating information you learned long ago.
For everyone else, understanding hidden files, how to see and hide them and how to create them is information that you should treat with care. If you need to use it, proceed with caution. It can be very useful and can serve many purposes but can also lead to major headaches.
What do you use hidden files for? Why not join the conversation and add a comment below?
If you liked this article, please consider sharing it with your friends and leaving a comment below. Also, don’t forget to “Like” us on Facebook and add the Apple Tech Talk channel to your Apple News app.
Apple Tech Talker

Leave a Comment
You must be logged in to post a comment.