We recently looked at the D-Link AC3200 router (read the review here), and it made us realize that there are router options other than the Airport Extreme Base Station (read our review here). So today, we’ll look at the Netgear Nighthawk X8, 802.11ac router, which provides yet another option for even the most loyal of Apple enthusiast.
Apple Tech Talk Scorecard
| Pros | Cons |
| Feature rich router with granular control. | Large format needs a lot if shelf space |
| Easy Set-up | Plug on power adapter is awkward |
Netgear Nighthawk X8 Hardware
Anyone who is familiar with the Netgear Nighthawk X8 (Model # R8500) router always describes it in the same way, big! Measuring 12.44” x 10.39” x 2.4”, and weighing in at 3.7 lbs., it is very similar in size to the D-Link AC3200. But its more traditional shape gives you the feeling that it is not as large as some of its competitors.
In the box is the Netgear Nighthawk X8 router, the power adapter, an Ethernet cable and a Quick Start Guide.
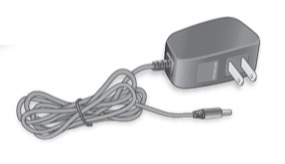
 If people like the fact that the Airport Extreme has an internal power supply and therefore only needs a chord to connect it to the AC outlet, you will probably have a strong reaction to the X8’s power supple as we do.
While it’s bad enough that the transformer is at the end of the chord that plugs in, it is designed in such a way that it covers two or three outlets if you are using a power strip. Granted, if plugged directly into a wall it will be off to the side and leave the other plug exposed but we suspect most people are using a power strip and like us, will need to reconfigure whatever else is plugged in to make it be at or near the very end of the strip.
The router is powered by a 1.4GHz dual core processor and has 128MB of Flash memory and 512MB of RAM.
The router is a simultaneous tri-band MU-MIMO (“Multi-User – Multiple Input, Multiple Output”) router with one 2.4GHz band rated at 1,000Mbps and dual 5 GHz bands rated at 2,166 Mbps each. It’s doubtful that you can attain these transfer speeds given today’s technologies. Those devices just don’t yet exist. But a router like this will ensure that it will be able to accommodate newer technology as it is developed.
The router has an interesting wave design across the top. Some have said that this was a way to prevent people putting other devices on top of the router, thus providing maximum air circulation and cooling. While that sounds plausible, it may also just be the way Netgear wanted to design it to avoid the more common square box format.
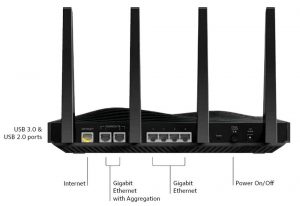
One the right side of the router is a small access door which covers the USB 2.0 and USB 3.0 ports. While this requires that you leave some extra space along the side of the unit, it does make attachment of a USB printer cable and a USB hard drive much easier.
Embedded within the pattern on the top left hand side are all of the indicator lights you would expect to see, including power, an indicator for the 2.4GHz network, one for each of the 5GHz networks, one for each for the two USB ports, one for the WAN connection and one for each of the six (6) LAN ports.
The Netgear Nighthawk X8 router has four (4) internal antennas, as well as four (4) active external antennas. The active antennas (according to Netgear the first in the industry), have the radio built into the antenna itself, rather than mounted on the motherboard where they are more susceptible to interference. When the router is powered on the external antennas have a blue led band at the top, that light up.

The rear of the Netgear Nighthawk X8 has seven (7) 10/100/1000 Mbps Gigabit Ethernet ports with one being the WAN connection, four (4) standard LAN ports and two (2) LAN ports that support aggregation. Given that the Netgear ReadyNAS units support Ethernet aggregation, we would have been disappointed if this router didn’t offer that. If you missed our review of the Netgear ReadyNAS RN202 NAS, you can read it here.
The router has a lot of technology built into it and while we don’t have the time or space to cover it all in great detail we want to at least, touch on some of them.
Load Balancing – The router uses load balancing to distribute WiFi connections among all three WiFi bands. Slower devices like printers, older computers, or an IP camera connect to the 2.4 GHz band, while having two 5 GH bands prevents overloading when many devices use WiFi at the same time. The router atomically determines which band is best suited for new incoming connections based on device type and speed.
Dynamic Quality of Service (“QoS”) – Dynamic QoS automatically allocates bandwidth to latency sensitive applications, such as online gaming and video streaming. Dynamic QoS will also ensure that the lowest priority applications will never get completely stopped.
Beamforming+ – The router automatically uses NETGEAR Beamforming+ technology to enhance WiFi performance with 802.11ac WiFi devices. When you connect to the WiFi network, Beamforming+ locks onto your laptop, tablet, or smartphone, and follows as you move from place to place, so you keep your optimal WiFi connection.
Parental Controls – Netgear Live Parental Controls give parents a centralized, flexible and reliable way to establish what web sites their children visit and what times of day they can go online for all devices on the network, Macs, smartphones and tablets.
It’s pretty obvious that this is a serious piece of equipment that can provide granular control of your network environment, if that is what you want.
Netgear Nighthawk X8 Router – Set-Up
Once out of the box, we followed the instructions in the Quick Start Guide. For anyone needing a little more instruction, Netgear provides a short but informative YouTube video on how to set-up the router which you can see here.
To get started, we powered down our modem, replaced our Airport Extreme with the X8 and then powered everything back up.
The X8 immediately figured out the Internet connection from our cable modem and we were up and running in a few minutes. The Quick Start Guide says you can configure the router either through a wired connection or any wireless device. When we attempted to connect to the new wireless networks that appeared on our MacBook we didn’t see the SSID listed on the tag affixed to the top of the router.

We also checked the label on the bottom of the router and found it matched the tag but that network did not exist so we grabbed an Ethernet cable which gave us immediate access to the dashboard by entering www.routerlogin.net into our browser.
We’ll stop here for a minute to make a confession. The problems we had finding the network didn’t really have anything to do with the router or the instructions and we only figured it out as the end of our review.
The Netgear Nighthawk X8 router that we tested was provided to us by our friends at Netgear. Like much of the equipment we report on, these units are “like new” but we may not be the first people to get it for evaluation. We also have a policy to always do whatever is needed to but the equipment back to its original state before we pack it up. This is so we delete any possible personal information and as a courtesy to the next people who might get the unit. As it turns out, not everyone follows that rule.
Whoever had the unit before us either left the SSID and password to what they changed it to or intentionally changed it from the factory defaults to make the next person’s life a little more interesting.
As it turned out, when we were done with our tests we did our own factory reset of the router, and when it completed, the SSID and password listed on the tag and label returned. Had we started with that, our attempt to configure the router wirelessly would have been extremely easy.
There are a couple of lessons here. First, if you purchase a piece of equipment and it doesn’t match the factory defaults, it may be a signal that the unit was purchased and returned. That doesn’t necessarily mean there is a problem with it but if you bought it as new, it should be new. Second, if you are having a problem getting a piece of hardware up and running, try to do a factory reset before you pack it up and return it yourself. We have had other situations where a new piece of equipment was giving us a problem during set up and a factory reset got things straightened out.
With that out of the way we can say that overall, the set-up on the Netgear Nighthawk X8 was super simple.

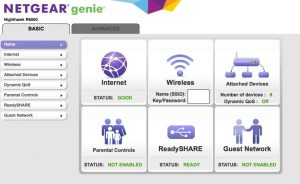
The Netgear Genie application is a robust dashboard that runs in your browser and has both a Basic and Advanced tab which lets you set and adjust just about any feature of the router you can think of. While the Quick Start Guide doesn’t really address any of that, Netgear does offer a very detailed 184 page User Manual which can be downloaded from their support site here. The manual includes sections on router configuration, network connection, advanced features like sharing an attached USB storage device and printer, VPN set-up and of course, troubleshooting. Our brief review of the manual found it to be well written with the right amount of detail without being overly technical. That said, we found the Netgear Genie to be very user friendly and suspect that, at least for the initial set-up like setting your own SSID and password, you won’t need the manual at all.
With the router now up and running and connected to the Internet, it’s time to see what it can do. To read about our test results, check out Part 2 of our review of the Netgear Nighthawk X8 router here.
If you liked this article, please consider sharing it with your friends and leaving a comment below.
Also, don’t forget to “Like” us on Facebook and “Follow Us” on Twitter.


Thanks admin for sharing such useful information for the Netgear Nighthawk X8. I like your post. Keep blogging and best of luck.